



Smart Matchmaking-Sonnenbrillen mit Arduino 101 und tinyTILE BLE
Komponenten und Zubehör
| Komponente | Menge | Hinweis |
|---|---|---|
| Intel tinyTILE | 2 | oder andere BLE-Module |
| Arduino 101 | 2 | Optional |
| Adafruit Liquid Crystal Light Valve (LCD Blackout Panel) | 2 | |
| Li-Ion Akku 100 mAh | 2 | |
| Adafruit JST-PH 2-pol SMT Right Angle Connector | 4 | |
| Adafruit JST-PH Batterie-Verlängerungskabel | 2 | |
| Schiebeschalter | 2 | |
| Widerstand 10 kΩ | 3 | |
| SparkFun Taster 12 mm | 1 | |
| LED (generic) | 2 | Nur Entwicklungsphase |
| Steckbrett | 1 | Nur Entwicklungsphase |
| Jumper-Kabel | 1 Set | Nur Entwicklungsphase |
Benötigte Werkzeuge
- 3D-Drucker
- Lötkolben
Apps und Onlinedienste
- Arduino IDE
- Arduino Web Editor
Über dieses Projekt
Statt einer App: Was, wenn man per Signal jemandem, an dem man interessiert ist, in einer sozialen Situation – sogar aus der Ferne – „Augenkontakt“ signalisieren könnte? Keine neue Dating-Methode, sondern Erkundung neuer Bluetooth-Anwendungen in der menschlichen Interaktion.
Als ich erfuhr, dass Intel Curie-Module als zentrale und periphere BLE-Geräte fungieren können, wollte ich sofort diese Brillen bauen. (Mehr zu CurieBLE.) Dank eines Adafruit-Tutorials war der 3D-gedruckte LCD-Brillen-Rahmen bereits als Referenz vorhanden. Meine Ergänzungen: BLE-Steuerung (statt Schalter) von zwei Brillen gleichzeitig – eine als Master, die andere als Slave – und neu designte 3D-gedruckte Rahmen.
Entwickelt auf Arduino 101, prototypisiert auf tinyTILE – beide mit Intel Curie. Auch wenn Curie-Module künftig schwerer erhältlich sind, bleibt die Methodik nützlich. Viele Anwendungen für BLE Central/Peripheral sind denkbar – freue mich auf Diskussionen.
Schritt 1 – Entwicklung
Zwei Arduino 101 und zwei LEDs für Schaltungs- und Code-Test auf Breadboard. Aufgrund der Komplexität der Endschaltung: erst Breadboard, dann löten.

Peripheral-Code: CurieBLE-Beispiel „Peripheral → LED“, HIGH/LOW vertauschen (Grund siehe letzter Schritt). Central-Code: fast identisch mit CurieBLE „Central → LEDcontrol“, um LCD-Steuerung erweitert. Code am Projektende.


tinyTILE ist quasi ein Miniatur-Arduino 101. Gleicher Curie-Chip, gleiche Flashbarkeit. Arduino 101 pins sind handlicher, tinyTILE kleiner für Wearables. Ich entwickle auf Arduino 101, übertrage dann auf tinyTILE.

Schritt 2 – 3D-Druck
Rahmen in SolidWorks basierend auf Adafruit-Design neu gestaltet. Adafruit-Design herunterladen und anpassen. Meine Designs (Herz & Universum) im Anhang. Warum Herz und Universum? Siehe Video.

Design anpassbar für besseren Sitz. Mein 3D-Drucker produzierte viel Stützmaterial an schwer zugänglichen Stellen – wasserlösliche Stützen oder Harzdrucker wären besser.
Schritt 3 – Montage
Adafruit-Tutorial zu Verdrahtung, Löten, Montage ist hervorragend. Zusätzlich tinyTILEs und Taster einbauen. Kabel auf richtige Länge zuschneiden.

Schritt 4 – Fertig & Spaß haben!
Eingeschaltet: Spannung an LCDs → dunkle Sonnenbrillen. Taster am Master drücken → Spannung am Master aus, per Bluetooth Signal an Slave → beide Brillen werden transparent.


Reichweite: BLE-typisch. Getestet: Heart erreicht Universe mindestens 15 Schritte entfernt.
Stell dir vor: statt Taster → Geste, Nicken, synchroner Herzschlag!
Heart (Master=Central): "I like your sophisticated mind <3"
Universe (Slave=Peripheral): "I see you. Let's talk."
Code
Button-Steuerung für Central (Master)
Basiert auf CurieBLE-Beispiel „Central → LEDcontrol“ mit LCD-Erweiterung.
/*
 * Copyright (c) 2016 Intel Corporation. All rights reserved.
 * Lizenz: GNU Lesser General Public License v2.1 oder später
 */
#include

const int buttonPin = 3;
int oldButtonState = LOW;
const int ledPin = 5;  // LCD-Steuerpin

void setup() {
  Serial.begin(9600);
  pinMode(buttonPin, INPUT);
  pinMode(ledPin, OUTPUT);
  BLE.begin();
  Serial.println("BLE Central - LED control");
  BLE.scanForUuid("19b10000-e8f2-537e-4f6c-d104768a1214");
}

void loop() {
  BLEDevice peripheral = BLE.available();
  if (peripheral) {
    Serial.print("Found ");
    Serial.print(peripheral.address());
    Serial.print(" '");
    Serial.print(peripheral.localName());
    Serial.print("' ");
    Serial.print(peripheral.advertisedServiceUuid());
    Serial.println();
    BLE.stopScan();
    controlLed(peripheral);
    BLE.scanForUuid("19b10000-e8f2-537e-4f6c-d104768a1214");
  }
}

void controlLed(BLEDevice peripheral) {
  Serial.println("Connecting ...");
  if (!peripheral.connect()) {
    Serial.println("Failed to connect!");
    return;
  }
  Serial.println("Connected");

  Serial.println("Discovering attributes ...");
  if (!peripheral.discoverAttributes()) {
    Serial.println("Attribute discovery failed!");
    peripheral.disconnect();
    return;
  }
  Serial.println("Attributes discovered");

  BLECharacteristic ledCharacteristic = peripheral.characteristic("19b10001-e8f2-537e-4f6c-d104768a1214");
  if (!ledCharacteristic || !ledCharacteristic.canWrite()) {
    Serial.println("No writable LED characteristic!");
    peripheral.disconnect();
    return;
  }

  while (peripheral.connected()) {
    int buttonState = digitalRead(buttonPin);
    if (oldButtonState != buttonState) {
      oldButtonState = buttonState;
      if (buttonState) {
        Serial.println("button pressed");
        ledCharacteristic.writeByte(0x01);  // LCD aus (transparent)
        digitalWrite(ledPin, LOW);
      } else {
        Serial.println("button released");
        ledCharacteristic.writeByte(0x00);  // LCD an (dunkel)
        digitalWrite(ledPin, HIGH);
      }
    }
  }
  Serial.println("Peripheral disconnected");
}
Individuelle Teile & Gehäuse
3D-Druckdateien im Anhang (Herz- und Universum-Design).
Schaltpläne
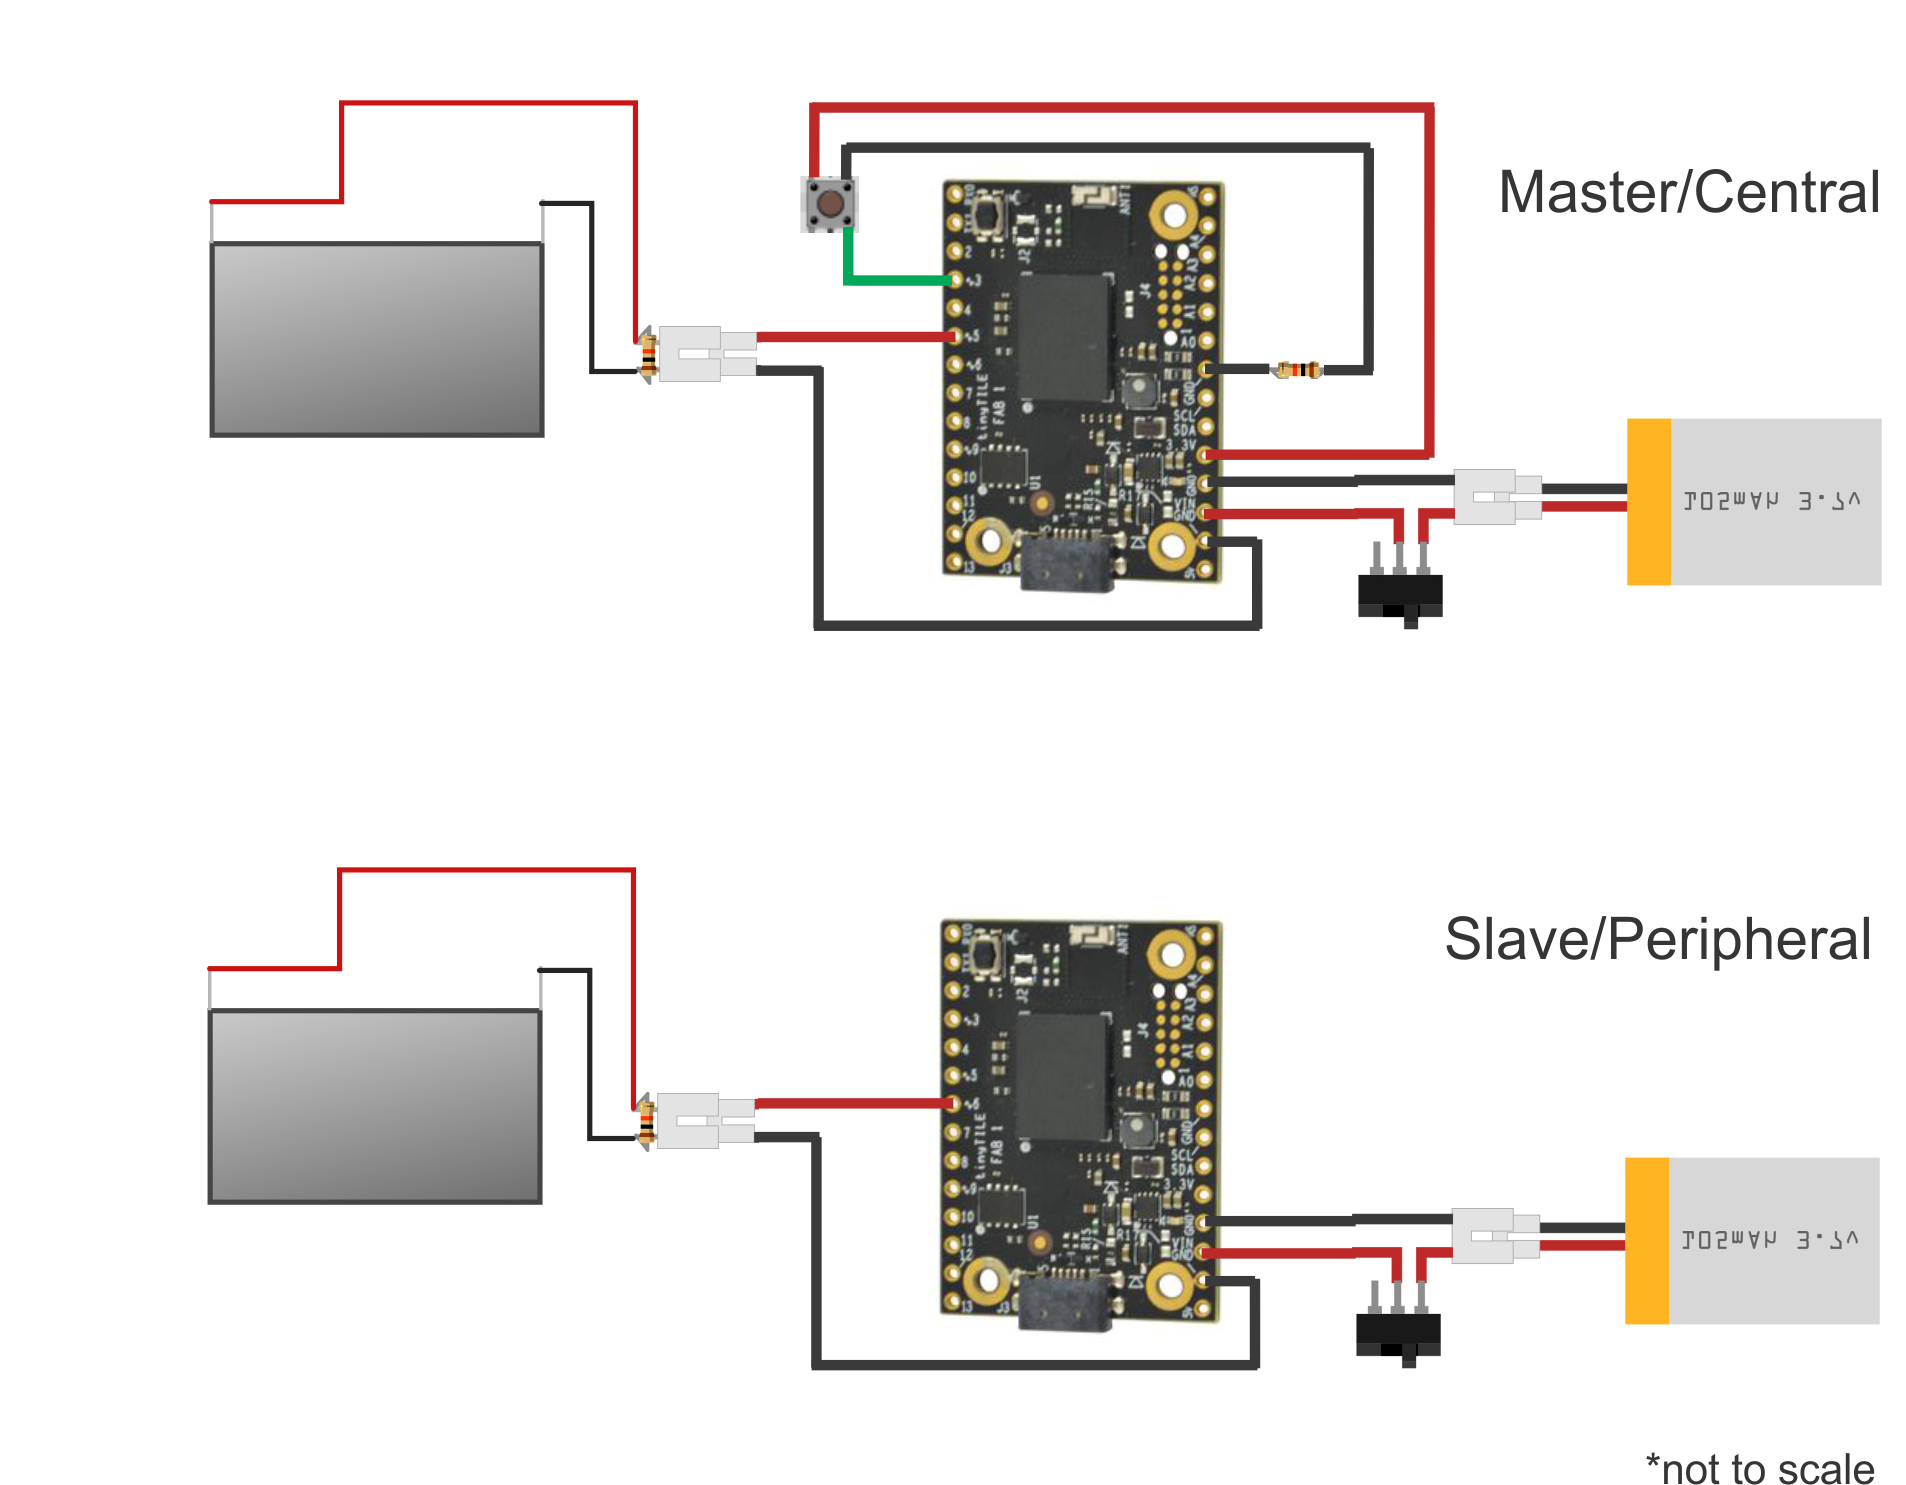
Central: Pin 3 (Taster), Pin 5 (LCD). Peripheral: Pin 6 (LCD).
Herstellungsprozess
- Sonnenbrillen: Design, Materialien und Augenschutzstandards
- Batterien: Von Voltas Säule zu modernen Lithium-Zellen
- UnifiedWater v1 – Komplettes Arduino Wasserqualitäts-Sensorkit
- Optimierte Stromversorgungslösungen für Arduino-Projekte
- Iron Man Helm & Arc Reactor selbst bauen – Schritt-für-Schritt mit Arduino & 3D-Druck
- Portables Abstimmungssystem mit GSM-Anbindung (Mobile Vote Box)
- Arduino 101 BLE + Blynk: DIY Bluetooth-gesteuerter Panzer-Roboter
- Die wesentliche Rolle von Autobatterien: Ihr Fahrzeug mit Energie versorgen
- Lichtmaschine (Alternator) testen: Methoden für zuverlässige Diagnose
- 7 klare Anzeichen für einen defekten Generator