



Smart Plant Monitoring System mit AWS IoT
Komponenten und Materialien
 |
Arduino Yun | × | 1 |
 |
Seeed Grove Starter Kit Plus für Intel Edison (Shield, Temperatur- & Lichtsensor) | × | 1 |
| Seeed Grove – Feuchtigkeitssensor (Boden) | × | 1 | |
 |
5 mm LED: Rot | × | 1 |
 |
Widerstand 330 Ω | × | 1 |
Benötigte Werkzeuge und Maschinen
 |
3D-Drucker |
Apps und Online-Dienste
 |
Amazon Web Services AWS IoT |
 |
Amazon Web Services AWS IAM |
 |
Amazon Web Services AWS DynamoDB |
 |
Amazon Web Services AWS SNS |
| dweet.io | |
 |
Arduino IDE |
Über dieses Projekt
Stellen Sie sich vor: Sie fahren eine Woche in den Urlaub und sorgen sich um Ihre Zimmerpflanze. Hier ist ein Projekt, das Sie eine Woche vor Abreise umsetzen können.
Bauen Sie ein Pflanzen-Überwachungs- und Benachrichtigungssystem mit folgenden Features:
- Temperatur, Lichtwert und Bodenfeuchte via dweet.io überwachen
- ODER mit dem neuen Amazon IoT Service Daten in AWS DynamoDB loggen
- AWS SNS-Benachrichtigungen per E-Mail an sich selbst senden, damit Nachbarn/Verwandte gießen oder Thermostat prüfen können
Zusätzlich habe ich ein 3D-gedrucktes Gehäuse entworfen, das Arduino Yun, Grove Shield und Sensoren aufnimmt.
Live-Daten meiner Pflanze: dweet.io/follow/PlantMonitorTorontoON
Schritte zum Nachbau
#1 Schaltung aufbauen
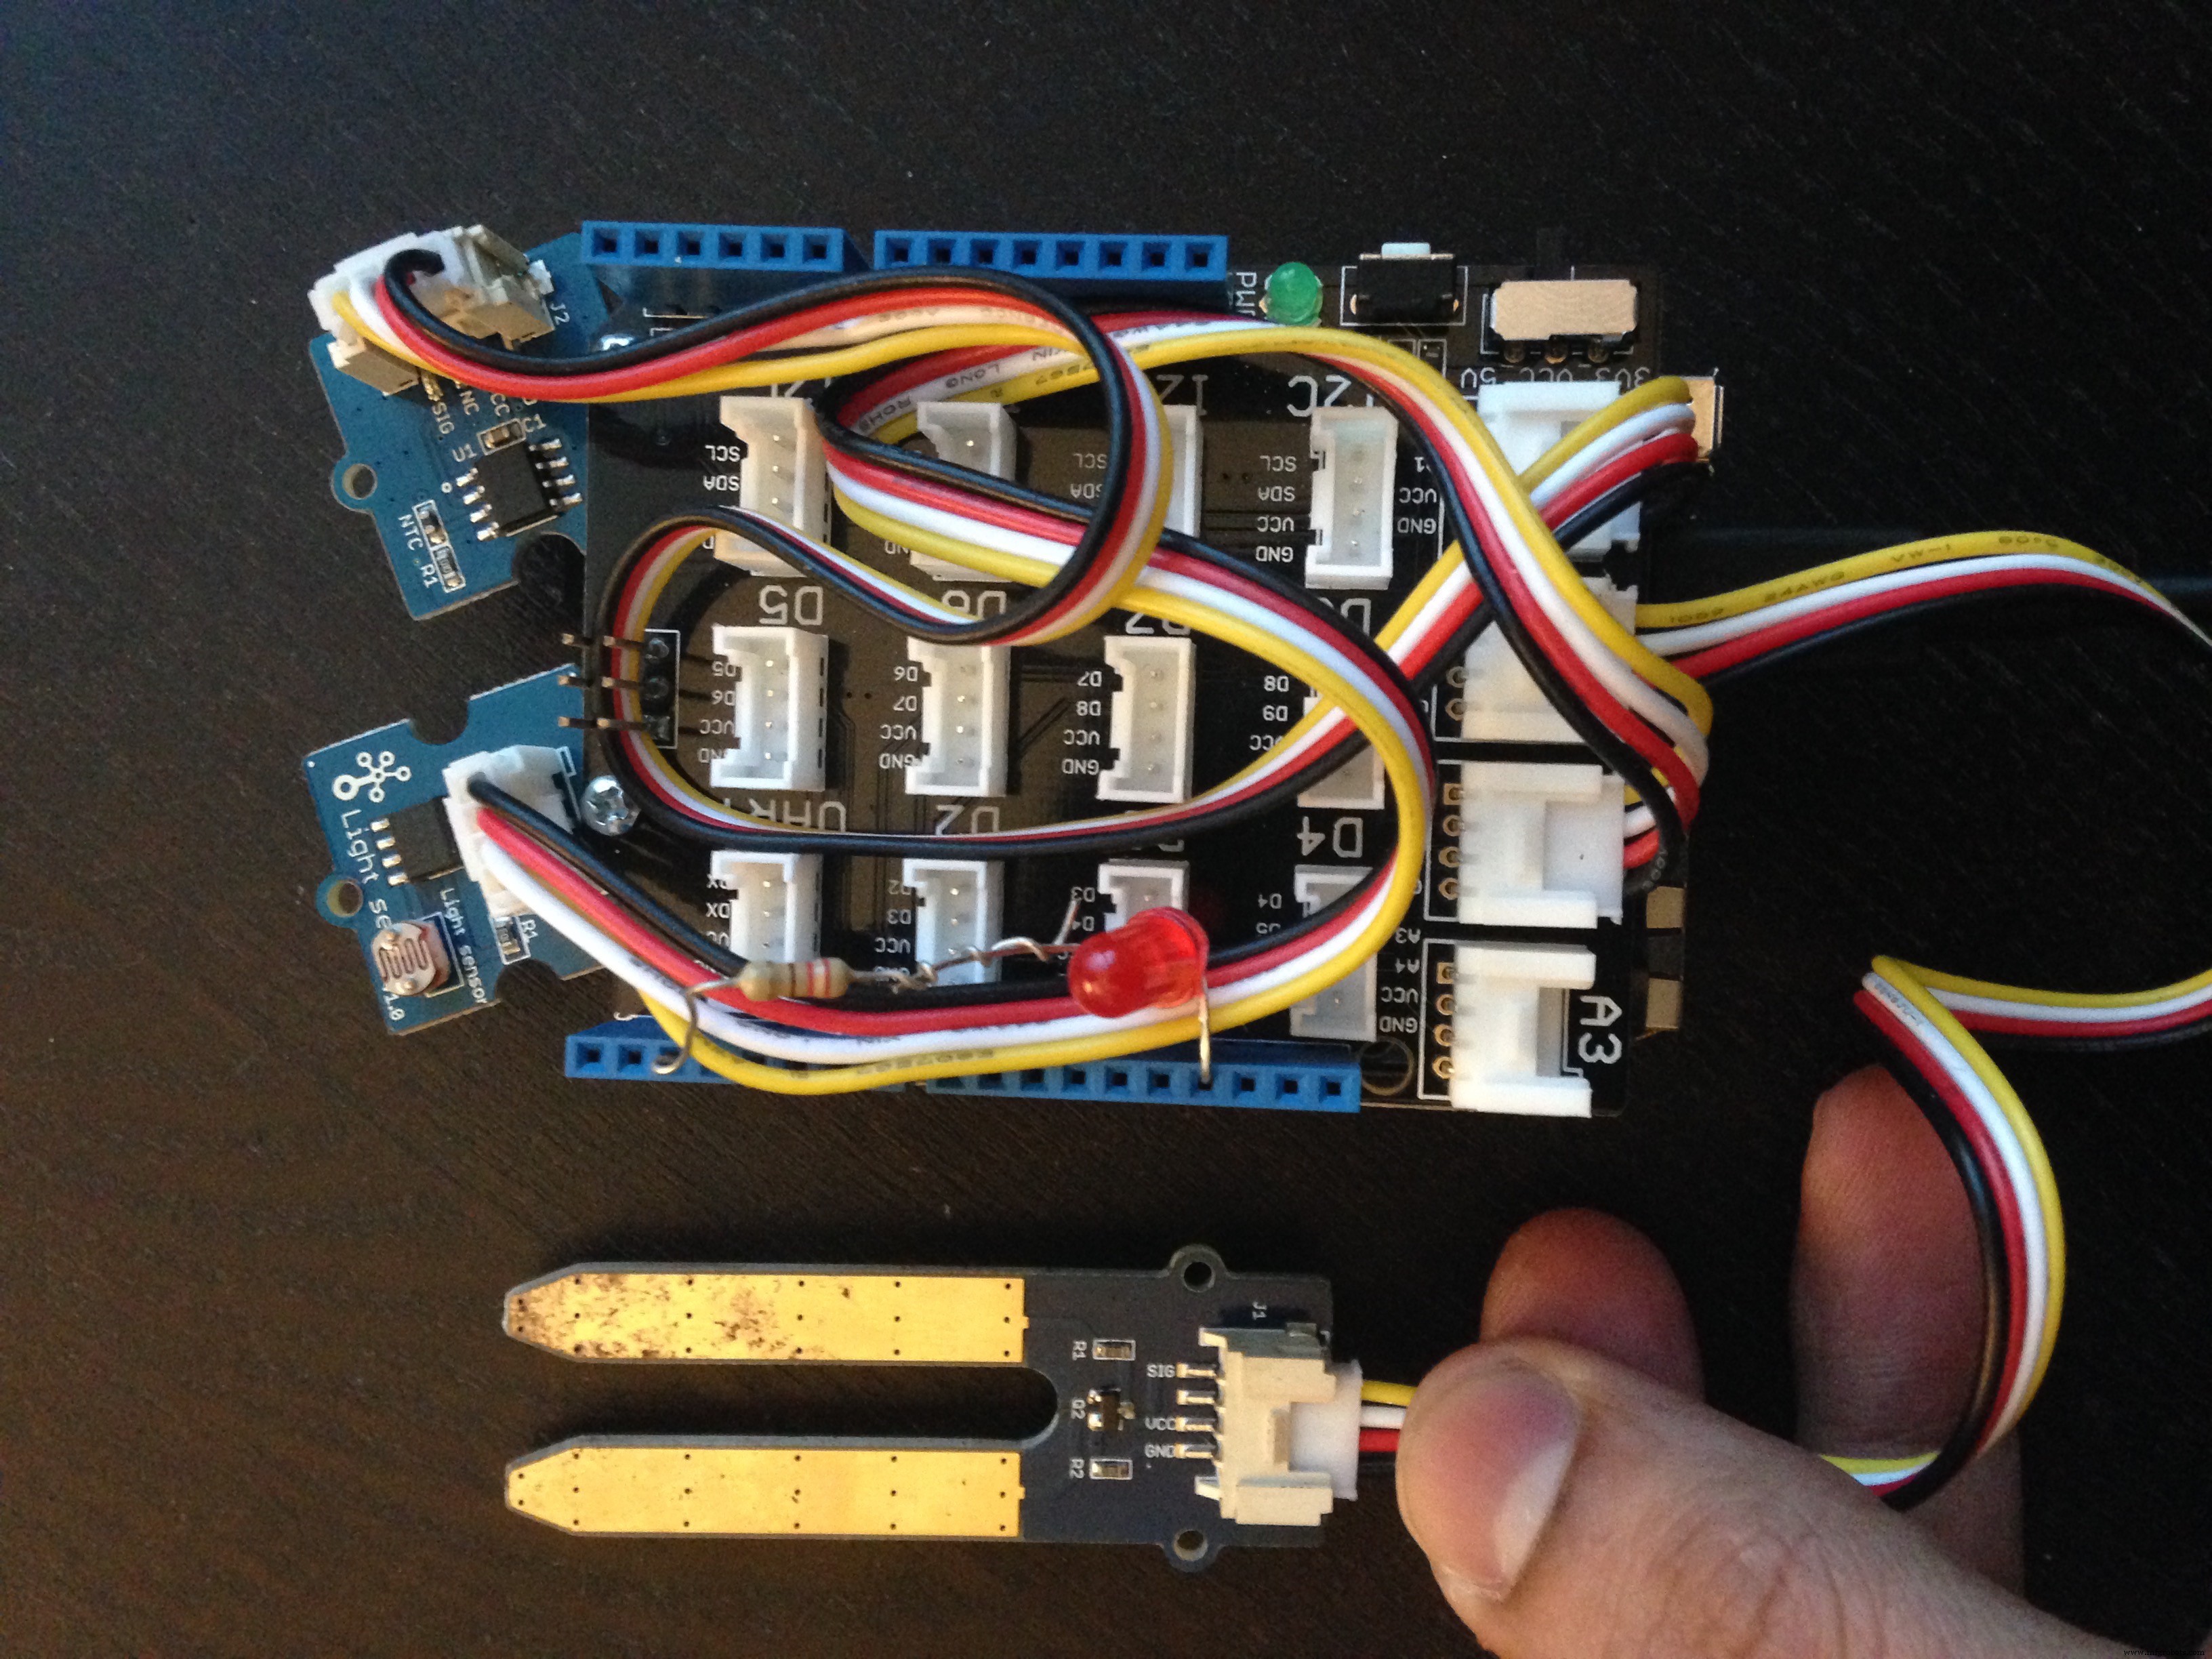
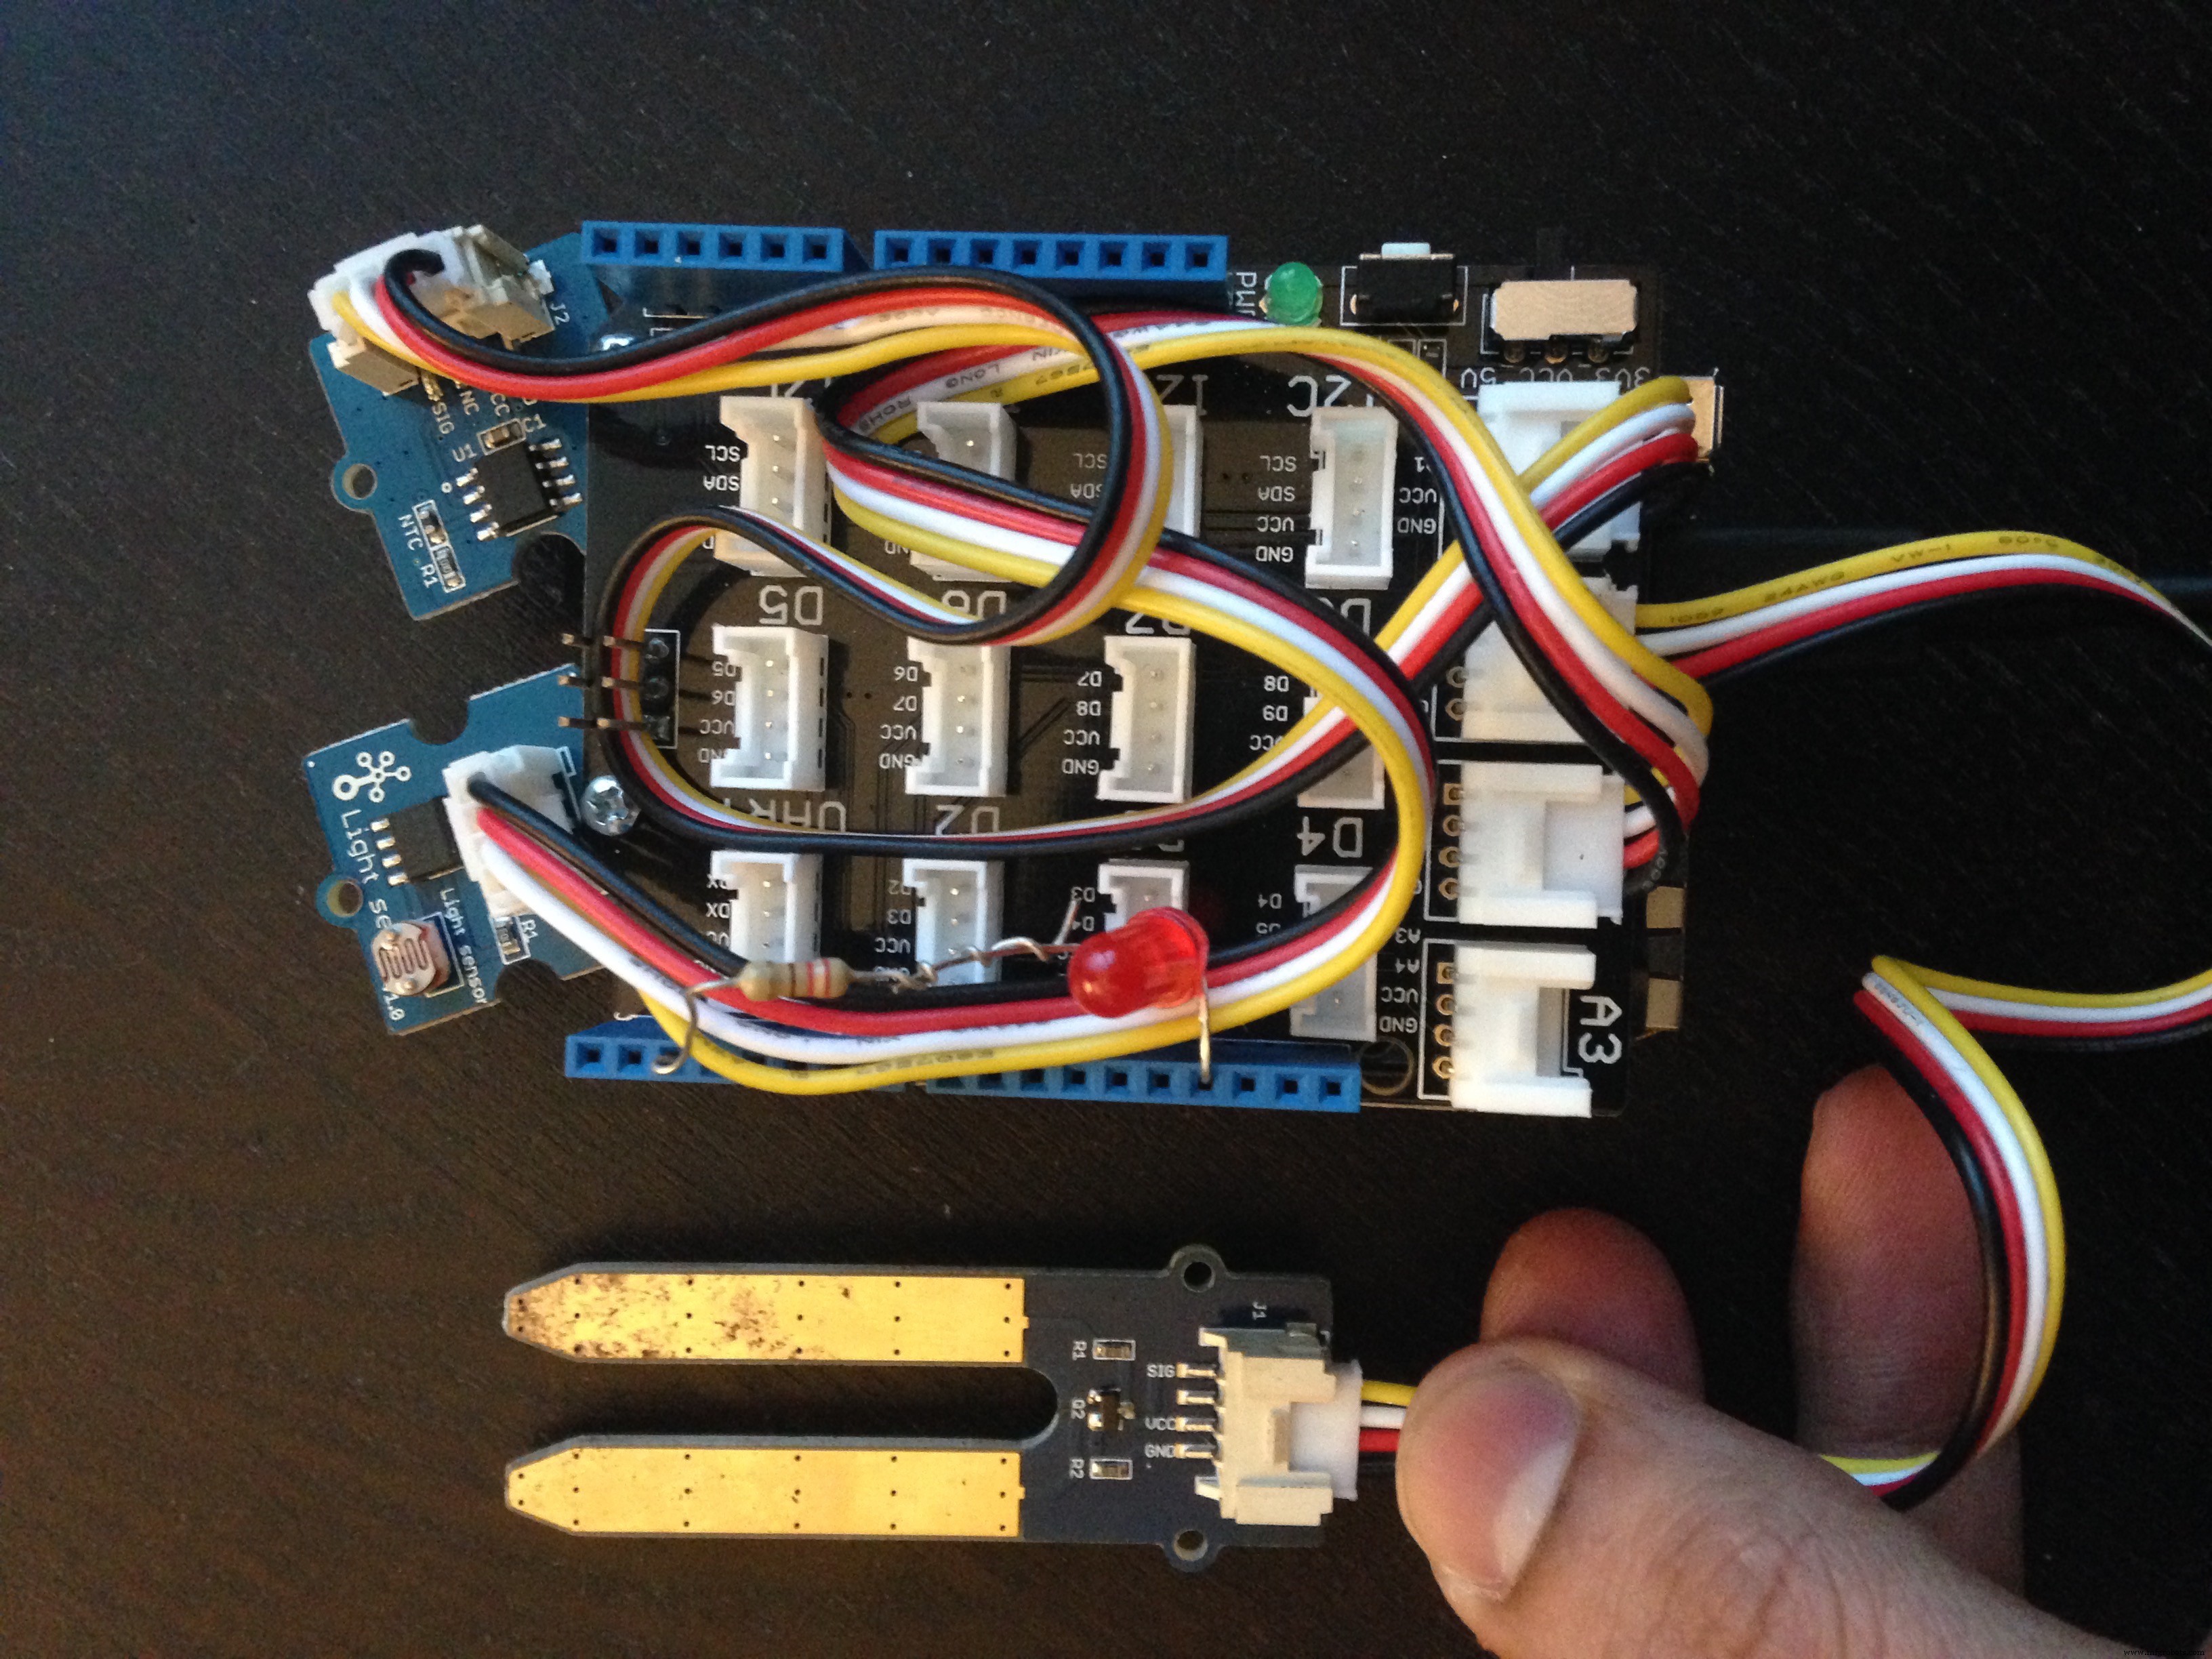
Mit Grove Connector Shield gemäß Schaltplan:
- Temperatursensor → A0
- Bodenfeuchtesensor → A1
- Lichtsensor → A2
- LED mit 220 Ω Vorwiderstand an Pin 2
#2 3D-Druck der STL-Dateien
Dateien im Bereich „Custom parts and enclosures“. 3 STL-Dateien drucken, Slicer: 0,3 mm Schichthöhe, Fülldichte mind. 25 %. Druckdauer ca. 2 Stunden – währenddessen andere Schritte erledigen.

#3 Idealen Bodenfeuchte-Wert ermitteln
Beiliegenden Code (SoilMoistureValue) auf Arduino Yun hochladen und tooDryValue bestimmen. Fällt der Feuchtewert darunter, muss gegossen werden (dieser Wert wird später in der AWS-SNS-Bedingung für E-Mail verwendet).
Video zur Ermittlung des tooDryValue.
#4 Arduino-Code für dweet.io hochladen
Nach Festlegung von tooDryValue den Sketch ArduinoYunDweetIO.ino hochladen. Im Code „PlantMonitorTorontoON“ durch eigenen, eindeutigen Namen ersetzen.
Video-Test: Upload der Sensordaten an dweet.io.
#5 AWS CLI auf dem Computer einrichten (hier macOS)
AWS-Konto unter aws.amazon.com/free erstellen (Kreditkarte nötig, für Tutorial fallen keine Kosten an – regionsabhängig).
Ordner „AWS“ anlegen und AWS CLI installieren:
$ curl "https://s3.amazonaws.com/aws-cli/awscli-bundle.zip" -o "awscli-bundle.zip"
$ unzip awscli-bundle.zip
$ sudo ./awscli-bundle/install -i /usr/local/aws -b /usr/local/bin/aws
Im Terminal im AWS-Ordner arbeiten.

#6 Thing über CLI erstellen (erscheint in AWS IoT Console)
aws iot create-thing --thing-name "plantSystem"
Mehr Info: AWS IoT Developer Guide
#7 Zertifikate erstellen
aws iot create-keys-and-certificate --set-as-active --certificate-pem-outfile cert.pem --public-key-outfile publicKey.pem --private-key-outfile privateKey.pemErzeugt 3 PEM-Dateien im AWS-Ordner.

#8 AWS IoT Policy erstellen & an Zertifikat anhängen
Datei policy.json im AWS-Ordner anlegen:
{
  "Version": "2012-10-17",
  "Statement": [{
    "Effect": "Allow",
    "Action": ["iot:*"],
    "Resource": ["*"]
  }]
}
Policy erstellen:
aws iot create-policy --policy-name "PubSub" --policy-document file://./policy.json
#9 Policy an Zertifikat & Zertifikat an Thing anhängen
$ aws iot attach-principal-policy --principal "arn:aws:iot:xxxxxxxxxxxxxxxxxxxxxxxx" --policy-name "PubSub"
$ aws iot attach-thing-principal --thing-name "PlantSystem" --principal "arn:aws:iot:xxxxxxxxxxxxxxxxxxxxxxxx"
Zertifikat-ARN in AWS IoT Console unter Zertifikat → Details kopieren.

Mehr: Secure Communication
#10 Setup auf Computer testen mit MQTT.fx
MQTT.fx herunterladen & installieren – testen, ob Publish/Subscribe via AWS IoT funktioniert.
Setup-Info & Root-CA: Verify Pub/Sub
- Verbindungsprofil in MQTT.fx einrichten
- Zertifikate verknüpfen (aus vorherigen Schritten)
Video: Test auf Mac mit MQTT.fx.
#11 Arduino Yun für AWS IoT Cloud einrichten
Neueste Arduino Yun SDK herunterladen, in Arduino „Libraries“-Ordner entpacken.
Erstmalige Yun-Nutzung: Arduino Yun Guide – WLAN einrichten.
Process-Beispiel laden (Datei → Beispiele → Bridge → Process) – bestätigt Internetzugang.
Root-CA, Private Key, Zertifikat in certs-Ordner legen.

codebase_upload.sh und environment_setup.sh anpassen: [your_boards_IP] durch Board-IP, [your_boards_password] durch Passwort ersetzen.
Im Terminal:
$ chmod 755 codebase_upload.sh
$ ./codebase_upload.sh
$ chmod 755 environment_setup.sh
$ ./environment_setup.sh
Dauert 5–10 Min. Installiert: distribute, python-openssl, pip, paho-mqtt auf dem Yun (nötig für AWS Cloud Kommunikation – unser Thing heißt „PlantSystem“).


Linux/Windows: Installation Guide
#12 IAM-Rolle erstellen & Berechtigungen vergeben
Für DynamoDB-Einträge per IoT-Regel: Rolle erstellen, Berechtigungen geben.
Datei rolePolicy.json:
{
  "Version": "2012-10-17",
  "Statement": [{
    "Sid": "",
    "Effect": "Allow",
    "Principal": { "Service": "iot.amazonaws.com" },
    "Action": "sts:AssumeRole"
  }]
}
aws iam create-role --role-name iot-actions-role --assume-role-policy-document file://./rolePolicy.jsonDatei policy.json:
{
  "Version": "2012-10-17",
  "Statement": [{
    "Effect": "Allow",
    "Action": ["dynamodb:*", "lambda:InvokeFunction"],
    "Resource": ["*"]
  }]
}
aws iam create-policy --policy-name iot-actions-policy --policy-document file://./policy.json
aws iam attach-role-policy --role-name iot-actions-role --policy-arn "arn:aws:xxxxxxxxxxxxx:policy/iot-action-policy"
Mehr: Config & Test Rules
#13 DynamoDB-Tabelle in AWS Console anlegen
- Tabellenname:
plantSensor - Partition Key:
key - Sort Key:
timestamp - Read/Write Capacity Units: 1

#14 Regel zum Einfügen in PlantSensor-Tabelle erstellen
Datei plantdatarule.json (roleArn anpassen – in IAM → Roles → iot-actions-role):
{
  "sql": "SELECT * FROM 'topic/plantdata'",
  "ruleDisabled": false,
  "actions": [{
    "dynamoDB": {
      "tableName": "plantSensor",
      "hashKeyField": "key",
      "hashKeyValue": "${topic(2)}",
      "rangeKeyField": "timestamp",
      "rangeKeyValue": "${timestamp()}",
      "roleArn": "arn:aws:iam::XXXXXXXXXXXX:role/iot-actions-role"
    }
  }]
}
aws iot create-topic-rule --rule-name plantDataToDynamoDB --topic-rule-payload file://./plantdatarule.jsonIn AWS IoT Console sollte Regel „PlantDataToDynamoDB“ erscheinen.

Mit MQTT.fx testen, ob Einträge in Tabelle entstehen.

#15 Arduino Sketch für AWS IoT / DynamoDB hochladen
Zuerst ArduinoJson Library von GitHub herunterladen.
Dann YunAWSIoTDynamoDB.ino und aws_iot_config.h (als neuen Tab in Arduino IDE) hochladen.
Seriellen Monitor öffnen → Temperatur, Lichtwert, Bodenfeuchte werden in DynamoDB gepostet.
Mit AWS Lambda & Kinesis lassen sich weitere coole Dinge bauen.

Hinweis: Für Dauerbetrieb delay am Loop-Ende erhöhen, um Posting-Intervall zu vergrößern und Kosten zu senken. Preise: AWS IoT Pricing.
#16 AWS IoT SNS-Regel für E-Mail bei niedriger Bodenfeuchte
Einfache SNS-Benachrichtigung basierend auf IoT-Regel.
Dem IAM-Rolle (iot-actions-role) in IAM Console folgende Policies zuweisen:
- AmazonSNSRole
- AmazonSNSFullAccess
In SNS Console Topic sendMail erstellen, Subscription mit eigener E-Mail (auf Handy konfiguriert) anlegen.
Zurück zur AWS IoT Console → „+Create Resource“ → Regel EmailSend:
- Name: EmailSend
- Attribute:
moistval(muss JSON-Wert im Arduino-Code entsprechen) - Topic filter:
topic/plantdata - Condition:
moistval < 250(Wert aus Ermittlungsschritt) - Action: Send message as push notification SNS
- SNS target: sendEmail
- Role: iot-actions-role
Console sollte so aussehen:

Beispiel-E-Mail beim Entfernen des Feuchtesensors aus Wasserglas:

Mehr zu AWS SNS: SNS FAQs
#17 3D-gedruckte Teile zusammenbauen & in Topf platzieren
4×40 Schraube & Mutter, um den schwarzen „Soil Poker“ (3D-Druck) an der Basis des Arduino Yun zu befestigen.

Oberteil rastet ein. Obere Öffnung Richtung Fenster zeigen, Feuchtesensor in Erde stecken. Yun per Micro-USB an Steckdose anschließen.

Hinweis: Ich erkunde noch die AWS-Welt und bin begeistert von den Features. Wenn Sie AWS schon länger nutzen, freue ich mich über Kommentare/Vorschläge für Features, die zum Pflanzen-Monitoring passen. Danke!
Code
- SoilMoistureValue – Ermittlung idealer Bodenfeuchte-Wert
- ArduinoYunDweetIO – Daten an dweet.io senden
- ArduinoYunAWSIoTDynamoDB – Daten an AWS IoT / DynamoDB senden
- aws_iot_config.h – Konfigurations-Header
SoilMoistureValue (Arduino)
//@CarmelitoA - House Plant Monitoring project determining soil moisture value
const int moisturePin = A1;
const int ledPin = 2;
int moisturValue = 0;
int tooDryValue = 250; // anpassen basierend auf Tests

void setup() {
  Serial.begin(9600);
  pinMode(ledPin, OUTPUT);
  digitalWrite(ledPin, LOW);
}

void loop() {
  moisturValue = analogRead(moisturePin);
  Serial.print("Moisture sensor = ");
  Serial.println(moisturValue);
  if (moisturValue < tooDryValue) {
    digitalWrite(ledPin, HIGH);
  } else {
    digitalWrite(ledPin, LOW);
  }
  delay(3000);
}
ArduinoYunDweetIO (Arduino)
//Created by @CarmelitoA for House Plant Monitoring - uploading data to dweet.io (CC BY-SA) #include#include #define SITE_URL "www.dweet.io" #include const int moisturePin = A1; const int ledPin = 2; int moisturValue = 0; const int tooDryValue = 500; // anpassen float tooLowTemp = 20; // anpassen (°C) // Temperature Sensor const int B = 4275; const int R0 = 100000; const int pinTempSensor = A0; // Light Sensor const int lightPin = A2; unsigned long lastConnectionTime = 0; const unsigned long postingInterval = 10L * 1000L; void setup() { Bridge.begin(); Serial.begin(9600); pinMode(ledPin, OUTPUT); digitalWrite(ledPin, LOW); while (!Serial); // warten auf Serial - nach Deployment auskommentieren } void loop() { YunClient c; if (millis() - lastConnectionTime > postingInterval) { moisturValue = analogRead(moisturePin); Serial.print("sensor = "); Serial.println(moisturValue); // Temperatur berechnen int a = analogRead(pinTempSensor); float R = 1023.0 / ((float)a) - 1.0; R = 100000.0 * R; float temperature = 1.0 / (log(R / 100000.0) / B + 1 / 298.15) - 273.15; Serial.print("temperature = "); Serial.println(temperature); // Lichtwert int lightValue = analogRead(lightPin); Serial.print("light value = "); Serial.println(lightValue); // LED bei Trockenheit oder zu niedriger Temp if (moisturValue < tooDryValue || temperature < tooLowTemp) { digitalWrite(ledPin, HIGH); } else { digitalWrite(ledPin, LOW); } // HTTP POST an dweet.io if (c.connect(SITE_URL, 80)) { Serial.println("connected"); String s = "POST /dweet/for/PlantMonitorTorontoON?Temperature="; s.concat(temperature); s.concat("&LightValue="); s.concat(lightValue); s.concat("&SoilMoisture="); s.concat(moisturValue); Serial.println(s); c.println(s); c.println("Host: www.dweet.io"); c.println("Connection: close"); c.println(); lastConnectionTime = millis(); } else { Serial.println("disconnected from server"); } } }
ArduinoYunAWSIoTDynamoDB (Arduino)
//Created by @CarmelitoA 01-16-2016 for House Plant Monitoring. Feel free to remix. #include#include #include "aws_iot_config.h" #include char data[80]; StaticJsonBuffer<200> jsonBuffer; #include const int moisturePin = A1; const int ledPin = 2; int moisturValue = 0; const int tooDryValue = 250; float tooLowTemp = 20; const int B = 4275; const int R0 = 100000; const int pinTempSensor = A0; const int lightPin = A2; unsigned long lastConnectionTime = 0; const unsigned long postingInterval = 10L * 1000L; aws_iot_mqtt_client myClient; char msg[32]; int cnt = 0; int rc = -100; bool success_connect = false; void msg_callback(char* src, int len) { Serial.println("CALLBACK:"); for (int i = 0; i < len; i++) { Serial.print(src[i]); } Serial.println(""); } void setup() { Bridge.begin(); pinMode(ledPin, OUTPUT); digitalWrite(ledPin, LOW); Serial.begin(115200); while (!Serial); char curr_version[80]; sprintf(curr_version, "AWS IoT SDK Version(dev) %d.%d.%d-%s\n", VERSION_MAJOR, VERSION_MINOR, VERSION_PATCH, VERSION_TAG); Serial.println(curr_version); if ((rc = myClient.setup(AWS_IOT_CLIENT_ID)) == 0) { if ((rc = myClient.config(AWS_IOT_MQTT_HOST, AWS_IOT_MQTT_PORT, AWS_IOT_ROOT_CA_PATH, AWS_IOT_PRIVATE_KEY_PATH, AWS_IOT_CERTIFICATE_PATH)) == 0) { if ((rc = myClient.connect()) == 0) { success_connect = true; // Subscribe nicht nötig für reines Monitoring } else { Serial.println("Connect failed!"); Serial.println(rc); } } else { Serial.println("Config failed!"); Serial.println(rc); } } else { Serial.println("Setup failed!"); Serial.println(rc); } delay(2000); } void loop() { moisturValue = analogRead(moisturePin); Serial.print("sensor = "); Serial.println(moisturValue); int a = analogRead(pinTempSensor); float R = 1023.0 / ((float)a) - 1.0; R = 100000.0 * R; float temperature = 1.0 / (log(R / 100000.0) / B + 1 / 298.15) - 273.15; Serial.print("temperature = "); Serial.println(temperature); int lightValue = analogRead(lightPin); Serial.print("light value = "); Serial.println(lightValue); if (moisturValue < tooDryValue || temperature < tooLowTemp) { digitalWrite(ledPin, HIGH); } else { digitalWrite(ledPin, LOW); } // JSON Payload bauen String temp = "\"temp\": " + String(temperature); String light = ", \"lightval\":" + String(lightValue); String soilMoist = ", \"moistval\":" + String(moisturValue); String value = temp + light + soilMoist; Serial.println(value); String payload = "{" + value + "}"; payload.toCharArray(data, (payload.length() + 1)); if (success_connect) { if ((rc = myClient.publish("topic/plantdata", data, strlen(data), 1, false)) != 0) { Serial.println("Publish failed!"); Serial.println(rc); } if ((rc = myClient.yield()) != 0) { Serial.println("Yield failed!"); Serial.println(rc); } sprintf(msg, "publish %d done", cnt++); Serial.println(msg); delay(10000); } delay(5000); }
aws_iot_config.h (Arduino)
/*
 * Copyright 2010-2015 Amazon.com, Inc. or its affiliates. All Rights Reserved.
 * Licensed under the Apache License, Version 2.0 (the "License").
 * You may not use this file except in compliance with the License.
 * A copy of the License is located at https://aws.amazon.com/apache2.0
 * or in the "license" file accompanying this file. This file is distributed
 * on an "AS IS" BASIS, WITHOUT WARRANTIES OR CONDITIONS OF ANY KIND, either
 * express or implied. See the License for the specific language governing
 * permissions and limitations under the License.
 */
//@carmelitoA modified the value for the plant monitoring project
#ifndef config_usr_h
#define config_usr_h

#define AWS_IOT_MQTT_HOST "XXXXXXXXXXX.iot.us-west-2.amazonaws.com"
#define AWS_IOT_MQTT_PORT 8883
#define AWS_IOT_CLIENT_ID "clientYun2"
#define AWS_IOT_MY_THING_NAME "PlantSystem"
#define AWS_IOT_ROOT_CA_FILENAME "rootCA.pem"
#define AWS_IOT_CERTIFICATE_FILENAME "cert.pem"
#define AWS_IOT_PRIVATE_KEY_FILENAME "privateKey.pem"

#define AWS_IOT_PATH_PREFIX "./certs/"
#define AWS_IOT_ROOT_CA_PATH AWS_IOT_PATH_PREFIX AWS_IOT_ROOT_CA_FILENAME
#define AWS_IOT_CERTIFICATE_PATH AWS_IOT_PATH_PREFIX AWS_IOT_CERTIFICATE_FILENAME
#define AWS_IOT_PRIVATE_KEY_PATH AWS_IOT_PATH_PREFIX AWS_IOT_PRIVATE_KEY_FILENAME

#endif
Schaltplan
Sensoren an Grove Starter Kit anschließen:
- Temperatursensor → A0
- Bodenfeuchtesensor → A1
- Lichtsensor → A2
- LED mit 220 Ω Vorwiderstand an Pin 2
Herstellungsprozess
- C# using-Anweisungen meistern: Importe, Aliase und statische Direktiven
- Remote-Wetterüberwachung mit Raspberry Pi 3 & PubNub
- Bewegungsgesteuerter AWS IoT Button mit Raspberry Pi, PIR-Sensor und MQTT
- Betrieb optimieren: IoT-Tanküberwachung für sicherere, intelligentere und profitablere Petroleum-Verwaltung
- Fortschrittliches KI-gestütztes IoT-System für frühzeitige Waldbranderkennung & Baumgesundheitsmonitoring
- IoT-gestütztes Remote-Monitoring für Öl- & Dieseltanks
- 8 Schlüsselvorteile von IoT-gestütztem Flotten-Gewichtsmonitoring
- Wie IoT-gestütztes Asset-Monitoring Sicherheit & Effizienz in Öl & Gas antreibt
- Milchwirtschaft revolutionieren: IoT-gestützte Füllstandüberwachung für effizientes Management
- Intelligentes IoT-Flussüberwachungssystem optimiert Wassermanagement & Hochwasserschutz