


Happy Birthday-Melodie auf Arduino Nano mit 3-Wege-Polyphonie
Komponenten und Verbrauchsmaterialien
 |
| × | 1 |
Apps und Onlinedienste
 |
|
Über dieses Projekt
Spielen Sie das Polyphonie-Thema "Happy Birthday" auf Arduino Nano mit drei Summern auf einem einzigen Mini-Steckbrett.
Zuallererst - Demonstration
Schließen Sie dieses Ding an eine beliebige USB-Stromquelle (nicht nur an einen Computer) an und es wird die "Happy Birthday"-Melodie auf unbestimmte Zeit abspielen ... fast ... bis Sie es wirklich satt haben =]
Übrigens, die Lichter blinken bei jedem Notenwechsel in einem entsprechenden Kanal/Summer.
Schaltpläne
Die Idee war, ein superkompaktes Gerät ohne (fast) kein Löten zu bauen.
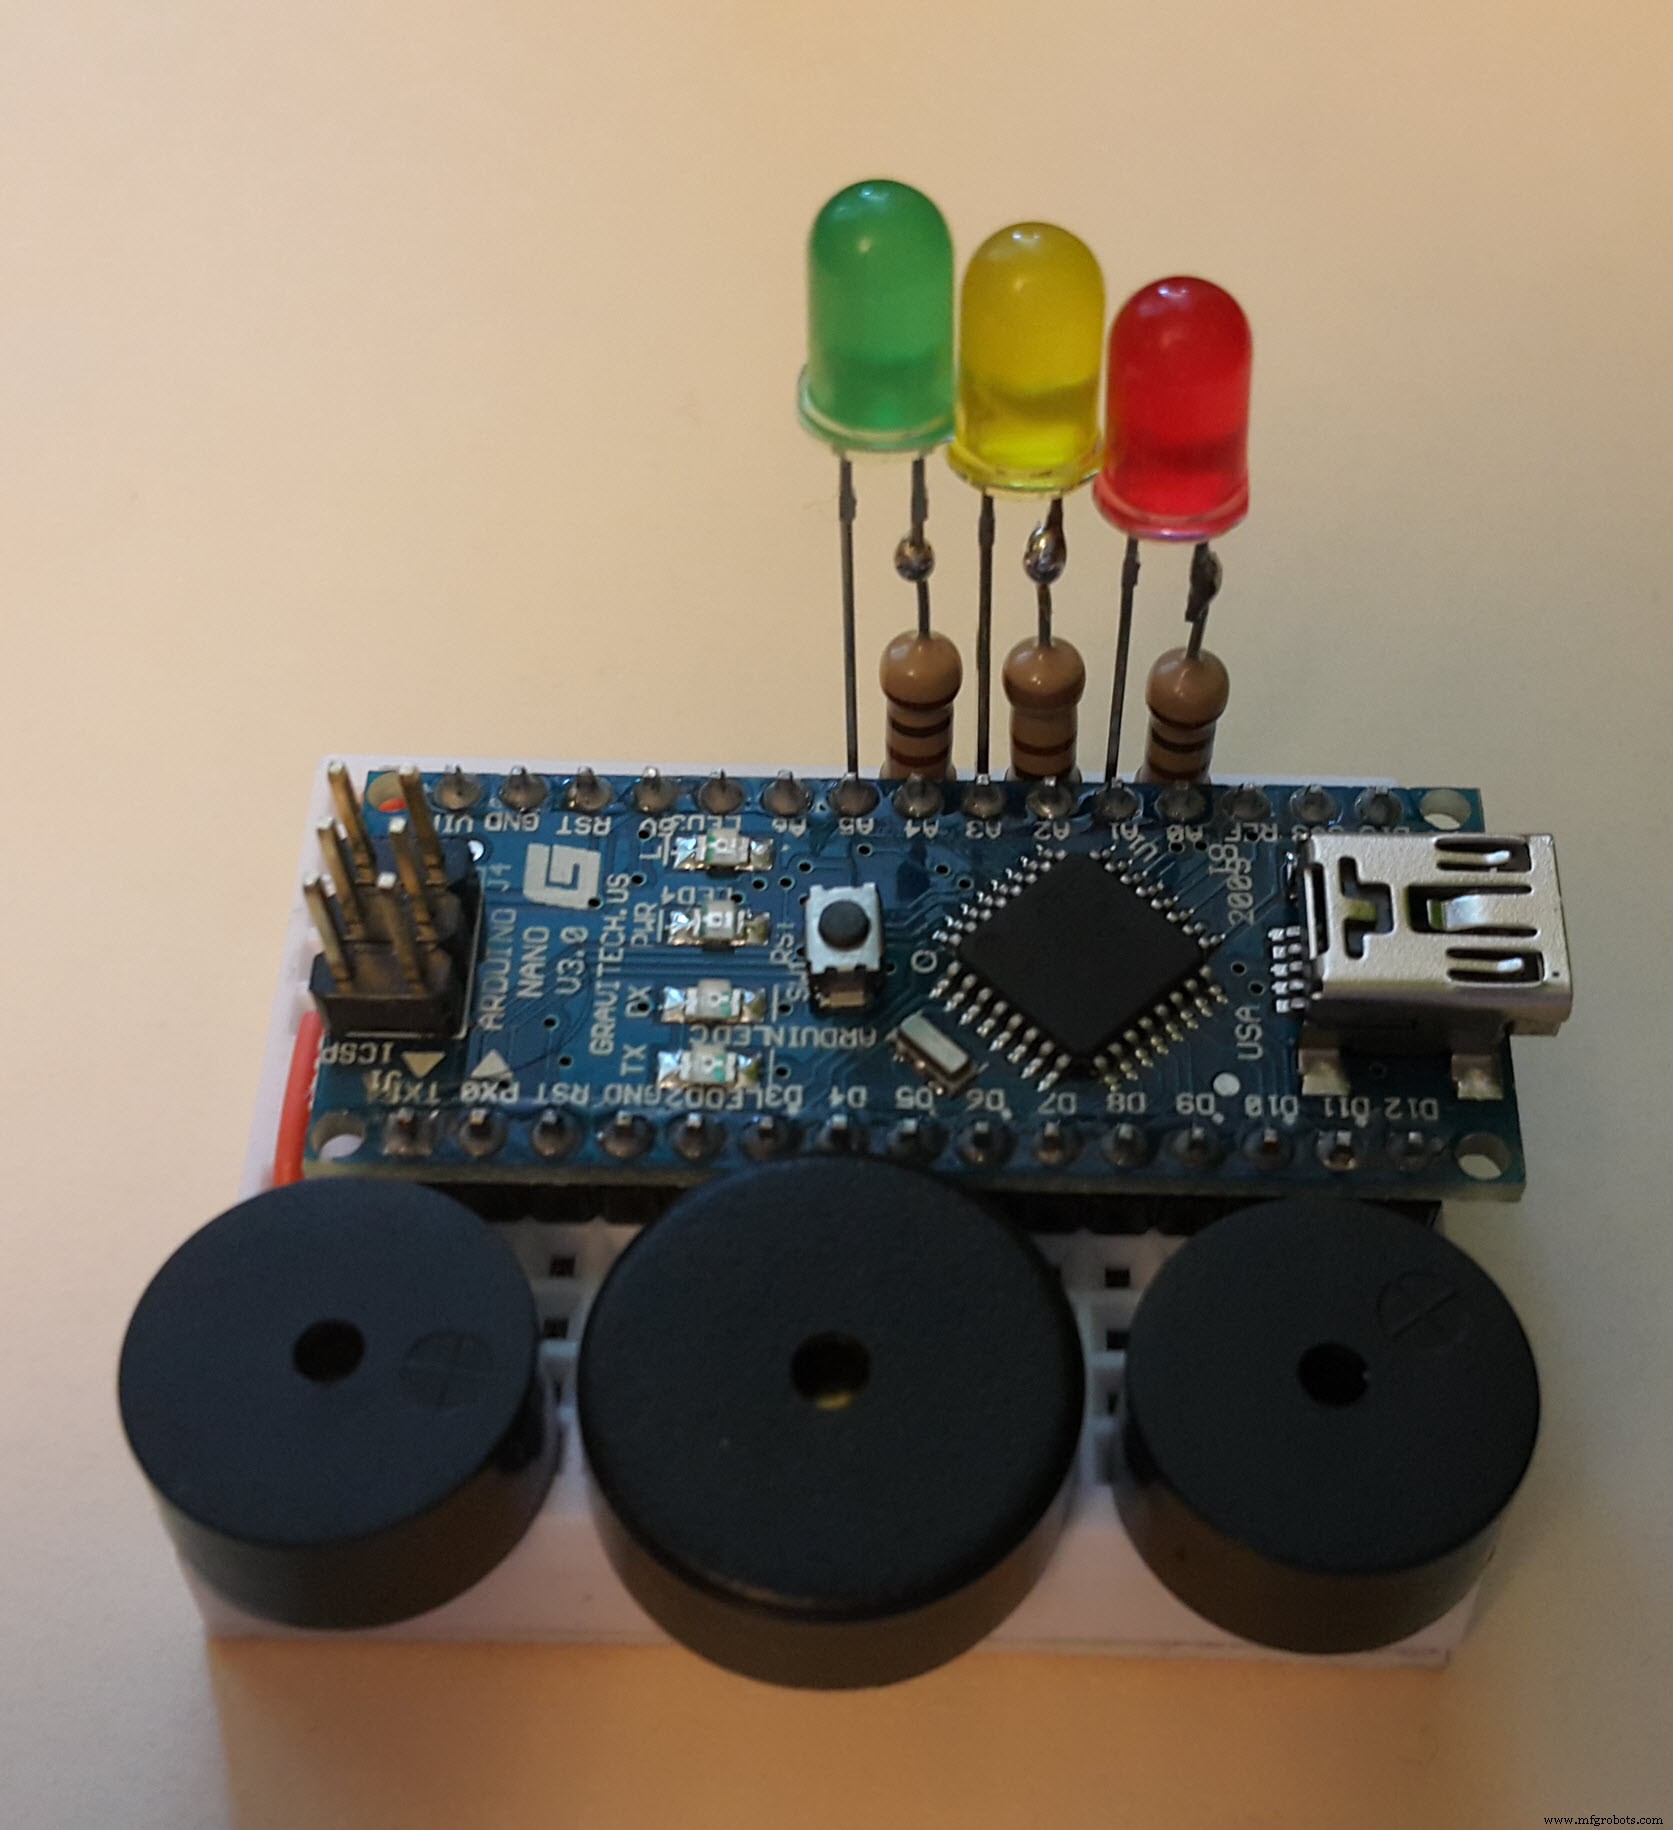
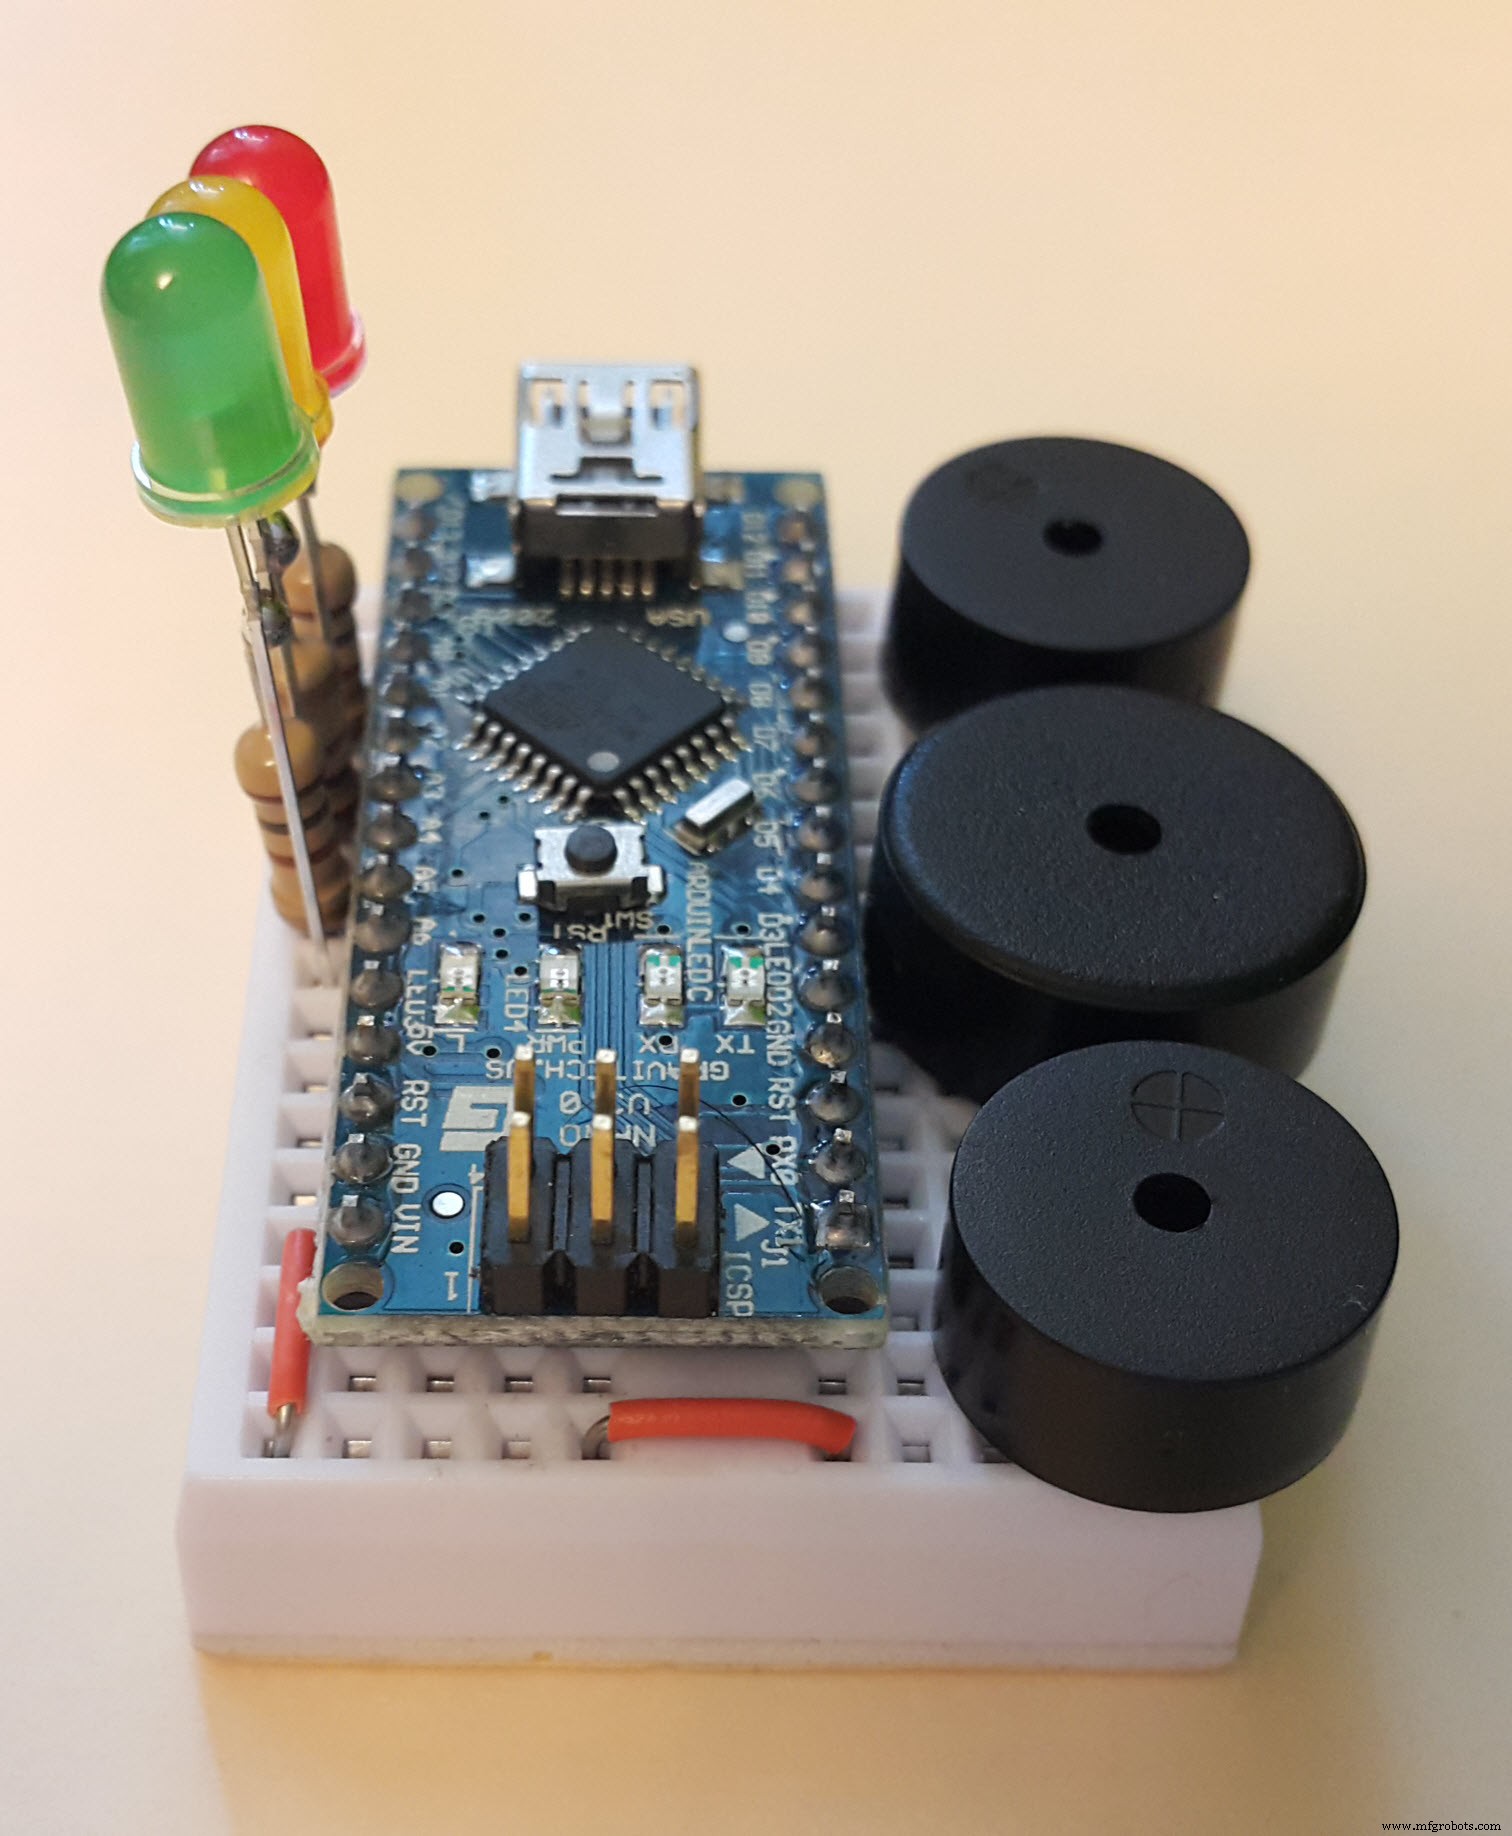
Schließlich habe ich es geschafft, alles Notwendige auf einem winzigen Steckbrett wie diesem unterzubringen:
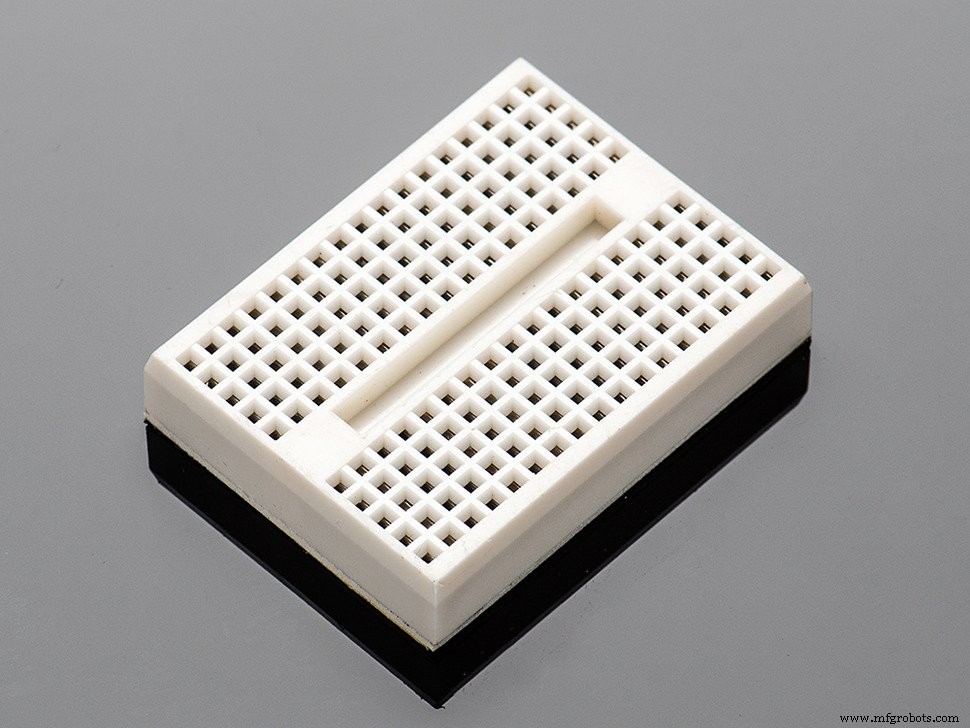
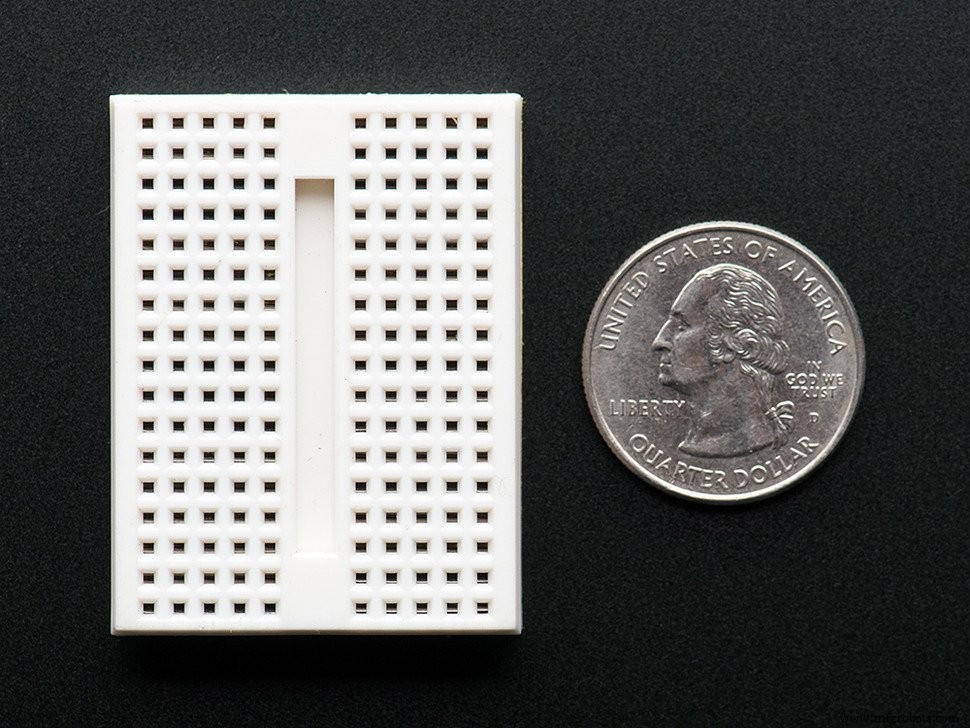
Löcher sind im Steckbrett auf diese Weise miteinander verbunden:
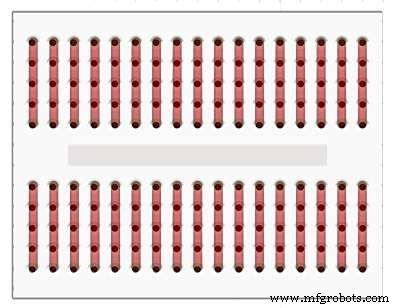
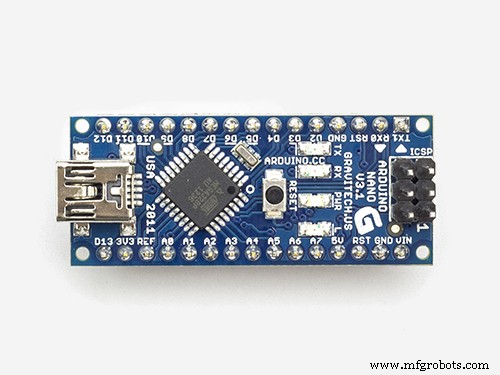
Der Trick hier ist, dass das Arduino Nano Board PERFEKT in ein solches Steckbrett passt, sodass wir einige zusätzliche Komponenten auf beiden Seiten des Steckbretts anschließen können.
Entschuldigung, Leute... Ich bin zu faul, hier irgendwelche Diagramme zu zeichnen, aber dieser Fall ist so einfach, dass ich mir sicher bin, dass diese Nahaufnahmen mehr als ausreichen werden, um alles herauszufinden =]
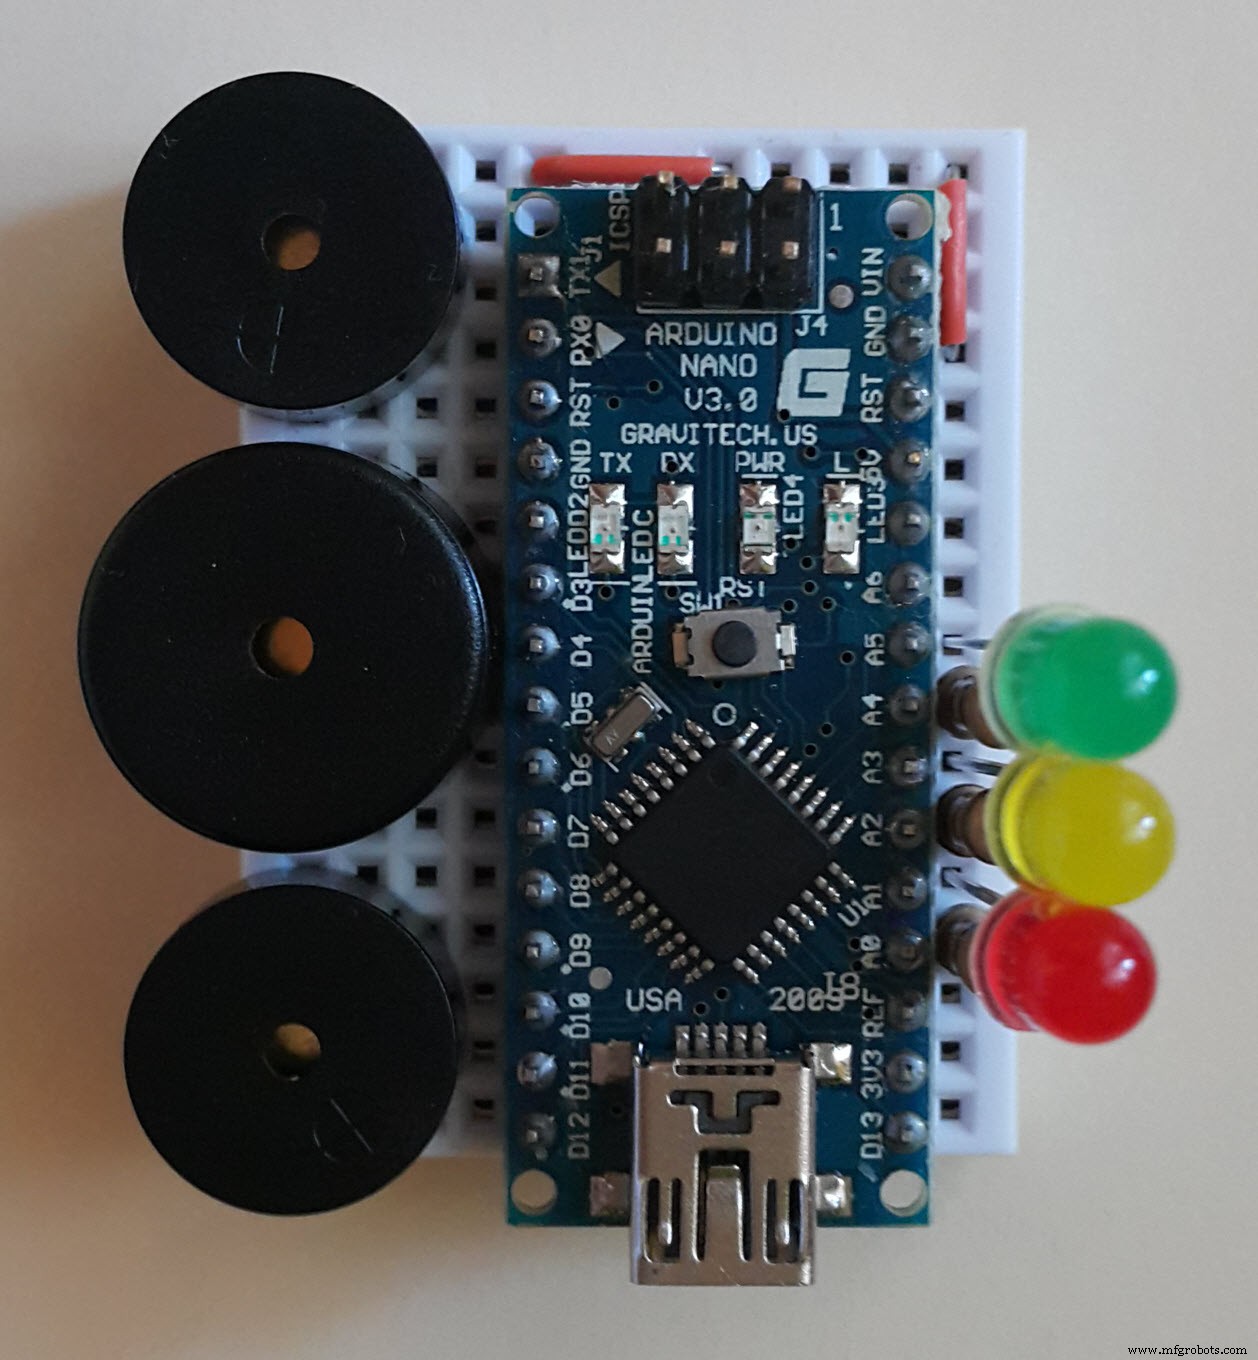
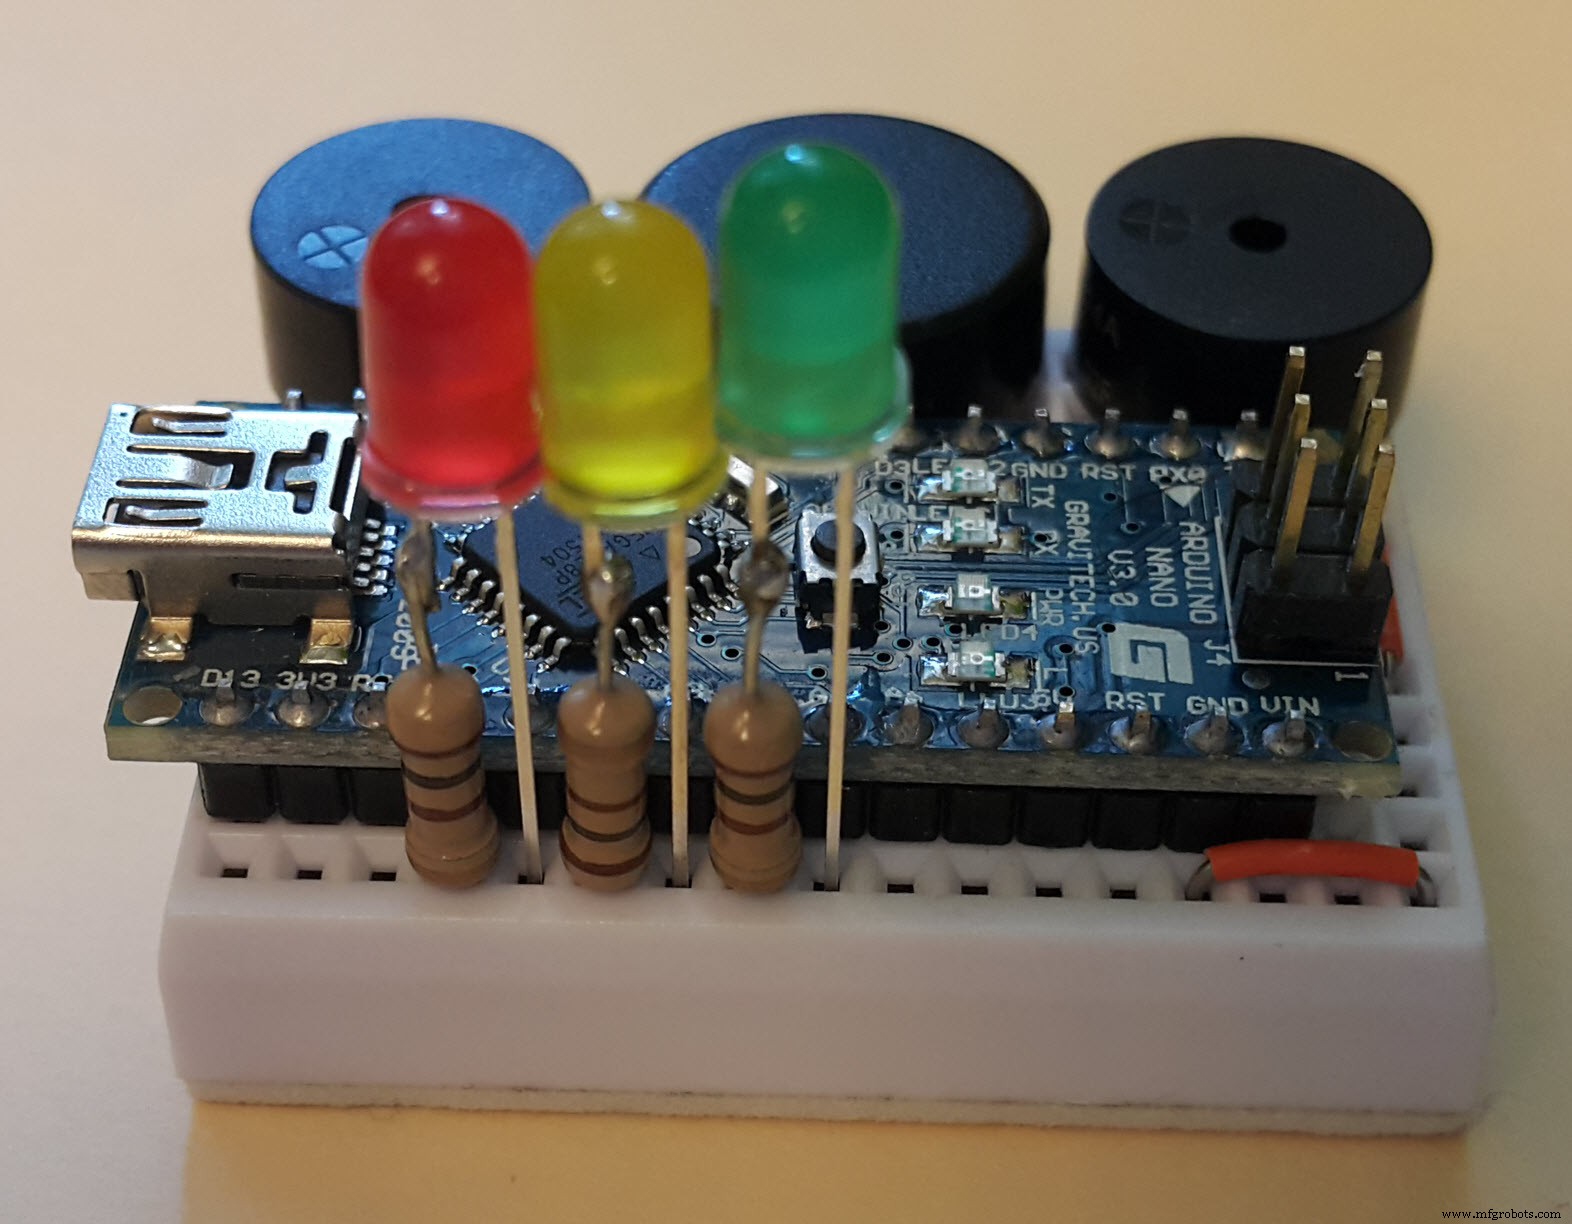

Wie Sie sehen können, verwende ich hier ein Arduino Nano v3.0-Board von Gravitech, aber jedes Analog ist ausreichend. Die Summer und die LEDs hier sind SEHR gewöhnliche. Sie müssen eigentlich keinen speziellen Parametern entsprechen.
Die Widerstände hier sind 100 Ohm... obwohl der übliche "Standard" für LED-Überlastungsschutz 220 Ohm ist... aber wen interessiert das... ¯\_(ツ)_/¯
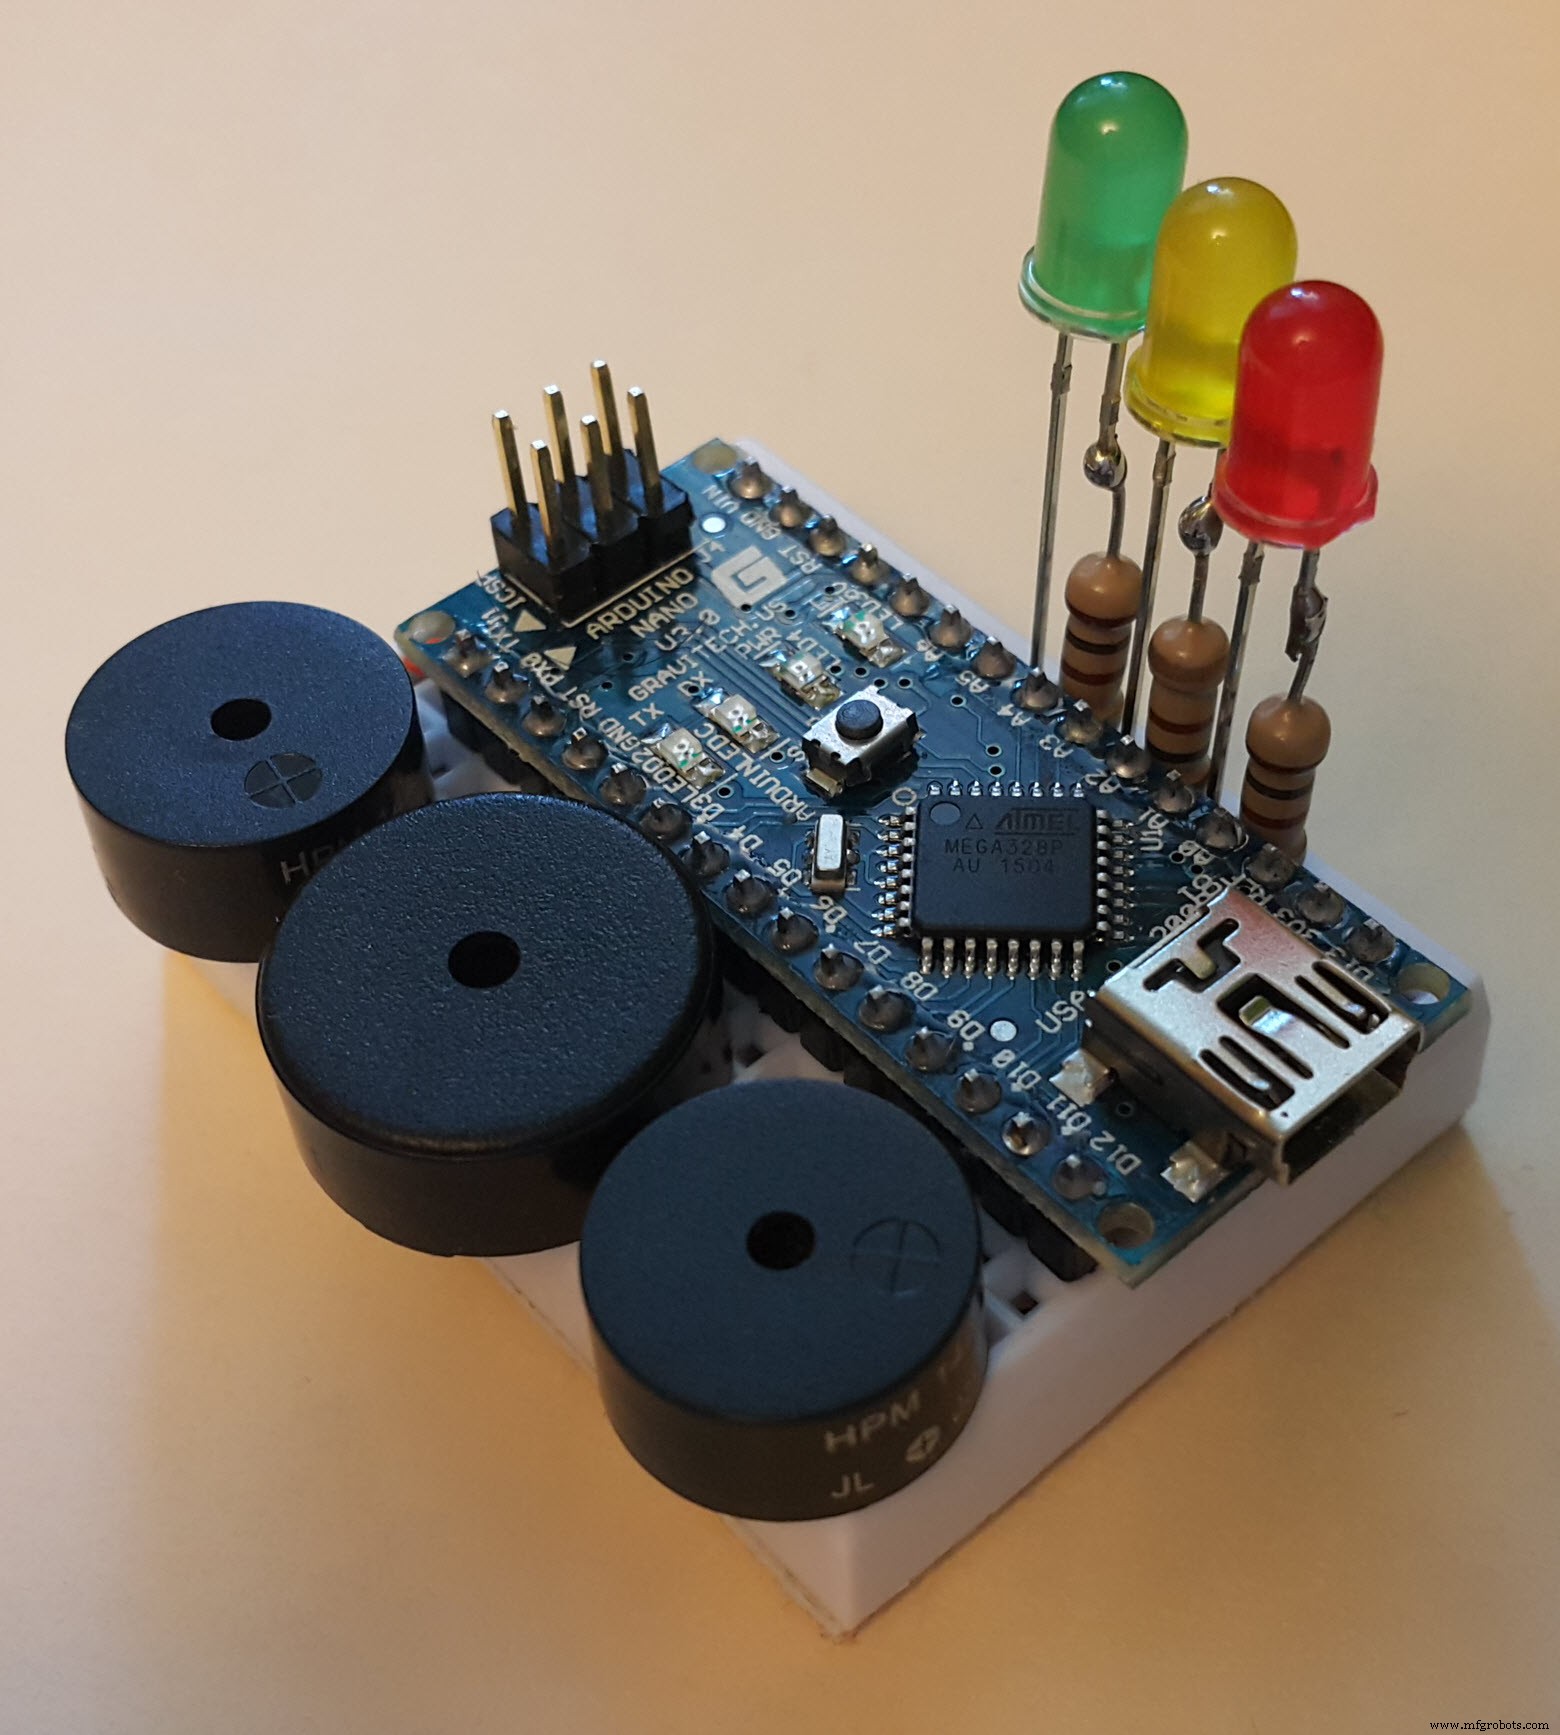
Das einzige, was hier auf diesen Fotos wahrscheinlich nicht so offensichtlich ist, ist, dass die Pins der Summer so in das Steckbrett eingesteckt werden:

Beachten Sie auch, dass der mittlere größer ist als die anderen - das liegt daran, dass dieser für den "Bass" -Musikkanal verwendet wird ☝🏻
... Ich mache nur Spaß! ^__^ Sie quietschen alle wie ein verrückter Mäusechor, ohne sich in ihren Klangfähigkeiten zu unterscheiden =]
Sie können also problemlos drei identische Summer verwenden, müssen diese jedoch an etwas anderen Positionen auf dem Steckbrett platzieren und auch die Nummern der Ausgangspins im Programmcode entsprechend Ihrer neuen Summerposition ändern.
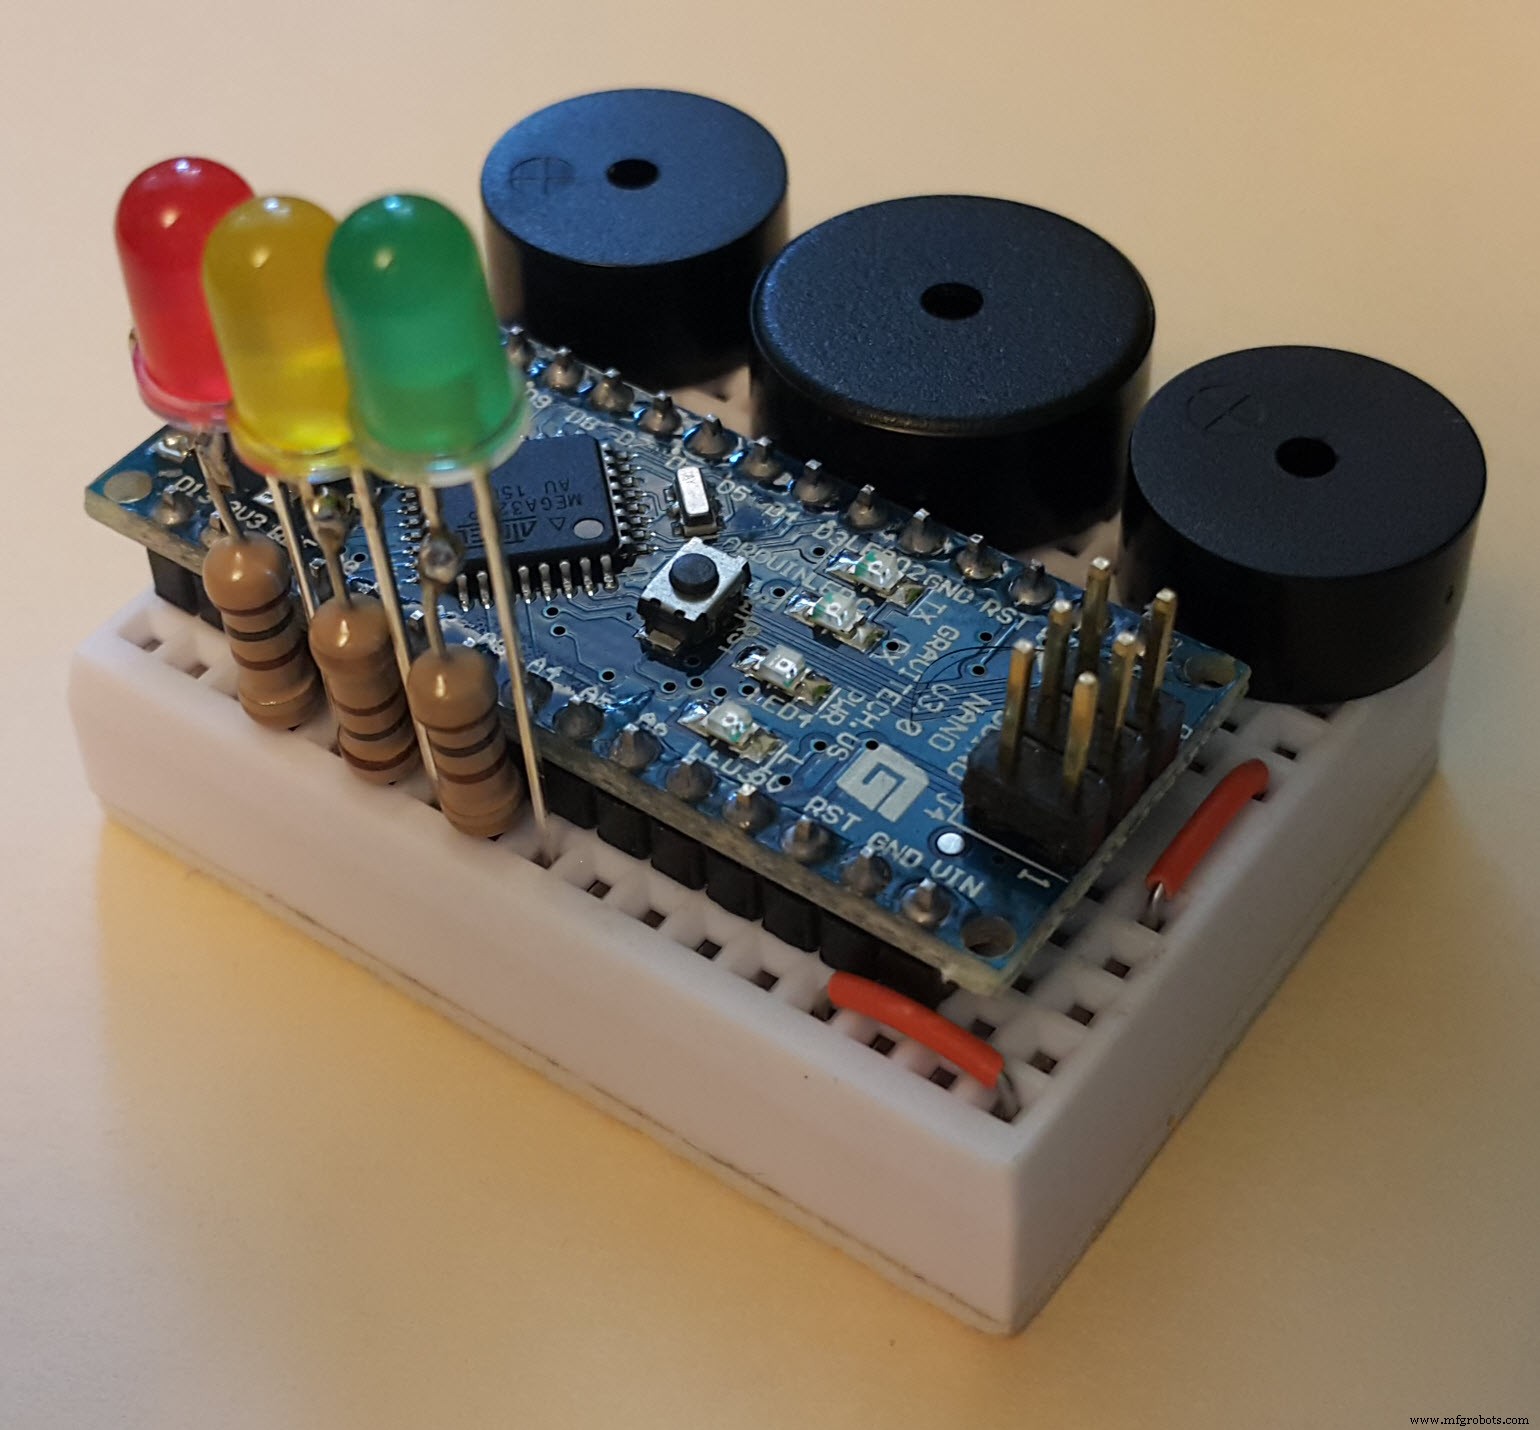
Beachten Sie auch einen weiteren kleinen "Hack" hier ... jedenfalls sind wir auf Hack ster hier oder was? =] Also verwende ich mehrere Arduinos I/O Pins hier als Masse Stifte für Summer und LEDs 😱😱 . Ja, das ist richtig. Wenn Sie in Ihrem Programm einen "LOW" -Zustand für einen beliebigen Arduino I / O-Pin festlegen, können Sie diese Pins genauso verwenden, wie Sie Standard-GND-Pins auf Arduino-Boards verwenden. Cool, oder?;)
Über das Programm...
Die vollständige Auflistung der Arduino-IDE-Skizze finden Sie unten. Sie müssen jedoch eine zusätzliche "Tone"-Bibliothek installieren, um den Sketch erstellen zu können, den Sie hier herunterladen können:
https://www.dropbox.com/s/q1udxg4yi47emeo/Tone.zip?dl=0
(Wenn es ein Popup-Fenster mit einem Registrierungs-"Vorschlag" gibt, schließen Sie es einfach mit dem "x"-Button in der Ecke)
Der einfachste Weg, diese Bibliothek zu installieren, ist die folgende:Wählen Sie im Hauptmenü der Arduino IDE Skizze - Bibliothek einschließen - .ZIP-Bibliothek hinzufügen... und wählen Sie dann Ihre heruntergeladene ZIP-Datei aus... einfach ¯\_(ツ)_/¯
Diese Bibliothek ist erforderlich, um die gleichzeitige Erzeugung mehrerer Töne auf einem einzigen Controller durchzuführen (sie verwendet einige zusätzliche Hardware-Timer und Hardware-Interrupts "unter der Haube", um dieses Ziel zu erreichen). Einfach ausgedrückt ist es eine Art "Redneck-Multitasking" auf einem einzigen Prozessorkern ohne Betriebssystem =]
Übrigens, hier ist der Autor der Bibliothek (danke bro! =] ):
http://playground.arduino.cc/Profiles/Bhagman
... und die GitHub-Seite der Bibliothek:
https://github.com/bhagman/Tone
HAFTUNGSAUSSCHLUSS 🙂 :
Ehrlich gesagt ist mein Programmcode hier ziemlich sperrig und schwer zu lesen. Das liegt hauptsächlich an dieser Notwendigkeit, mit drei "unabhängigen" Melodie-Threads gleichzeitig aus nur einem linearen Befehlsfluss zu "jonglieren". Ich dachte wirklich daran, den Code später zu refaktorisieren, um die Melodien voneinander zu trennen und ihn in Zukunft zum Spielen verschiedener Songs zu verwenden ... aber ich werde wahrscheinlich nicht =]
Also viel Glück. Jedes Feedback ist willkommen.
Danke fürs Lesen bis zum Ende =]
Code
- Alles Gute zum Geburtstag
Happy_birthdayArduino
Vergessen Sie nicht, die Tonbibliothek zu installieren!!#includeTon solo;Tonbass;Tonrhythmus;const int t =600; // Vierteltondauerconst int tt =t*2;const int t14 =round(t*1/4);const int t24 =round(t*2/4);const int t34 =round(t*3/4);const int bassLedPin =15; // Bass-LED-Signalstift (auch bekannt als A1) const int rythmLedPin =17; // Rhythmus-LED-Signalstift (auch bekannt als A3) const int soloLedPin =19; // Solo-LED-Signalstift (auch bekannt als A5)void wait (Tone t) { Während (t.isPlaying ()) {}} Int bassLedState =LOW;void switchBassLed () { if (bassLedState ==LOW) bassLedState =HIGH; sonst bassLedState =LOW; digitalWrite(bassLedPin, bassLedState);}int rythmLedState =LOW;void switchRythmLed(){ if (rythmLedState ==LOW) rythmLedState =HIGH; sonst rythmLedState =LOW; digitalWrite(rythmLedPin, rythmLedState);}int soloLedState =LOW;void switchSoloLed(){ if (soloLedState ==LOW) soloLedState =HIGH; sonst soloLedState =LOW; digitalWrite (soloLedPin, soloLedState);}void setup (void) {pinMode (14, OUTPUT); // LED-Massestift (auch bekannt als A0) PinMode (16, OUTPUT); // LED-Massestift (auch bekannt als A2) PinMode (18, OUTPUT); // LED-Massestift (auch bekannt als A4) PinMode (bassLedPin, OUTPUT); // Bass-LED-Signalstift PinMode (rythmLedPin, OUTPUT); // Rhythmus-LED-Signalstift PinMode (soloLedPin, OUTPUT); // Solo-LED-Signalstift PinMode (2, AUSGANG); // Solo-Summer-Massestift PinMode (9, OUTPUT); // Rhythmus-Summer-Erdungsstift solo.begin (6); // Solo-Summer-Signalstift bass.begin (12); // Basssummer-Signalstift rythm.begin (0); // Rhythmus-Summer-Signalstift solo.play (NOTE_D4, t34); switchSoloLed(); warten (allein); solo.play(HINWEIS_D4, t14); switchSoloLed(); wait(solo);}void loop (void){bass.play(NOTE_G3, t); switchBassLed(); rythm.play(HINWEIS_G4, t24); switchRythmLed(); solo.play(HINWEIS_E4, t); switchSoloLed(); warten (Rhythmus); rythm.play(HINWEIS_B4, t14); switchRythmLed(); warten (Rhythmus); rythm.play(HINWEIS_D5, t14); switchRythmLed(); wait(Rhythmus);bass.play(NOTE_B3, t); switchBassLed(); rythm.play(HINWEIS_G4, t24); switchRythmLed(); solo.play(HINWEIS_D4, t); switchSoloLed(); warten (Rhythmus); rythm.play(HINWEIS_B4, t14); switchRythmLed(); warten (Rhythmus); rythm.play(HINWEIS_D5, t14); switchRythmLed(); wait(Rhythmus);bass.play(NOTE_D4, t); switchBassLed(); rythm.play(HINWEIS_G4, t24); switchRythmLed(); solo.play(HINWEIS_G4, t); switchSoloLed(); warten (Rhythmus); rythm.play(HINWEIS_B4, t14); switchRythmLed(); warten (Rhythmus); rythm.play(HINWEIS_D5, t14); switchRythmLed(); wait(Rhythmus);bass.play(NOTE_D4, t); switchBassLed(); rythm.play(HINWEIS_D5, t24); switchRythmLed(); solo.play(HINWEIS_FS4, tt); switchSoloLed(); warten (Rhythmus); rythm.play(HINWEIS_FS5, t14); switchRythmLed(); warten (Rhythmus); rythm.play(HINWEIS_A5, t14); switchRythmLed(); wait(Rhythmus);bass.play(NOTE_FS4, t); switchBassLed(); rythm.play(HINWEIS_D5, t24); switchRythmLed(); warten (Rhythmus); rythm.play(HINWEIS_FS5, t14); switchRythmLed(); warten (Rhythmus); rythm.play(HINWEIS_A5, t14); switchRythmLed(); wait(Rhythmus);bass.play(NOTE_A4, t); switchBassLed(); rythm.play(HINWEIS_D5, t24); switchRythmLed(); solo.play(HINWEIS_D4, t34); switchSoloLed(); warten (Rhythmus); rythm.play(HINWEIS_FS5, t14); switchRythmLed(); warten (Rhythmus); rythm.play(HINWEIS_A5, t14); switchRythmLed(); solo.play(HINWEIS_D4, t14); switchSoloLed(); wait(Rhythmus);bass.play(NOTE_D4, t); switchBassLed(); rythm.play(HINWEIS_D5, t24); switchRythmLed(); solo.play(HINWEIS_E4, t); switchSoloLed(); warten (Rhythmus); rythm.play(HINWEIS_FS5, t14); switchRythmLed(); warten (Rhythmus); rythm.play(HINWEIS_A5, t14); switchRythmLed(); warten (Rhythmus); bass.play(HINWEIS_FS4, t); switchBassLed(); rythm.play(HINWEIS_D5, t24); switchRythmLed(); solo.play(HINWEIS_D4, t); switchSoloLed(); warten (Rhythmus); rythm.play(HINWEIS_FS5, t14); switchRythmLed(); warten (Rhythmus); rythm.play(HINWEIS_A5, t14); switchRythmLed(); warten (Rhythmus); bass.play(HINWEIS_A4, t); switchBassLed(); rythm.play(HINWEIS_D5, t24); switchRythmLed(); solo.play(HINWEIS_A4, t); switchSoloLed(); warten (Rhythmus); rythm.play(HINWEIS_FS5, t14); switchRythmLed(); warten (Rhythmus); rythm.play(HINWEIS_A5, t14); switchRythmLed(); warten (Rhythmus); bass.play(HINWEIS_G3, t); switchBassLed(); rythm.play(HINWEIS_G4, t24); switchRythmLed(); solo.play(HINWEIS_G4, tt); switchSoloLed(); warten (Rhythmus); rythm.play(HINWEIS_B4, t14); switchRythmLed(); warten (Rhythmus); rythm.play(HINWEIS_D5, t14); switchRythmLed(); wait(Rhythmus);bass.play(NOTE_B3, t); switchBassLed(); rythm.play(HINWEIS_G4, t24); switchRythmLed(); warten (Rhythmus); rythm.play(HINWEIS_B4, t14); switchRythmLed(); warten (Rhythmus); rythm.play(HINWEIS_D5, t14); switchRythmLed(); warten (Rhythmus); bass.play(HINWEIS_D4, t); switchBassLed(); rythm.play(HINWEIS_G4, t24); switchRythmLed(); solo.play(HINWEIS_D4, t34); switchSoloLed(); warten (Rhythmus); rythm.play(HINWEIS_B4, t14); switchRythmLed(); warten (Rhythmus); rythm.play(HINWEIS_D5, t14); switchRythmLed(); solo.play(HINWEIS_D4, t14); switchSoloLed(); wait(rhythmus);bass.play(NOTE_G3, t); switchBassLed(); rythm.play(HINWEIS_G4, t24); switchRythmLed(); solo.play(HINWEIS_D5, t); switchSoloLed(); warten (Rhythmus); rythm.play(HINWEIS_B4, t14); switchRythmLed(); warten (Rhythmus); rythm.play(HINWEIS_D5, t14); switchRythmLed(); warten (Rhythmus); bass.play(HINWEIS_B3, t); switchBassLed(); rythm.play(HINWEIS_G4, t24); switchRythmLed(); solo.play(HINWEIS_B4, t); switchSoloLed(); warten (Rhythmus); rythm.play(HINWEIS_B4, t14); switchRythmLed(); warten (Rhythmus); rythm.play(HINWEIS_D5, t14); switchRythmLed(); warten (Rhythmus); bass.play(HINWEIS_D4, t); switchBassLed(); rythm.play(HINWEIS_G4, t24); switchRythmLed(); solo.play(HINWEIS_G4, t); switchSoloLed(); warten (Rhythmus); rythm.play(HINWEIS_B4, t14); switchRythmLed(); warten (Rhythmus); rythm.play(HINWEIS_D5, t14); switchRythmLed(); warten (Rhythmus); bass.play(HINWEIS_C4, t); switchBassLed(); rythm.play(HINWEIS_C5, t24); switchRythmLed(); solo.play(HINWEIS_FS4, t); switchSoloLed(); warten (Rhythmus); rythm.play(HINWEIS_E5, t14); switchRythmLed(); warten (Rhythmus); rythm.play(HINWEIS_G5, t14); switchRythmLed(); warten (Rhythmus); bass.play(HINWEIS_E4, t); switchBassLed(); rythm.play(HINWEIS_C5, t24); switchRythmLed(); solo.play(HINWEIS_E4, t); switchSoloLed(); warten (Rhythmus); rythm.play(HINWEIS_E5, t14); switchRythmLed(); warten (Rhythmus); rythm.play(HINWEIS_G5, t14); switchRythmLed(); warten (Rhythmus); bass.play(HINWEIS_G4, t); switchBassLed(); rythm.play(HINWEIS_C5, t24); switchRythmLed(); solo.play(HINWEIS_C5, t34); switchSoloLed(); warten (Rhythmus); rythm.play(HINWEIS_E5, t14); switchRythmLed(); warten (Rhythmus); rythm.play(HINWEIS_G5, t14); switchRythmLed(); solo.play(HINWEIS_C5, t14); switchSoloLed(); wait(rhythmus);bass.play(NOTE_G3, t); switchBassLed(); rythm.play(HINWEIS_G4, t24); switchRythmLed(); solo.play(HINWEIS_B4, t); switchSoloLed(); warten (Rhythmus); rythm.play(HINWEIS_B4, t14); switchRythmLed(); warten (Rhythmus); rythm.play(HINWEIS_D5, t14); switchRythmLed(); warten (Rhythmus); bass.play(HINWEIS_D3, t); switchBassLed(); rythm.play(HINWEIS_G4, t24); switchRythmLed(); solo.play(HINWEIS_G4, t); switchSoloLed(); warten (Rhythmus); rythm.play(HINWEIS_B4, t14); switchRythmLed(); warten (Rhythmus); rythm.play(HINWEIS_D5, t14); switchRythmLed(); warten (Rhythmus); bass.play(HINWEIS_FS3, t); switchBassLed(); rythm.play(HINWEIS_D5, t24); switchRythmLed(); solo.play(HINWEIS_A4, t); switchSoloLed(); warten (Rhythmus); warten (Rhythmus); rythm.play(HINWEIS_FS5, t14); switchRythmLed(); warten (Rhythmus); rythm.play(HINWEIS_A5, t14); switchRythmLed(); warten (Rhythmus); bass.play(HINWEIS_G3, t); switchBassLed(); rythm.play(HINWEIS_G4, t24); switchRythmLed(); solo.play(HINWEIS_G4, tt); switchSoloLed(); warten (Rhythmus); rythm.play(HINWEIS_B4, t14); switchRythmLed(); warten (Rhythmus); rythm.play(HINWEIS_D5, t14); switchRythmLed(); wait(Rhythmus);bass.play(NOTE_B3, t); switchBassLed(); rythm.play(HINWEIS_G4, t24); switchRythmLed(); warten (Rhythmus); rythm.play(HINWEIS_B4, t14); switchRythmLed(); warten (Rhythmus); rythm.play(HINWEIS_D5, t14); switchRythmLed(); warten (Rhythmus); solo.play(HINWEIS_D4, t34); switchSoloLed(); warten (allein); solo.play(HINWEIS_D4, t14); switchSoloLed(); wait(solo);}
Herstellungsprozess
- CO2-Überwachung mit K30-Sensor
- taubblinde Kommunikation mit 1Sheeld/Arduino
- Münzprüfer mit Arduino steuern
- Blumen - Arduino Nano, CrazyCircuits, DFRobot
- Arduino mit Bluetooth zur Steuerung einer LED!
- Kapazitiver Fingerabdrucksensor mit einem Arduino oder ESP8266
- Mit Nextion Display spielen
- Nunchuk-gesteuerter Roboterarm (mit Arduino)
- Arduino Nano:Steuerung von 2 Schrittmotoren mit Joystick
- Handheld-Geigerzähler mit Arduino Nano