



Italienische Word Clock mit Arduino Nano, NeoPixel, LCD & RTC
Komponenten und Zubehör
| Arduino Nano R3 | × | 1 |
| NeoPixel Strip (144 LEDs) | × | 1 |
| Adafruit Standard LCD 16×2 (Weiß auf Blau) mit I²C-Modul | × | 1 |
| Real Time Clock (RTC) Modul | × | 1 |
| Taster 12 mm (SparkFun) | × | 4 |
| Widerstand 10 kΩ | × | 3 |
| Widerstand 475 Ω | × | 1 |
| 1N4007 Diode (High Voltage/Current) | × | 3 |
| DC-DC Step-Down Converter (einstellbar) | × | 1 |
| IKEA RIBBA Bilderrahmen | × | 1 |
| Gewiss Abdeckkasten 150 × 110 mm | × | 1 |
| Aluminiumstreifen 230 × 10 × 1 mm | × | 1 |
Über dieses Projekt
Meine Leidenschaft für Arduino-Uhren führte mich zur „Word Clock“ – auf Italienisch, da ich in Italien lebe. Inspiriert vom Tutorial „Word Clock Javelin“, mit kleinen Änderungen: „Word Clock of Italy“!
Zusätzlich zur Uhrzeit auf Italienisch zeigt sie Familiengeburtstage (inkl. Katze). Gehäuse: IKEA RIBBA Rahmen, interne Teile aus vorhandenem Material.


Display-Maske: Inkscape-Vorlage. Panel 12×12 Buchstaben, 200 mm Kantenlänge. Ohne 3D-Drucker: Gitter aus Alustreifen, LED-Kontakte mit Klebeschaum isoliert (auch Lichtisolierung).
Elektronische Schaltung


- Zeitbasis: RTC (DS1307/DS3231).
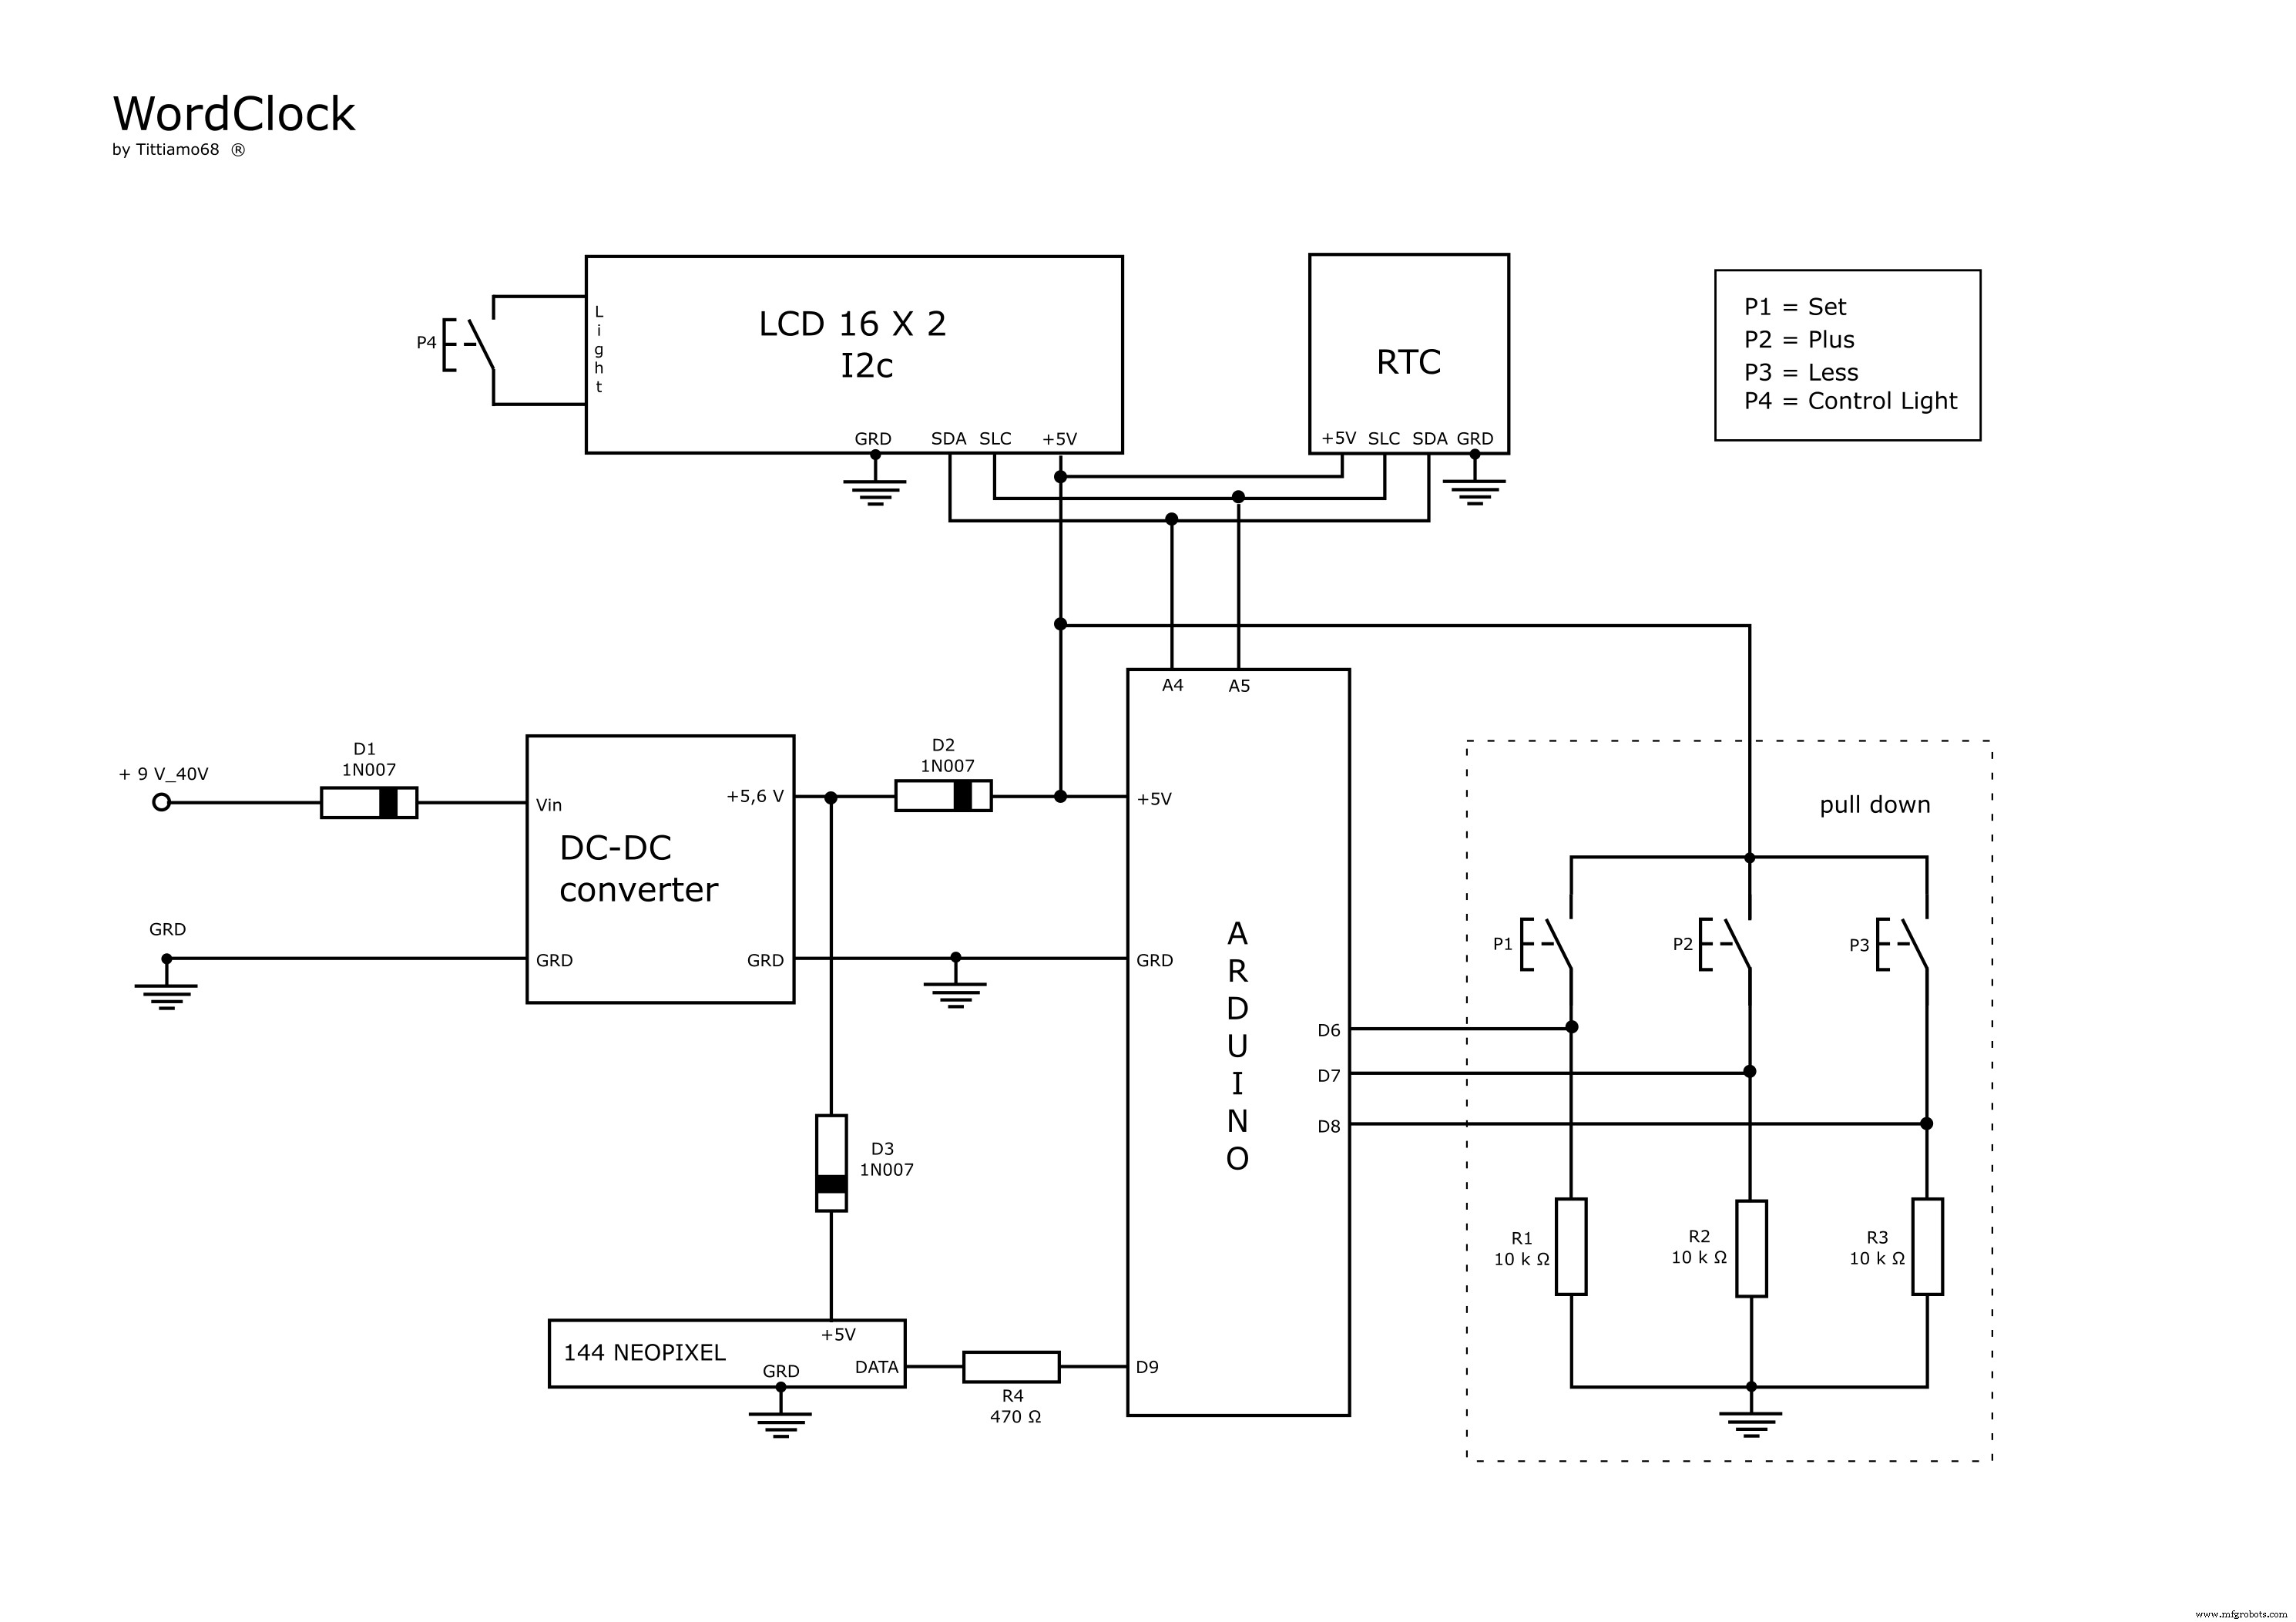
- Zeiteinstellung: 3 Taster (P1=Menü/Set, P2=+, P3=−) + 16×2 LCD (I²C). Pull-Down-Schaltung für Taster.
- Display-Backlight nur bei Bedarf: Jumper durch Taster ersetzt → leuchtet nur während Einstellung.
- Diode D1: Verpolungsschutz.
- Diode D2: Trennt NeoPixel-Strom bei Sketch-Update (Schutz vor Überstrom).
- Diode D3: Senkt Spannung auf 5 V für NeoPixel.
- Schaltplan, Fritzing, PCB-Layout beigefügt.
LED-Matrix


Matrix-Verdrahtung: Zickzack von links oben nach rechts unten durch alle Streifen.
Arduino Bibliotheken
- RTC (RTClib)
- LiquidCrystal_I2C
- Adafruit_NeoPixel
Code-Erklärung
Code in 5 Hauptteile gegliedert:
DisplayDateTime(): Datum/Zeit auf LCDHourClock(): Stunden auf PanelMinuteClock(): Minuten auf PanelAuguri(): GeburtstagsanzeigepaintWord(int arrWord[], uint32_t intColor): Kernfunktion – schaltet LEDs (arrWord) in Farbe (intColor)
Für Minutengenauigkeit: Zahlen 1–4 als progressive Minuten (Modulo 5).
Beispiel: „SONO LE ORE DIECI E VENTI 4“ = 10:24 (10:20 + 4 Min), „SONO LE DIECI MENO QUINDICI 2“ = 09:47 (09:45 + 2 Min).
Montage


- Rahmen öffnen, Glas reinigen
- Acetat-Druck einlegen
- Papier-Druck einlegen
- Alu-Gitter einlegen
- LED-Panel einlegen
- Sperrholzstück (etwas größer als Steuerbox) einlegen
- Steuerbox mit Blechschrauben fixieren
Auf exakte Ausrichtung der beiden Drucke achten!
Platzierung

Im Wohnzimmer – sieht gut aus.
Code
Italian WordClock
Arduino
Vollständiger Code (gekürzt – Download für Vollversion):
/* Project: WordClock
 * Author: Tiziano Bianchettin
 * Date: 25/09/2016
 * Revision: 1
 * License: Public Domain
 * Thanks to: Javelin's Word Clock, arduinoenonsolo, mauroalfieri, danielealberti, maffucci, Prof. Perito Carli
 */
#include <Wire.h>
#include <RTClib.h>
#include <LiquidCrystal_I2C.h>
#include <Adafruit_NeoPixel.h>

#define PIN 9
#define NUM_LEDS 144
#define GIORNO 255
#define SERA 25
Adafruit_NeoPixel strip = Adafruit_NeoPixel(NUM_LEDS, PIN, NEO_GRB + NEO_KHZ800);
int intBrightness;

uint32_t Red = strip.Color(255,0,0);
uint32_t Green = strip.Color(0,255,0);
uint32_t Blue = strip.Color(0,0,255);
uint32_t White = strip.Color(255,255,255);
uint32_t Yellow = strip.Color(255,255,0);
uint32_t Purple = strip.Color(60,0,255);
uint32_t Off = strip.Color(0,0,0);

LiquidCrystal_I2C lcd(0x27,16,2);
RTC_DS1307 RTC;

int P1=6, P2=7, P3=8;
int oraagg, minagg, annoagg, meseagg, dayagg;
int menu = 0;
int ora;

// Wort-LED-Arrays (Indizes 0-143)
int txtSONO[] = {1,2,3,4,6,7,9,10,11,-1};
int txtUNA[] = {20,21,22,-1};
int txtDUE[] = {17,18,19,-1};
int txtTRE[] = {57,58,59,-1};
int txtQUATTRO[] = {96,97,98,99,100,101,102,-1};
int txtCINQUE[] = {30,31,32,33,34,35,-1};
int txtSEI[] = {103,104,105,-1};
int txtSETTE[] = {48,49,50,51,52,-1};
int txtOTTO[] = {72,73,74,75,-1};
int txtNOVE[] = {60,61,62,63,-1};
int txtDIECI[] = {12,13,14,15,16,-1};
int txtUNDICI[] = {84,85,86,87,88,89,-1};
int txtDODOCI[] = {90,91,92,93,94,95,-1};

// Geburtstage
int txtAUGURI[] = {24,25,26,27,28,29,-1};
int txtSIMONE[] = {36,37,38,39,40,41,-1};
int txtJACOPO[] = {42,43,44,45,46,47,-1};
int txtMINU[] = {53,54,55,56,-1};
int txtTIZIANO[] = {65,66,67,68,69,70,71,-1};
int txtMARILENA[] = {76,77,78,79,80,81,82,83,-1};

// Minuten
int txtE[] = {107,-1};
int txtMENO[] = {116,117,118,119,-1};
int txtMUNO[] = {5,-1};
int txtMDUE[] = {64,-1};
int txtMTRE[] = {106,-1};
int txtMQUATTRO[] = {125,-1};
int txtMCINQUE[] = {132,133,134,135,136,137,-1};
int txtMDIECI[] = {120,121,122,123,124,-1};
int txtQUINDICI[] = {108,109,110,111,112,113,114,115,-1};
int txtVENTI[] = {139,140,141,142,143,-1};
int txtTRENTA[] = {126,127,128,129,130,131,-1};

void setup() {
  strip.begin(); strip.show();
  lcd.begin(); lcd.backlight(); lcd.clear();
  pinMode(P1,INPUT); pinMode(P2,INPUT); pinMode(P3,INPUT);
  Serial.begin(9600);
  Wire.begin(); RTC.begin();
  if (!RTC.isrunning()) {
    Serial.println("RTC not running!");
    RTC.adjust(DateTime(__DATE__, __TIME__));
  }
}

void loop() {
  if (digitalRead(P1)) { menu++; }
  if (menu == 0) {
    DisplayDateTime();
    DateTime now = RTC.now();
    intBrightness = (now.hour() >= 19 || now.hour() < 7) ? SERA : GIORNO;
    strip.setBrightness(intBrightness); strip.show();
    int timeMin = now.minute();
    int modMin = timeMin % 5;
    // Minuten-Indikator 1-4 + Farbwechsel
    if (modMin == 0) { paintWord(txtSONO, White); paintWord(txtMQUATTRO, Off); }
    else if (modMin == 1) { paintWord(txtSONO, Yellow); paintWord(txtMUNO, Red); }
    else if (modMin == 2) { paintWord(txtSONO, Green); paintWord(txtMUNO, Off); paintWord(txtMDUE, Blue); }
    else if (modMin == 3) { paintWord(txtSONO, Blue); paintWord(txtMDUE, Off); paintWord(txtMTRE, Green); }
    else if (modMin == 4) { paintWord(txtSONO, Red); paintWord(txtMTRE, Off); paintWord(txtMQUATTRO, Yellow); }
    HourClock(); MinuteClock(); Auguri(); strip.show();
  }
  else if (menu == 1) DisplaySetHour();
  else if (menu == 2) DisplaySetMinute();
  else if (menu == 3) DisplaySetYear();
  else if (menu == 4) DisplaySetMonth();
  else if (menu == 5) DisplaySetDay();
  else if (menu == 6) { StoreAgg(); delay(500); menu = 0; }
  delay(100);
}

// ... (DisplaySetHour, DisplaySetMinute, DisplaySetYear, DisplaySetMonth, DisplaySetDay, StoreAgg,
// HourClock, MinuteClock, Auguri, paintWord, setPixel, showStrip Funktionen folgen)
// Vollständiger Code im Download: Italian_WordClock.ino
Custom Parts & Enclosures
SVG-Vorlage für Displaymaske: wordklock_aWvuaZRw4N.svg
Schaltpläne
Fritzing-Datei: wordklock_JBoZPYrsYr.fzz
Herstellungsprozess
- Smart Thirst Alert: DIY Pflanzen-Alarm für optimale Bewässerung
- DIY Arduino Word Clock – Elegante Wortuhr mit RTC & Schieberegistern
- Präzisions-Wortuhr: Minuten-genaue Zeitanzeige in Worten
- Zuverlässiger Sigfox-kWh-Zähler mit Arduino MKR Fox 1200
- Bluetooth-Temperaturmonitor mit Arduino Nano
- Berührungsloses Gesten-Schloss: Sicherer Zugang mit APDS-9960 & Arduino
- Arduino Nano Begleiter-Set – Essentielle Bauteile & Werkzeuge für DIY-Elektronik
- USB-MIDI-Adapter für Arduino Micro / Leonardo – Komplettes Bauteil-Kit & Code
- Isolierter Analogeingang für Arduino: Spannung/Strom galvanisch trennen
- Präziser Reaktionszeit-Test mit Arduino UNO