



Android-gesteuertes Roboterfahrzeug mit Raspberry Pi Motor Shield
Komponenten und Zubehör
| Android-Gerät | × | 1 |
| Arduino 101 | × | 1 |
| Raspberry Pi 2 Model B | × | 1 |
| DK Electronic Motor Shield | × | 1 |
| Offizieller Raspberry Pi WiFi-Dongle | × | 1 |
| Trust 5 V Powerbank | × | 1 |
Apps und Online-Dienste
- Microsoft Windows 10 IoT Core
- Arduino IDE
- Microsoft Visual Studio 2015
Über dieses Projekt
Am Ende steuern wir ein Geländefahrzeug per Android-Gerät (Beschleunigungssensor).
Hardware: Motor Shield, Raspberry Pi, Arduino, DC-Motoren.
SCHRITT 1: I2C-Bus zwischen Raspberry Pi und Arduino
Warum I2C? Siehe Link. Code für Arduino (I2C Slave + Motor Shield):
#include <Wire.h>
#define MyAddress 0x40
#include <AFMotor.h>
AF_DCMotor motorhiz(3); // Geschwindigkeit
AF_DCMotor motoryon(4); // Richtung
byte DataToBeSend[1];
byte ReceivedData;
int counter = 0;

void setup() {
  Serial.begin(9600);
  Wire.begin(MyAddress);
  Wire.onReceive(I2CReceived);
  Wire.onRequest(I2CRequest);
  motorhiz.setSpeed(254);
  motorhiz.run(RELEASE);
  motoryon.setSpeed(254);
  motoryon.run(RELEASE);
}

void loop() {
  // DataToBeSend[0] = (DataToBeSend[0] >= 99) ? 0 : DataToBeSend[0] + 1;
}

void I2CReceived(int NumberOfBytes) {
  ReceivedData = Wire.read();
  int ReceivedDataInt = (int)ReceivedData;
  String ReceivedDataStr = String(ReceivedData);
  Serial.println(ReceivedDataInt);

  if (ReceivedDataInt >= 100) { // X-Daten (Geschwindigkeit)
    Serial.println("DataX :" + ReceivedDataStr);
    if (ReceivedDataInt > 145 && ReceivedDataInt < 154) {
      Serial.println("RELEASE"); motorhiz.run(RELEASE);
    } else if (ReceivedDataInt >= 100 && ReceivedDataInt < 104) {
      Serial.println("RELEASE"); motorhiz.run(RELEASE);
    } else if (ReceivedDataInt >= 155) { // Rückwärts
      ReceivedDataInt -= 155;
      int motorSpeed = (ReceivedDataInt * 10) + 50;
      if (motorSpeed > 254) motorSpeed = 254;
      motorhiz.setSpeed(motorSpeed);
      motorhiz.run(BACKWARD);
      Serial.println("MotorHiz :" + String(motorSpeed));
    } else if (ReceivedDataInt >= 105) { // Vorwärts
      ReceivedDataInt -= 105;
      int motorSpeed = (ReceivedDataInt * 10) + 50;
      if (motorSpeed > 254) motorSpeed = 254;
      motorhiz.setSpeed(motorSpeed);
      motorhiz.run(FORWARD);
      Serial.println("MotorHiz :" + String(motorSpeed));
    }
  } else { // Y-Daten (Lenkung)
    Serial.println("DataY :" + ReceivedDataStr);
    if (ReceivedDataInt > 45 && ReceivedDataInt < 54) {
      Serial.println("RELEASE"); motoryon.run(RELEASE);
    } else if (ReceivedDataInt >= 0 && ReceivedDataInt < 4) {
      Serial.println("RELEASE"); motoryon.run(RELEASE);
    } else if (ReceivedDataInt >= 55) { // Links
      ReceivedDataInt -= 55;
      int motorSpeed = (ReceivedDataInt * 12) + 50;
      if (motorSpeed > 254) motorSpeed = 254;
      motoryon.setSpeed(motorSpeed);
      motoryon.run(BACKWARD);
      Serial.println("MotorHiz :" + String(motorSpeed));
    } else if (ReceivedDataInt >= 5) { // Rechts
      ReceivedDataInt -= 5;
      int motorSpeed = (ReceivedDataInt * 12) + 50;
      if (motorSpeed > 254) motorSpeed = 254;
      motoryon.setSpeed(motorSpeed);
      motoryon.run(FORWARD);
      Serial.println("MotorHiz :" + String(motorSpeed));
    }
  }
}

void I2CRequest() {
  // Wire.write(DataToBeSend, 1);
}

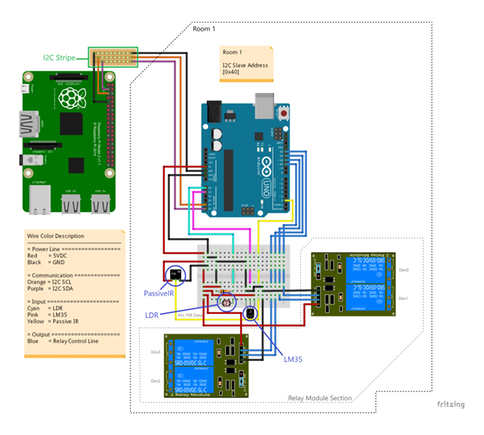
I2C-Pinbelegung für Kommunikation Arduino ↔ Raspberry Pi. Externe Stromversorgung für Arduino nicht nötig – Arduino wird über Raspberry Pi Vout versorgt.
SCHRITT 2: Raspberry Pi Code (Webserver)
Code für Raspberry Pi (Webserver), der Daten via I2C an Arduino sendet. Siehe Code-Sektion unten.
SCHRITT 3: Android App (Visual Studio Cordova)
Android-App sendet Beschleunigungssensordaten per AJAX an Webserver (Raspberry Pi). Code in Code-Sektion.
Kurzfassung
- Android-App sendet Beschleunigungssensordaten an Webserver (Raspberry Pi).
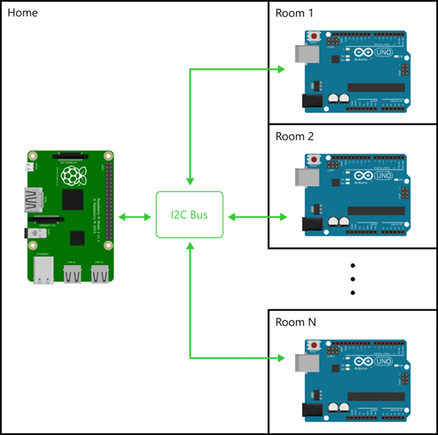
- Webserver leitet Daten via I2C an Arduino weiter.
- Arduino verarbeitet Daten und steuert Motoren per Motor Shield.
Code
Wire.h I2C Communication & Motor Shield (Arduino)
Arduino
I2C-Kommunikation zwischen Arduino und Raspberry Pi. Serielle Kommunikation mit minimalen I/O-Ressourcen.
#include <Wire.h>
#define MyAddress 0x40
#include <AFMotor.h>
AF_DCMotor motorhiz(3);
AF_DCMotor motoryon(4);
byte DataToBeSend[1];
byte ReceivedData;
int counter = 0;

void setup() {
  Serial.begin(9600);
  Wire.begin(MyAddress);
  Wire.onReceive(I2CReceived);
  Wire.onRequest(I2CRequest);
  motorhiz.setSpeed(254);
  motorhiz.run(RELEASE);
  motoryon.setSpeed(254);
  motoryon.run(RELEASE);
}

void loop() {}

void I2CReceived(int NumberOfBytes) {
  ReceivedData = Wire.read();
  int ReceivedDataInt = (int)ReceivedData;
  String ReceivedDataStr = String(ReceivedData);
  Serial.println(ReceivedDataInt);
  if (ReceivedDataInt >= 100) { // X Data
    Serial.println("DataX :" + ReceivedDataStr);
    if (ReceivedDataInt > 145 && ReceivedDataInt < 154) {
      Serial.println("RELEASE"); motorhiz.run(RELEASE);
    } else if (ReceivedDataInt >= 100 && ReceivedDataInt < 104) {
      Serial.println("RELEASE"); motorhiz.run(RELEASE);
    } else if (ReceivedDataInt >= 155) {
      ReceivedDataInt -= 155;
      int motorSpeed = (ReceivedDataInt * 10) + 50;
      if (motorSpeed > 254) motorSpeed = 254;
      motorhiz.setSpeed(motorSpeed);
      motorhiz.run(BACKWARD);
      Serial.println("MotorHiz :" + String(motorSpeed));
    } else if (ReceivedDataInt >= 105) {
      ReceivedDataInt -= 105;
      int motorSpeed = (ReceivedDataInt * 10) + 50;
      if (motorSpeed > 254) motorSpeed = 254;
      motorhiz.setSpeed(motorSpeed);
      motorhiz.run(FORWARD);
      Serial.println("MotorHiz :" + String(motorSpeed));
    }
  } else { // Y Data
    Serial.println("DataY :" + ReceivedDataStr);
    if (ReceivedDataInt > 45 && ReceivedDataInt < 54) {
      Serial.println("RELEASE"); motoryon.run(RELEASE);
    } else if (ReceivedDataInt >= 0 && ReceivedDataInt < 4) {
      Serial.println("RELEASE"); motoryon.run(RELEASE);
    } else if (ReceivedDataInt >= 55) {
      ReceivedDataInt -= 55;
      int motorSpeed = (ReceivedDataInt * 12) + 50;
      if (motorSpeed > 254) motorSpeed = 254;
      motoryon.setSpeed(motorSpeed);
      motoryon.run(BACKWARD);
      Serial.println("MotorHiz :" + String(motorSpeed));
    } else if (ReceivedDataInt >= 5) {
      ReceivedDataInt -= 5;
      int motorSpeed = (ReceivedDataInt * 12) + 50;
      if (motorSpeed > 254) motorSpeed = 254;
      motoryon.setSpeed(motorSpeed);
      motoryon.run(FORWARD);
      Serial.println("MotorHiz :" + String(motorSpeed));
    }
  }
}

void I2CRequest() {
  // Wire.write(DataToBeSend, 1);
}
Android Remote Controller
C#
Download only – keine Vorschau.
Windows IoT Web Server
C#
Download only – keine Vorschau.
Custom Parts & Enclosures
Arduino ↔ Raspberry Pi Verdrahtungsdiagramm
Schaltpläne
Details: Hackster.io Projekt
Herstellungsprozess
- LED mit PIR-Bewegungsmelder am Raspberry Pi steuern
- Intelligenten Roboter mit Bridge Shield bauen – Raspberry Pi & Arduino Integration
- Bluetooth-gesteuerter Raspberry Pi Roboter mit Audio-Feedback bauen
- Internet-gesteuerter Video-Streaming-Roboter mit Arduino & Raspberry Pi bauen
- Gesten-gesteuerter Roboter mit Raspberry Pi
- WLAN-gesteuerter Roboter mit Raspberry Pi & Android Smartphone bauen
- WLAN-gesteuerter Raspberry Pi Roboter mit Python bauen – Schritt-für-Schritt
- Arduino-Uno-Roboter zur Personenerkennung – Sensorintegration Schritt für Schritt
- Bluetooth-gesteuerter Arduino-Spybot bauen – Überwachungsroboter mit IP-Kamera
- Universelle Android-Fernbedienung mit Arduino, 1Sheeld & IR-Steuerung