



Tetris-Spiel mit Arduino Nano auf selbstgebauter 16×8 LED-Matrix
Komponenten und Zubehör
| Arduino Nano R3 | × | 1 |
| Taster 12 mm (SparkFun) | × | 4 |
| Shift Register 74HC595 (Serial zu Parallel) | × | 2 |
| Schiebeschalter | × | 1 |
| 5 mm LED Gelb | × | 128 |
Benötigte Werkzeuge
- Lötkolben
Apps & Online-Dienste
- Arduino IDE
Über dieses Projekt
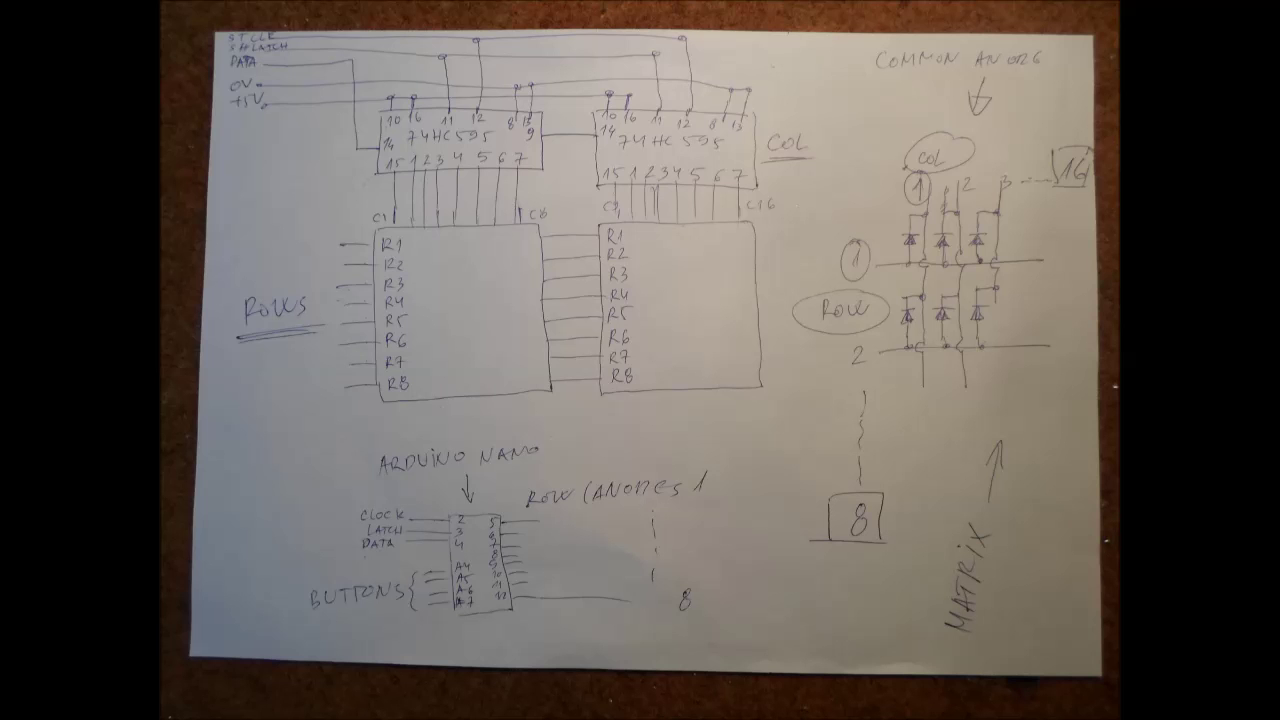
Dieses Tetris-Spiel läuft auf einer selbstgelöteten 16×8 LED-Matrix (128 LEDs), gesteuert von einem Arduino Nano und zwei 74HC595 Schieberegistern. Tastendrücke werden per Piezo-Summer akustisch bestätigt.
Code
Tetris v2 (Arduino)
Author: Jae Yeong Bae | UBC ECE | jocker.tistory.com | Datum: 18.01.2013
Änderungen v2: Punktestand bei Game Over anzeigen
/* Pinbelegung:
   Latch = 3, Clock = 2, Data = 4
   Row Anodes = 5 bis 13 (8 Pins)
   Buttons (analog): A4=Links, A5=Runter, A6=Rechts, A7=Hoch (Drehen)
*/

unsigned char latchPin = 3;
unsigned char clockPin = 2;
unsigned char dataPin = 4;
unsigned char rowPin = 5;
long delays = 0;
short delay_ = 500;
long bdelay = 0;
short buttondelay = 150;
short btdowndelay = 30;
short btsidedelay = 80;
unsigned char blocktype;
unsigned char blockrotation;
int lines = 0;
boolean block[8][18];  // 2 extra für Rotation
boolean pile[8][16];
boolean disp[8][16];
boolean lib[10][5][7]; // Ziffern-Bibliothek für Score-Anzeige

void setup() {
  // Ziffern-Muster definieren (0-9)
  // ... (Initialisierung lib Array) ...

  int seed = (analogRead(0)+1) * (analogRead(1)+1) * (analogRead(2)+1) * (analogRead(3)+1);
  randomSeed(seed);
  random(10,9610806);
  seed = seed * random(3336,15679912) + analogRead(random(4));
  randomSeed(seed);
  random(10,98046);

  cli(); // Interrupts stoppen
  // Timer1 auf 2 kHz konfigurieren
  TCCR1A = 0; TCCR1B = 0; TCNT1 = 0;
  OCR1A = 259; // (16MHz)/(2000*64)-1
  TCCR1B |= (1 << WGM12); // CTC Modus
  TCCR1B |= (1 << CS12) | (1 << CS10); // 1024 Prescaler
  TIMSK1 |= (1 << OCIE1A); // Compare Match Interrupt
  sei(); // Interrupts erlauben

  pinMode(latchPin, OUTPUT);
  pinMode(clockPin, OUTPUT);
  pinMode(dataPin, OUTPUT);
  pinMode(A7, INPUT); // Hoch
  pinMode(A6, INPUT); // Rechts
  pinMode(A5, INPUT); // Links
  pinMode(A4, INPUT); // Runter
  for(int i=0;i<8;i++) pinMode(rowPin+i, OUTPUT);

  newBlock();
  updateLED();
  Serial.begin(9600);
}

void loop() {
  if (delays < millis()) {
    delays = millis() + delay_;
    movedown();
  }

  int button = readBut();
  if (button == 1) rotate();      // Hoch = Drehen
  if (button == 2) moveright();   // Rechts
  if (button == 3) moveleft();    // Links
  if (button == 4) movedown();    // Runter
}

boolean moveleft() {
  if (space_left()) {
    for(int i=0;i<7;i++) for(int j=0;j<16;j++) block[i][j]=block[i+1][j];
    for(int j=0;j<16;j++) block[7][j]=0;
    updateLED(); return 1;
  } return 0;
}

boolean moveright() {
  if (space_right()) {
    for(int i=7;i>0;i--) for(int j=0;j<16;j++) block[i][j]=block[i-1][j];
    for(int j=0;j<16;j++) block[0][j]=0;
    updateLED(); return 1;
  } return 0;
}

int readBut() {
  if (bdelay > millis()) return 0;
  if (analogRead(A4) > 500) { bdelay = millis() + btsidedelay; return 3; } // Links
  if (analogRead(A5) > 500) { bdelay = millis() + btdowndelay; return 4; } // Runter
  if (analogRead(A6) > 500) { bdelay = millis() + btsidedelay; return 2; } // Rechts
  if (analogRead(A7) > 500) { bdelay = millis() + buttondelay; return 1; } // Hoch
  return 0;
}

void updateLED() {
  for(int i=0;i<8;i++) for(int j=0;j<16;j++) disp[i][j] = block[i][j] | pile[i][j];
}

// Rotation, movedown, check_overlap, check_gameover, gameover, newBlock,
// space_below, space_left/right (und Varianten), LEDRefresh ISR
// ... (vollständiger Code im Download)
Schaltplan
Digitales Stadiometer bauen: Körpergröße messen mit Arduino & Lasersensor VL53L0X
Smart IoT-Glas bauen: Füllstand überwachen mit ESP8266, Arduino & Ultraschall
Herstellungsprozess
- Echtzeit-Gyroskop-Spiel mit Arduino Nano & MPU-6050
- Arduino Digitaler Würfel: LCD-Würfel mit Zufallszahlen (1–6)
- DIY Arduino TV-B-Gone: Universelle TV-Aus-Fernbedienung
- DIY Arduino USB Gaming Controller – Bauen Sie Ihren eigenen High-Performance Gamepad
- 24×16 LED Pong-Konsole mit Arduino Nano & MAX7219 bauen
- Pixel Chaser: Interaktives One-Tap-LED-Spiel mit Arduino Nano
- Arduino Flip Clock mit 8×8 LED-Matrix – DIY Echtzeituhr-Projekt
- NeoPixel-Matrix Pong auf Arduino Nano: Neon-Pong selbst bauen
- Handheld Geigerzähler mit Arduino Nano selbst bauen
- Never Ride Alone – Smarter Fahrrad-Sicherheitsbegleiter mit Sigfox & GPS