



Arduino-Tennisspiel – Virtueller Schläger mit NeoPixel, Sensoren & Bluetooth
Komponenten und Zubehör
| Bauteil | Menge |
|---|---|
| Arduino Nano R3 | 2 |
| SparkFun 9DoF Sensor Stick | 1 |
| Jumper-Wires (generisch) | 1 |
| NeoPixel-Stripe | 1 |
| HC-05 Bluetooth-Modul | 1 |
| 9 V Blockbatterie | 1 |
Benötigte Werkzeuge
- Lötkolben (generisch)
Apps & Online-Dienste
- Arduino IDE
Projektbeschreibung
Das Projekt besteht aus drei Teilen: Spielfeld/Anzeige (NeoPixel-Matrix), Schläger (Controller) und Master-Router (Python-Skript am Host-PC).
Teil 1 – Die Anzeige
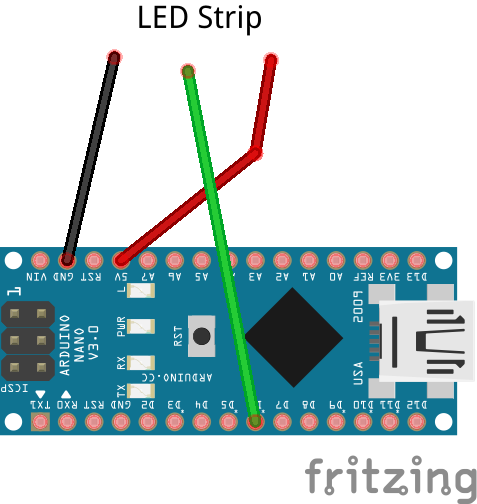
Eine 15×10 NeoPixel-Matrix wird von einem Arduino Nano gesteuert. Sie übernimmt die Spiellogik und empfängt Eingaben vom Python-Skript. Ein Ball wird dargestellt, der größer wird und sich dem Spieler nähert (Tiefe-Illusion). Wird der Ball getroffen, fliegt er „weg“ vom Spieler.

Punkte
Richtung (links/rechts) wechselt bei jedem Schlag. Verfehlt der Spieler, punktet der COM; verfehlt der COM (25 % Chance), punktet der Spieler – ähnlich wie Wii Sports Tennis. Punkte werden angezeigt, wenn der COM punktet.

Highscore
Der Highscore wird in einem I2C-EEPROM (Adresse 0x04) gespeichert. Bei neuem Rekord wird überschrieben. Bei 10 COM-Punkten ist Game Over. Logik-Diagramm:

Matrix bauen
Der Aufbau der Matrix erfordert Zeit – folgen Sie der Anleitung.


Teil 2 – Der Controller (Schläger)
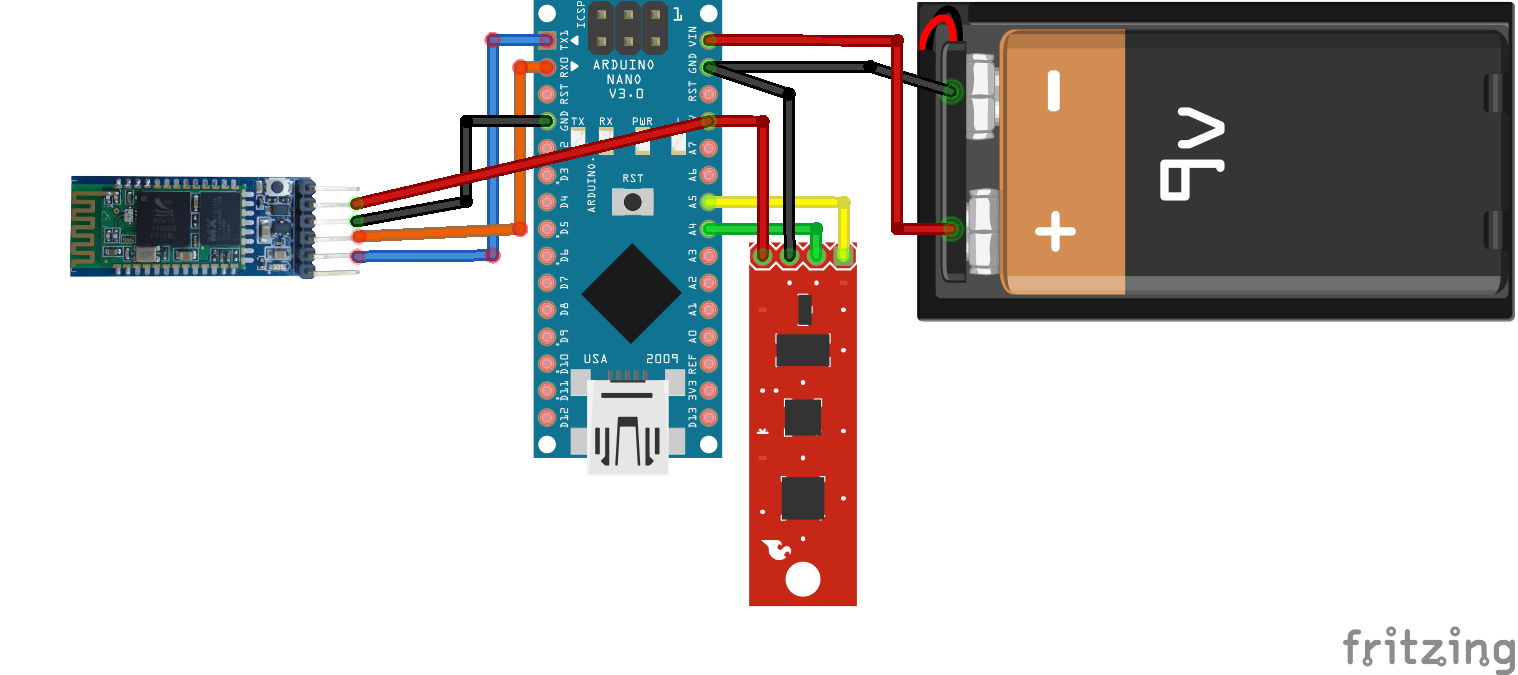
Zweiter Arduino Nano mit 9DoF-Stick (nur 3,3 V!) und HC-05 BLE-Modul. Überschreitet die Beschleunigung auf X- oder Y-Achse einen Schwellwert (1,5 g), sendet er ‚1‘ per Serial an den Host-PC, der es an die Matrix weiterleitet. Bibliothek: SparkFun LSM9DS1. Stromversorgung über 9 V Block an Vin-Pin (nicht 5 V!).

Bluetooth-Kommunikation
Schläger und Matrix sprechen nicht direkt miteinander. Ein Python-Skript relayt die serielle Bluetooth-Verbindung (COM-Port des Schlägers) an den COM-Port der Matrix. Beide Systeme reseten beim Öffnen der Ports – das Skript synchronisiert sie. Entprellung: 1 s, um Pufferüberlauf zu vermeiden (32 Byte Puffer).
Der Schläger – Bauanleitung
Karton-Schlägerform, weißes Papier, Design aufmalen. Bildergalerie:


Code
Matrix Code (C/C++)
#include <Adafruit_GFX.h>
#include <Adafruit_NeoMatrix.h>
#include <Adafruit_NeoPixel.h>
#include <Wire.h>
#include <EEPROM.h>

#define PIN 6
#define EEPROM_ADR 0x50
#define HS_ADR 0x02
#define NOTE_C1 33
#define SPKR_PIN 3

Adafruit_NeoMatrix matrix = Adafruit_NeoMatrix(15, 10, PIN,
  NEO_MATRIX_BOTTOM + NEO_MATRIX_LEFT + NEO_MATRIX_COLUMNS + NEO_MATRIX_ZIGZAG,
  NEO_GRB + NEO_KHZ800);

int ball_x = 7, ball_y = 2, radius = 1, r_incr = 1;
bool isSwung = false;
int ball_x_dir = 1, ball_y_dir = 1;
bool isDirRight = true;
int score = 0, COM_score = 0, highscore = 0;
int framerate = 50;
int serial_data;
String score_string = "";
uint16_t colors[] = {matrix.Color(255,0,0), matrix.Color(0,255,0), matrix.Color(150,200,0)};
int melody[] = {0};
int tempo[] = {0};
static unsigned long lastFrame = 0;

void setup() {
  Serial.begin(9600);
  matrix.begin();
  matrix.fillScreen(0);
  matrix.setTextColor(colors[1]);
  randomSeed(analogRead(A2));
  display_scores();
  highscore = read_HS();
  Serial.println(highscore, DEC);
  matrix.setCursor(0,1); matrix.print("HS: "); matrix.show(); delay(1000);
  matrix.fillScreen(0); matrix.setCursor(0,1); matrix.print(highscore,DEC); matrix.show(); delay(1000);
  score_string = "";
}

void loop() {
  if ((lastFrame + framerate) < millis()) {
    update_frame();
    lastFrame = millis();
  }
}

void update_frame() {
  serial_data = Serial.parseInt();
  if (serial_data) isSwung = true;
  else isSwung = false;

  if (ball_y >= 5 && ball_y < 7 && isSwung) {
    if (isDirRight) { ball_x_dir = -1; ball_y_dir = -1; }
    else { ball_x_dir = 1; ball_y_dir = -1; }
    r_incr = -1;
  } else if (ball_y >= 8) {
    COM_score += 1; end_round();
  } else if (ball_y <= 2) {
    isDirRight = !isDirRight;
    int randNum = random(4);
    Serial.println(randNum);
    if (randNum == 2) { // 25% COM verfehlt
      score += 1;
      if (score > highscore) write_HS();
      end_round();
    } else {
      if (isDirRight) { ball_x_dir = 1; ball_y_dir = 1; }
      else { ball_x_dir = -1; ball_y_dir = 1; }
      r_incr = 1;
    }
  }
  ball_x += ball_x_dir;
  ball_y += ball_y_dir;
  radius += r_incr;
  matrix.fillScreen(0);
  matrix.fillCircle(ball_x, ball_y, radius, colors[2]);
  matrix.show();
}

void end_round() {
  if (COM_score >= 10) end_game();
  isDirRight = true; r_incr = 1; ball_x_dir = 1; ball_y_dir = 1;
  ball_x = 7; ball_y = 2; radius = 1;
  display_scores();
  matrix.fillScreen(0);
  matrix.fillCircle(ball_x, ball_y, radius, colors[2]);
  matrix.show();
}

void end_game() {
  matrix.fillScreen(0);
  matrix.setCursor(0,1); matrix.setTextColor(colors[0]);
  matrix.drawLine(3,0,12,9,colors[0]);
  matrix.drawLine(11,0,2,9,colors[0]);
  matrix.show(); delay(500);
  while(1) {}
}

void display_scores() {
  matrix.fillScreen(0);
  matrix.setTextColor(colors[1]);
  matrix.setCursor(0,1);
  score_string = String(score) + "-" + String(COM_score);
  scrollText(score_string);
  matrix.fillScreen(0); delay(2000); matrix.show();
}

void scrollText(String text) {
  int x = matrix.width();
  for (int i=0; i<24; i++) {
    matrix.fillScreen(0);
    matrix.setCursor(x,2); matrix.print(text);
    x -= 1; matrix.show(); delay(150);
  }
}

void write_HS() { EEPROM.write(0x04, int(score)); }
int read_HS() { return EEPROM.read(0x04); }
Racquet Code (C/C++)
#include <Wire.h>
#include <SPI.h>
#include <SparkFunLSM9DS1.h>

LSM9DS1 imu;
#define LSM9DS1_M 0x1E
#define LSM9DS1_AG 0x6B
#define PRINT_SPEED 10

static unsigned long lastPrint = 0;
float accelx = 0, accely = 0;

void setup() {
  Serial.begin(9600);
  imu.settings.device.commInterface = IMU_MODE_I2C;
  imu.settings.device.mAddress = LSM9DS1_M;
  imu.settings.device.agAddress = LSM9DS1_AG;
  if (!imu.begin()) { while(1); }
}

void loop() {
  if ((lastPrint + PRINT_SPEED) < millis()) {
    if (imu.accelAvailable()) imu.readAccel();
    lastPrint = millis();
  }
  accelx = imu.calcAccel(imu.ax);
  accely = imu.calcAccel(imu.ay);
  if (accelx <= -1.5 || accelx >= 1.5) { Serial.print(1); delay(600); }
  else if (accely <= -1.5 || accely >= 1.5) { Serial.print(1); delay(600); }
}
Python Code
import serial, time
matrix_port = "COM3"
raquet_port = "COM9"
matrix = serial.Serial(matrix_port, 9600)
racquet = serial.Serial(raquet_port, 9600)
time.sleep(10)
while 1:
  data = racquet.read()
  print(data)
  if data == "1":
    print("hit")
    matrix.write("1")
    time.sleep(1)
  time.sleep(0.05)
Schaltpläne
Herstellungsprozess
- TinyML Spracherkennung mit Edge Impulse auf Arduino Nano 33 BLE Sense
- Echtzeit-Gyroskop-Spiel mit Arduino Nano & MPU-6050
- Arduino Digitaler Würfel: LCD-Würfel mit Zufallszahlen (1–6)
- Arduino Iron Man bauen: Komponenten, Sensoren & Schritt-für-Schritt-Anleitung
- Find Me: Smarter Gegenstands-Finder mit Arduino und Bluetooth
- DIY Arduino Luftbefeuchter-Steuerung mit Relais – Sichere Hochspannungs-Installation
- Echtzeit-Entfernungsmessung mit Arduino Sonar & Processing-Visualisierung
- MobBob: Eigenen Arduino-Roboter bauen, per Android-Smartphone steuern
- Audio-reaktive Schreibtischlampe mit Arduino Nano bauen
- NeoPixel-Matrix Pong auf Arduino Nano: Neon-Pong selbst bauen