


Arduino-Touchscreen-Tutorial | TFT-LCD
In diesem Arduino-Touchscreen-Tutorial lernen wir, wie man den TFT-LCD-Touchscreen mit Arduino verwendet. Sie können sich das folgende Video ansehen oder das schriftliche Tutorial unten lesen.
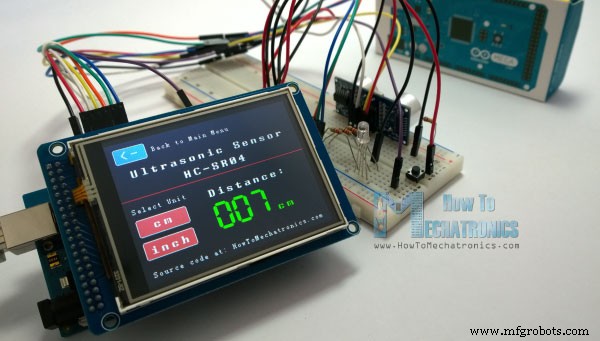
Für dieses Tutorial habe ich drei Beispiele zusammengestellt. Das erste Beispiel ist die Abstandsmessung mittels Ultraschallsensor. Die Ausgabe des Sensors oder der Abstand wird auf dem Bildschirm ausgedruckt und über den Touchscreen können wir die Einheiten auswählen, entweder Zentimeter oder Zoll.
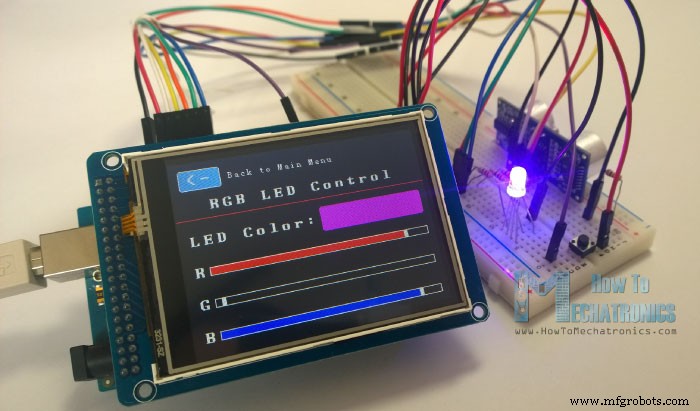
Das nächste Beispiel steuert eine RGB-LED mit diesen drei RGB-Schiebereglern. Wenn wir zum Beispiel anfangen, den blauen Schieberegler zu verschieben, leuchtet die LED blau und erhöht das Licht, wenn wir auf den Maximalwert gehen würden. Die Schieberegler können sich also von 0 bis 255 bewegen und mit ihrer Kombination können wir jede Farbe für die RGB-LED einstellen, aber denken Sie daran, dass die LED die Farben nicht so genau darstellen kann.
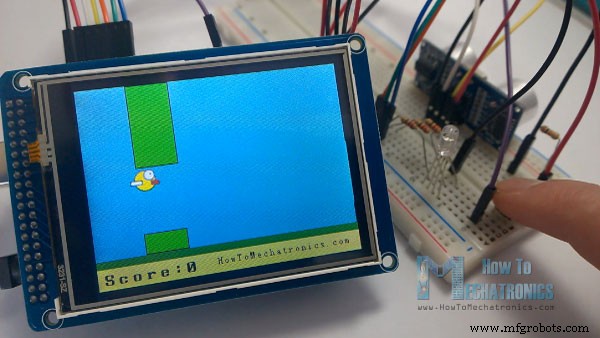
Das dritte Beispiel ist ein Spiel. Eigentlich ist es eine Nachbildung des beliebten Flappy Bird-Spiels für Smartphones. Wir können das Spiel mit der Drucktaste oder sogar mit dem Touchscreen selbst spielen.
Jetzt gehen wir jedes dieser Beispiele durch und erklären Schritt für Schritt die Codes dahinter.
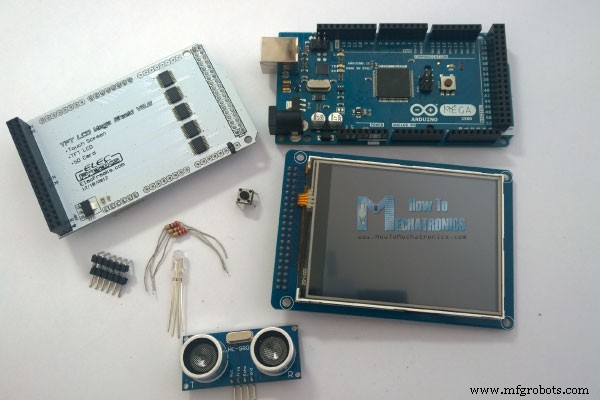
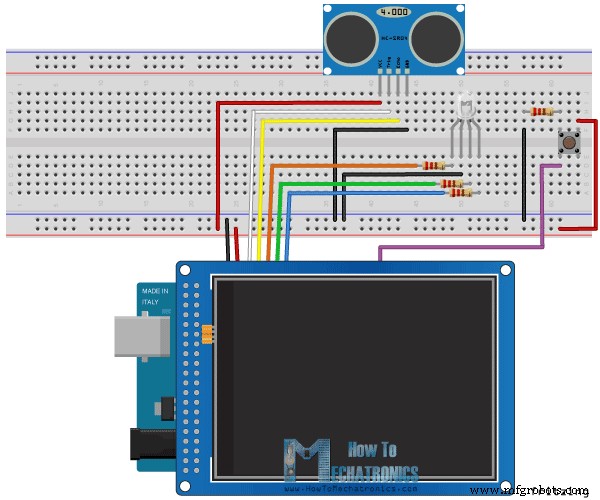
Als Beispiel verwende ich einen 3,2“ TFT Touchscreen in Kombination mit einem TFT LCD Arduino Mega Shield. Wir brauchen eine Abschirmung, weil der TFT-Touchscreen mit 3,3 V arbeitet und die Ausgänge des Arduino Mega 5 V betragen. Für das erste Beispiel habe ich den HC-SR04-Ultraschallsensor, dann für das zweite Beispiel eine RGB-LED mit drei Widerständen und einem Taster zum Spielbeispiel. Außerdem musste ich eine maßgeschneiderte Stiftleiste wie diese herstellen, indem ich Stiftleisten lötete und an ihnen biegte, damit ich sie zwischen das Arduino-Board und das TFT-Schild einfügen konnte.
Sie können diese Komponenten von einer der folgenden Websites beziehen:
Hier ist der Schaltplan. Wir werden den GND-Pin, die digitalen Pins von 8 bis 13 sowie die Pin-Nummer 14 verwenden. Da die 5-V-Pins bereits vom TFT-Bildschirm verwendet werden, werde ich die Pin-Nummer 13 als VCC verwenden, indem ich sie gleich hoch setze im Setup-Abschnitt des Codes.
Da der Code etwas länger ist und zum besseren Verständnis werde ich den Quellcode des Programms in Abschnitten mit Beschreibung für jeden Abschnitt veröffentlichen. Und am Ende dieses Artikels werde ich den vollständigen Quellcode posten.
Ich werde die UTFT- und URTouch-Bibliotheken von Henning Karlsen verwenden. An dieser Stelle möchte ich ihm für die unglaubliche Arbeit danken, die er geleistet hat. Die Bibliotheken ermöglichen eine wirklich einfache Verwendung der TFT-Bildschirme und funktionieren mit vielen verschiedenen TFT-Bildschirmgrößen, Shields und Controllern. Sie können diese Bibliotheken von seiner Website RinkyDinkElectronics.com herunterladen und finden dort auch viele Demo-Beispiele und eine detaillierte Dokumentation zu ihrer Verwendung.
Nachdem wir die Bibliotheken eingebunden haben, müssen wir UTFT- und URTouch-Objekte erstellen. Die Parameter dieser Objekte hängen vom Modell des TFT-Bildschirms und des Schilds ab und diese Details können auch in der Dokumentation der Bibliotheken gefunden werden.
Als nächstes müssen wir die Schriftarten definieren, die mit den Bibliotheken geliefert werden, und auch einige Variablen definieren, die für das Programm benötigt werden. Im Setup-Abschnitt müssen wir den Bildschirm und die Berührung initiieren, die Pin-Modi für den angeschlossenen Sensor, die LED und die Schaltfläche definieren und zunächst die benutzerdefinierte Funktion drawHomeSreen() aufrufen, die den Startbildschirm des Programms zeichnet.
Also werde ich jetzt erklären, wie wir den Startbildschirm des Programms erstellen können. Mit der Funktion setBackColor() müssen wir die Hintergrundfarbe des Textes setzen, in unserem Fall schwarz. Dann müssen wir die Farbe auf Weiß setzen, die große Schriftart einstellen und mit der Funktion print () die Zeichenfolge „Arduino TFT Tutorial“ in der Mitte des Bildschirms und 10 Pixel entlang der Y-Achse des Bildschirms drucken. Als nächstes setzen wir die Farbe auf Rot und zeichnen die rote Linie unter dem Text. Danach müssen wir die Farbe wieder auf Weiß zurücksetzen und die beiden anderen Zeichenfolgen „von HowToMechatronics.com“ in kleiner Schrift und „Beispiel auswählen“ in großer Schrift drucken.
Als nächstes ist die Schaltfläche für den Abstandssensor. Zuerst müssen wir die Farbe festlegen und dann mit der Funktion fillRoundRect() das abgerundete Rechteck zeichnen. Dann setzen wir die Farbe wieder auf Weiß und zeichnen mit der Funktion drawRoundRect() ein weiteres abgerundetes Rechteck über das vorherige, aber dieses wird ohne Füllung sein, sodass das Gesamterscheinungsbild der Schaltfläche so aussieht, als hätte sie einen Rahmen . Über der Schaltfläche drucken wir den Text mit der großen Schriftart und der gleichen Hintergrundfarbe wie die Füllung der Schaltfläche. Das gleiche Verfahren gilt für die beiden anderen Schaltflächen.
Jetzt müssen wir die Schaltflächen funktionsfähig machen, damit sie uns beim Drücken zum entsprechenden Beispiel schicken. Im Setup-Bereich setzen wir das Zeichen „0“ auf die Variable „currentPage“, was anzeigt, dass wir uns auf dem Startbildschirm befinden. Also, wenn das wahr ist, und wenn wir auf den Bildschirm drücken, würde diese if-Anweisung wahr werden, und wenn wir diese Zeilen hier verwenden, erhalten wir die X- und Y-Koordinaten, wo der Bildschirm gedrückt wurde. Wenn dies der Bereich ist, der die erste Schaltfläche abdeckt, rufen wir die benutzerdefinierte Funktion drawDistanceSensor() auf, die das Beispiel des Abstandssensors aktiviert. Außerdem setzen wir das Zeichen „1“ auf die Variable currentPage, was anzeigt, dass wir uns beim ersten Beispiel befinden. Die benutzerdefinierte Funktion drawFrame() wird verwendet, um die Schaltfläche hervorzuheben, wenn sie gedrückt wird. Das gleiche Verfahren gilt für die beiden anderen Schaltflächen.
Die benutzerdefinierte Funktion drawDistanceSensor() muss also nur einmal aufgerufen werden, wenn die Schaltfläche gedrückt wird, um alle Grafiken dieses Beispiels auf ähnliche Weise zu zeichnen, wie wir es für den Startbildschirm beschrieben haben. Die benutzerdefinierte Funktion getDistance() muss jedoch wiederholt aufgerufen werden, um die neuesten Ergebnisse der vom Sensor gemessenen Entfernung zu drucken.
Hier ist die Funktion, die den Ultraschallsensor verwendet, um die Entfernung zu berechnen und die Werte mit SevenSegNum-Schrift in grüner Farbe zu drucken, entweder in Zentimetern oder Zoll. Wenn Sie weitere Details zur Funktionsweise des Ultraschallsensors benötigen, können Sie mein spezielles Tutorial dafür lesen. Zurück in der Schleifensektion können wir sehen, was passiert, wenn wir die Einheitenauswahltasten sowie die Zurück-Taste drücken.
Ok, als nächstes kommt das RGB-LED-Steuerungsbeispiel. Wenn wir die zweite Schaltfläche drücken, wird die benutzerdefinierte Funktion drawLedControl() nur einmal aufgerufen, um die Grafik dieses Beispiels zu zeichnen, und die benutzerdefinierte Funktion setLedColor() wird wiederholt aufgerufen. In dieser Funktion verwenden wir den Touchscreen, um die Werte der 3 Schieberegler von 0 bis 255 einzustellen. Mit den if-Anweisungen begrenzen wir den Bereich jedes Schiebereglers und erhalten den X-Wert des Schiebereglers. Die Werte der X-Koordinate jedes Schiebereglers liegen also zwischen 38 und 310 Pixel, und wir müssen diese Werte in Werte von 0 bis 255 umwandeln, die als PWM-Signal zum Aufleuchten der LED verwendet werden. Wenn Sie weitere Details zur Funktionsweise der RGB-LED benötigen, können Sie mein spezielles Tutorial dafür lesen. Der Rest des Codes in dieser benutzerdefinierten Funktion dient zum Zeichnen der Schieberegler. Zurück in der Schleifensektion haben wir nur die Zurück-Taste, die auch die LED ausschaltet, wenn sie gedrückt wird.
Als nächstes kommt das Arduino-Spielbeispiel, aber ich belasse es für mein nächstes Tutorial, damit wir es besser verstehen können, da es etwas komplexer ist.
Damit der Code funktioniert und kompiliert wird, müssen Sie eine zusätzliche „.c“-Datei im selben Verzeichnis wie die Arduino-Skizze einfügen. Diese Datei ist für das dritte Spielbeispiel und es ist eine Bitmap des Vogels. Weitere Einzelheiten zur Funktionsweise dieses Teils des Codes finden Sie in meinem speziellen Tutorial. Hier können Sie diese Datei herunterladen:
Hier ist der vollständige Quellcode des Programms: Übersicht
Für diesen Arduino-Touchscreen benötigte Teile
Arduino-Touchscreen-Code
#include <UTFT.h>
#include <URTouch.h>

//==== Creating Objects
UTFT    myGLCD(SSD1289,38,39,40,41); //Parameters should be adjusted to your Display/Schield model
URTouch  myTouch( 6, 5, 4, 3, 2);

//==== Defining Variables
extern uint8_t SmallFont[];
extern uint8_t BigFont[];
extern uint8_t SevenSegNumFont[];

extern unsigned int bird01[0x41A];

int x, y;

char currentPage, selectedUnit;

//Ultrasonic Sensor
const int VCC = 13;
const int trigPin = 11;
const int echoPin = 12;

long duration;
int distanceInch, distanceCm;

// RGB LEDs
const int redLed = 10;
const int greenLed = 9;
const int blueLed = 8;
int xR=38;
int xG=38;
int xB=38;

// Floppy Bird
int xP = 319;
int yP = 100;
int yB = 30;
int fallRateInt = 0;
float fallRate =0;
int score=0;
const int button = 14;
int buttonState = 0;

void setup() {
// Initial setup
  myGLCD.InitLCD();
  myGLCD.clrScr();
  myTouch.InitTouch();
  myTouch.setPrecision(PREC_MEDIUM);

  // Defining Pin Modes
  pinMode(VCC, OUTPUT); // VCC
  pinMode(trigPin, OUTPUT); // Sets the trigPin as an Output
  pinMode(echoPin, INPUT); // Sets the echoPin as an Input
  pinMode(redLed, OUTPUT);
  pinMode(greenLed, OUTPUT);
  pinMode(blueLed, OUTPUT);
  pinMode(button, INPUT);
  digitalWrite(VCC, HIGH); // +5V - Pin 13 as VCC

  drawHomeScreen();  // Draws the Home Screen
  currentPage = '0'; // Indicates that we are at Home Screen
  selectedUnit = '0'; // Indicates the selected unit for the first example, cms or inches
}
Codesprache:Arduino (arduino) // drawHomeScreen - Custom Function
void drawHomeScreen() {
// Title
myGLCD.setBackColor(0,0,0); // Sets the background color of the area where the text will be printed to black
myGLCD.setColor(255, 255, 255); // Sets color to white
myGLCD.setFont(BigFont); // Sets font to big
myGLCD.print("Arduino TFT Tutorial", CENTER, 10); // Prints the string on the screen
myGLCD.setColor(255, 0, 0); // Sets color to red
myGLCD.drawLine(0,32,319,32); // Draws the red line
myGLCD.setColor(255, 255, 255); // Sets color to white
myGLCD.setFont(SmallFont); // Sets the font to small
myGLCD.print("by HowToMechatronics.com", CENTER, 41); // Prints the string
myGLCD.setFont(BigFont);
myGLCD.print("Select Example", CENTER, 64);
// Button - Distance Sensor
myGLCD.setColor(16, 167, 103); // Sets green color
myGLCD.fillRoundRect (35, 90, 285, 130); // Draws filled rounded rectangle
myGLCD.setColor(255, 255, 255); // Sets color to white
myGLCD.drawRoundRect (35, 90, 285, 130); // Draws rounded rectangle without a fill, so the overall appearance of the button looks like it has a frame
myGLCD.setFont(BigFont); // Sets the font to big
myGLCD.setBackColor(16, 167, 103); // Sets the background color of the area where the text will be printed to green, same as the button
myGLCD.print("DISTANCE SENSOR", CENTER, 102); // Prints the string
// Button - RGB LED Control
myGLCD.setColor(16, 167, 103);
myGLCD.fillRoundRect (35, 140, 285, 180);
myGLCD.setColor(255, 255, 255);
myGLCD.drawRoundRect (35, 140, 285, 180);
myGLCD.setFont(BigFont);
myGLCD.setBackColor(16, 167, 103);
myGLCD.print("RGB LED CONTROL", CENTER, 152);
// Button - Birduino
myGLCD.setColor(16, 167, 103);
myGLCD.fillRoundRect (35, 190, 285, 230);
myGLCD.setColor(255, 255, 255);
myGLCD.drawRoundRect (35, 190, 285, 230);
myGLCD.setFont(BigFont);
myGLCD.setBackColor(16, 167, 103);
myGLCD.print("BIRDUINO GAME", CENTER, 202);
} Codesprache:Arduino (arduino) //========== The loop section ========
void loop() {
// Home Screen
if (currentPage == '0') {
if (myTouch.dataAvailable()) {
myTouch.read();
x=myTouch.getX(); // X coordinate where the screen has been pressed
y=myTouch.getY(); // Y coordinates where the screen has been pressed
// If we press the Distance Sensor Button
if ((x>=35) && (x<=285) && (y>=90) && (y<=130)) {
drawFrame(35, 90, 285, 130); // Custom Function -Highlighs the buttons when it's pressed
currentPage = '1'; // Indicates that we are the first example
myGLCD.clrScr(); // Clears the screen
drawDistanceSensor(); // It is called only once, because in the next iteration of the loop, this above if statement will be false so this funtion won't be called. This function will draw the graphics of the first example.
}
// If we press the RGB LED Control Button
if ((x>=35) && (x<=285) && (y>=140) && (y<=180)) {
drawFrame(35, 140, 285, 180);
currentPage = '2';
myGLCD.clrScr();
drawLedControl();
}
// If we press the Birduino Game Button
if ((x>=35) && (x<=285) && (y>=190) && (y<=230)) {
drawFrame(35, 190, 285, 230);
currentPage = '3';
myGLCD.clrScr();
myGLCD.setColor(114, 198, 206);
myGLCD.fillRect(0,0,319,239);
drawGround();
drawPilars(xP,yP);
drawBird(30);
delay(1000);
}
}
}
// Distance Sensor Example
if (currentPage == '1') {
getDistance(); // Gets distance from the sensor and this function is repeatedly called while we are at the first example in order to print the lasest results from the distance sensor
if (myTouch.dataAvailable()) {
myTouch.read();
x=myTouch.getX();
y=myTouch.getY();
// If we press the Centimeters Button
if ((x>=10) && (x<=135) &&(y>=90) && (y<=163)) {
selectedUnit = '0';
}
// If we press the Inches Button
if ((x>=10) && (x<=135) &&(y>=173) && (y<=201)) {
selectedUnit = '1';
}
// If we press the Back Button
if ((x>=10) && (x<=60) &&(y>=10) && (y<=36)) {
drawFrame(10, 10, 60, 36);
currentPage = '0'; // Indicates we are at home screen
myGLCD.clrScr();
drawHomeScreen(); // Draws the home screen
}
}
}
// RGB LED Control
if (currentPage == '2') {
setLedColor();
if (myTouch.dataAvailable()) {
myTouch.read();
x=myTouch.getX();
y=myTouch.getY();
//Back button
if ((x>=10) && (x<=60) &&(y>=10) && (y<=36)) {
drawFrame(10, 10, 60, 36);
currentPage = '0';
myGLCD.clrScr();
drawHomeScreen();
// Turns the LED off
analogWrite(redLed, 0);
analogWrite(greenLed, 0);
analogWrite(blueLed, 0);
}
}
}
//==== This section of the code, for the game example, is explained in my next tutorial
// Birduino Game
if (currentPage == '3') {
//delay(1);
xP=xP-3;
drawPilars(xP, yP);
yB+=fallRateInt;
fallRate=fallRate+0.4;
fallRateInt= int(fallRate);
if (yB>=220) {
yB=220;
}
if(yB>=180 || yB<=0){
restartGame();
}
if((xP<=85) && (xP>=30) && (yB<=yP-2)){
restartGame();
}
if((xP<=85) && (xP>=30) && (yB>=yP+60)){
restartGame();
}
drawBird(yB);
if (xP<=-51){
xP=319;
yP = rand() % 100+20;
score++;
}
if (myTouch.dataAvailable()) {
myTouch.read();
x=myTouch.getX();
y=myTouch.getY();
if ((x>=0) && (x<=319) &&(y>=50) && (y<=239)) {
fallRate=-5;
}
}
buttonState = digitalRead(button);
if (buttonState == HIGH) {
fallRate=-5;
}
}
if (myTouch.dataAvailable()) {
myTouch.read();
x=myTouch.getX();
y=myTouch.getY();
if ((x>=10) && (x<=60) &&(y>=10) && (y<=36)) {
drawFrame(10, 10, 60, 36);
currentPage = '0';
myGLCD.clrScr();
drawHomeScreen();
analogWrite(redLed, 0);
analogWrite(greenLed, 0);
analogWrite(blueLed, 0);
}
}
} Codesprache:Arduino (arduino) //===== getDistance() - Custom Function
void getDistance() {
// Clears the trigPin
digitalWrite(trigPin, LOW);
delayMicroseconds(2);
// Sets the trigPin on HIGH state for 10 micro seconds
digitalWrite(trigPin, HIGH);
delayMicroseconds(10);
digitalWrite(trigPin, LOW);
// Reads the echoPin, returns the sound wave travel time in microseconds
duration = pulseIn(echoPin, HIGH);
// Calculating the distance
distanceCm= duration*0.034/2;
distanceInch= distanceCm/2.53;
// Prints the distance in centimeters
if (selectedUnit == '0' && distanceCm <=400) {
myGLCD.setFont(SevenSegNumFont);
myGLCD.setColor(0, 255, 0);
myGLCD.setBackColor(0, 0, 0);
myGLCD.printNumI(distanceCm,130, 145, 3,'0');
myGLCD.setFont(BigFont);
myGLCD.print("cm ", 235, 178);
}
// Prints the distance in inches
if (selectedUnit == '1' && distanceCm <=160) {
myGLCD.setFont(SevenSegNumFont);
myGLCD.setColor(0, 255, 0);
myGLCD.setBackColor(0, 0, 0);
myGLCD.printNumI(distanceInch,130, 145, 3,'0');
myGLCD.setFont(BigFont);
myGLCD.print("inch", 235, 178);
}
delay(10);
} Codesprache:Arduino (arduino) //============= setLedColor() - Custom Funtion
void setLedColor() {
if (myTouch.dataAvailable()) {
myTouch.read();
x=myTouch.getX();
y=myTouch.getY();
// Area of the Red color slider
if( (y>=130) && (y<=156)) {
xR=x; // Stores the X value where the screen has been pressed in to variable xR
if (xR<=38) { // Confines the area of the slider to be above 38 pixels
xR=38;
}
if (xR>=303){ /// Confines the area of the slider to be under 310 pixels
xR=303;
}
}
// Area of the Green color slider
if( (y>=170) && (y<=196)) {
xG=x;
if (xG<=38) {
xG=38;
}
if (xG>=303){
xG=303;
}
}
// Area of the Blue color slider
if( (y>=210) && (y<=236)) {
xB=x;
if (xB<=38) {
xB=38;
}
if (xB>=303){
xB=303;
}
}
}
// Maps the values of the X - Axis from 38 to 0 and 310 to 255, because we need values from 0 to 255 for turning on the led
int xRC = map(xR,38,310,0,255);
int xGC = map(xG,38,310,0,255);
int xBC = map(xB,38,310,0,255);
// Sends PWM signal to the pins of the led
analogWrite(redLed, xRC);
analogWrite(greenLed, xGC);
analogWrite(blueLed, xBC);
// Draws a rectangle with the latest color combination
myGLCD.setColor(xRC, xGC, xBC);
myGLCD.fillRoundRect(175, 87, 310, 119);
// Draws the positioners
myGLCD.setColor(255, 255, 255);
myGLCD.fillRect(xR,139,(xR+4),147); // Positioner
myGLCD.setColor(xRC, 0, 0);
myGLCD.fillRect(31, 139, (xR-1), 147);
myGLCD.setColor(0, 0, 0);
myGLCD.fillRect((xR+5), 139, 309, 147);
myGLCD.setColor(255, 255, 255);
myGLCD.fillRect(xG,179,(xG+4),187);
myGLCD.setColor(0, xGC, 0);
myGLCD.fillRect(31, 179, (xG-1), 187);
myGLCD.setColor(0, 0, 0);
myGLCD.fillRect((xG+5), 179, 309, 187);
myGLCD.setColor(255, 255, 255);
myGLCD.fillRect(xB,219,(xB+4),227);
myGLCD.setColor(0, 0, xBC);
myGLCD.fillRect(31, 219, (xB-1), 227);
myGLCD.setColor(0, 0, 0);
myGLCD.fillRect((xB+5), 219, 309, 227);
} Codesprache:Arduino (arduino) Vollständiger Quellcode des Programms
Arduino-TFT-Tutorial-Dateien
1 Datei(en) 6,07 KB Herunterladen /* Arduino TFT Tutorial
* Program made by Dejan Nedelkovski,
* www.HowToMechatronics.com
*/
/* This program uses the UTFT and URTouch libraries
* made by Henning Karlsen.
* You can find and download them at:
* www.RinkyDinkElectronics.com
*/
#include <UTFT.h>
#include <URTouch.h>
//==== Creating Objects
UTFT myGLCD(SSD1289,38,39,40,41); //Parameters should be adjusted to your Display/Schield model
URTouch myTouch( 6, 5, 4, 3, 2);
//==== Defining Variables
extern uint8_t SmallFont[];
extern uint8_t BigFont[];
extern uint8_t SevenSegNumFont[];
extern unsigned int bird01[0x41A];
int x, y;
char currentPage, selectedUnit;
//Ultrasonic Sensor
const int VCC = 13;
const int trigPin = 11;
const int echoPin = 12;
long duration;
int distanceInch, distanceCm;
// RGB LEDs
const int redLed = 10;
const int greenLed = 9;
const int blueLed = 8;
int xR=38;
int xG=38;
int xB=38;
// Floppy Bird
int xP = 319;
int yP = 100;
int yB = 30;
int fallRateInt = 0;
float fallRate =0;
int score=0;
const int button = 14;
int buttonState = 0;
void setup() {
// Initial setup
myGLCD.InitLCD();
myGLCD.clrScr();
myTouch.InitTouch();
myTouch.setPrecision(PREC_MEDIUM);
// Defining Pin Modes
pinMode(VCC, OUTPUT); // VCC
pinMode(trigPin, OUTPUT); // Sets the trigPin as an Output
pinMode(echoPin, INPUT); // Sets the echoPin as an Input
pinMode(redLed, OUTPUT);
pinMode(greenLed, OUTPUT);
pinMode(blueLed, OUTPUT);
pinMode(button, INPUT);
digitalWrite(VCC, HIGH); // +5V - Pin 13 as VCC
drawHomeScreen(); // Draws the Home Screen
currentPage = '0'; // Indicates that we are at Home Screen
selectedUnit = '0'; // Indicates the selected unit for the first example, cms or inches
}
void loop() {
// Home Screen
if (currentPage == '0') {
if (myTouch.dataAvailable()) {
myTouch.read();
x=myTouch.getX(); // X coordinate where the screen has been pressed
y=myTouch.getY(); // Y coordinates where the screen has been pressed
// If we press the Distance Sensor Button
if ((x>=35) && (x<=285) && (y>=90) && (y<=130)) {
drawFrame(35, 90, 285, 130); // Custom Function -Highlighs the buttons when it's pressed
currentPage = '1'; // Indicates that we are the first example
myGLCD.clrScr(); // Clears the screen
drawDistanceSensor(); // It is called only once, because in the next iteration of the loop, this above if statement will be false so this funtion won't be called. This function will draw the graphics of the first example.
}
// If we press the RGB LED Control Button
if ((x>=35) && (x<=285) && (y>=140) && (y<=180)) {
drawFrame(35, 140, 285, 180);
currentPage = '2';
myGLCD.clrScr();
drawLedControl();
}
// If we press the Birduino Game Button
if ((x>=35) && (x<=285) && (y>=190) && (y<=230)) {
drawFrame(35, 190, 285, 230);
currentPage = '3';
myGLCD.clrScr();
myGLCD.setColor(114, 198, 206);
myGLCD.fillRect(0,0,319,239);
drawGround();
drawPilars(xP,yP);
drawBird(30);
delay(1000);
}
}
}
// Distance Sensor Example
if (currentPage == '1') {
getDistance(); // Gets distance from the sensor and this function is repeatedly called while we are at the first example in order to print the lasest results from the distance sensor
if (myTouch.dataAvailable()) {
myTouch.read();
x=myTouch.getX();
y=myTouch.getY();
// If we press the Centimeters Button
if ((x>=10) && (x<=135) &&(y>=90) && (y<=163)) {
selectedUnit = '0';
}
// If we press the Inches Button
if ((x>=10) && (x<=135) &&(y>=173) && (y<=201)) {
selectedUnit = '1';
}
// If we press the Back Button
if ((x>=10) && (x<=60) &&(y>=10) && (y<=36)) {
drawFrame(10, 10, 60, 36);
currentPage = '0'; // Indicates we are at home screen
myGLCD.clrScr();
drawHomeScreen(); // Draws the home screen
}
}
}
// RGB LED Control
if (currentPage == '2') {
setLedColor();
if (myTouch.dataAvailable()) {
myTouch.read();
x=myTouch.getX();
y=myTouch.getY();
//Back button
if ((x>=10) && (x<=60) &&(y>=10) && (y<=36)) {
drawFrame(10, 10, 60, 36);
currentPage = '0';
myGLCD.clrScr();
drawHomeScreen();
// Turns the LED off
analogWrite(redLed, 0);
analogWrite(greenLed, 0);
analogWrite(blueLed, 0);
}
}
}
//==== This section of the code, for the game example, is explained in my next tutorial
// Birduino Game
if (currentPage == '3') {
//delay(1);
xP=xP-3;
drawPilars(xP, yP);
yB+=fallRateInt;
fallRate=fallRate+0.4;
fallRateInt= int(fallRate);
if (yB>=220) {
yB=220;
}
if(yB>=180 || yB<=0){
restartGame();
}
if((xP<=85) && (xP>=30) && (yB<=yP-2)){
restartGame();
}
if((xP<=85) && (xP>=30) && (yB>=yP+60)){
restartGame();
}
drawBird(yB);
if (xP<=-51){
xP=319;
yP = rand() % 100+20;
score++;
}
if (myTouch.dataAvailable()) {
myTouch.read();
x=myTouch.getX();
y=myTouch.getY();
if ((x>=0) && (x<=319) &&(y>=50) && (y<=239)) {
fallRate=-5;
}
}
buttonState = digitalRead(button);
if (buttonState == HIGH) {
fallRate=-5;
}
}
if (myTouch.dataAvailable()) {
myTouch.read();
x=myTouch.getX();
y=myTouch.getY();
if ((x>=10) && (x<=60) &&(y>=10) && (y<=36)) {
drawFrame(10, 10, 60, 36);
currentPage = '0';
myGLCD.clrScr();
drawHomeScreen();
analogWrite(redLed, 0);
analogWrite(greenLed, 0);
analogWrite(blueLed, 0);
}
}
}
// ====== Custom Funtions ======
// drawHomeScreen - Custom Function
void drawHomeScreen() {
// Title
myGLCD.setBackColor(0,0,0); // Sets the background color of the area where the text will be printed to black
myGLCD.setColor(255, 255, 255); // Sets color to white
myGLCD.setFont(BigFont); // Sets font to big
myGLCD.print("Arduino TFT Tutorial", CENTER, 10); // Prints the string on the screen
myGLCD.setColor(255, 0, 0); // Sets color to red
myGLCD.drawLine(0,32,319,32); // Draws the red line
myGLCD.setColor(255, 255, 255); // Sets color to white
myGLCD.setFont(SmallFont); // Sets the font to small
myGLCD.print("by HowToMechatronics.com", CENTER, 41); // Prints the string
myGLCD.setFont(BigFont);
myGLCD.print("Select Example", CENTER, 64);
// Button - Distance Sensor
myGLCD.setColor(16, 167, 103); // Sets green color
myGLCD.fillRoundRect (35, 90, 285, 130); // Draws filled rounded rectangle
myGLCD.setColor(255, 255, 255); // Sets color to white
myGLCD.drawRoundRect (35, 90, 285, 130); // Draws rounded rectangle without a fill, so the overall appearance of the button looks like it has a frame
myGLCD.setFont(BigFont); // Sets the font to big
myGLCD.setBackColor(16, 167, 103); // Sets the background color of the area where the text will be printed to green, same as the button
myGLCD.print("DISTANCE SENSOR", CENTER, 102); // Prints the string
// Button - RGB LED Control
myGLCD.setColor(16, 167, 103);
myGLCD.fillRoundRect (35, 140, 285, 180);
myGLCD.setColor(255, 255, 255);
myGLCD.drawRoundRect (35, 140, 285, 180);
myGLCD.setFont(BigFont);
myGLCD.setBackColor(16, 167, 103);
myGLCD.print("RGB LED CONTROL", CENTER, 152);
// Button - Birduino
myGLCD.setColor(16, 167, 103);
myGLCD.fillRoundRect (35, 190, 285, 230);
myGLCD.setColor(255, 255, 255);
myGLCD.drawRoundRect (35, 190, 285, 230);
myGLCD.setFont(BigFont);
myGLCD.setBackColor(16, 167, 103);
myGLCD.print("BIRDUINO GAME", CENTER, 202);
}
// Highlights the button when pressed
void drawFrame(int x1, int y1, int x2, int y2) {
myGLCD.setColor(255, 0, 0);
myGLCD.drawRoundRect (x1, y1, x2, y2);
while (myTouch.dataAvailable())
myTouch.read();
myGLCD.setColor(255, 255, 255);
myGLCD.drawRoundRect (x1, y1, x2, y2);
}
//====================================================
void drawDistanceSensor() {
myGLCD.setColor(100, 155, 203);
myGLCD.fillRoundRect (10, 10, 60, 36);
myGLCD.setColor(255, 255, 255);
myGLCD.drawRoundRect (10, 10, 60, 36);
myGLCD.setFont(BigFont);
myGLCD.setBackColor(100, 155, 203);
myGLCD.print("<-", 18, 15);
myGLCD.setBackColor(0, 0, 0);
myGLCD.setFont(SmallFont);
myGLCD.print("Back to Main Menu", 70, 18);
myGLCD.setFont(BigFont);
myGLCD.print("Ultrasonic Sensor", CENTER, 50);
myGLCD.print("HC-SR04", CENTER, 76);
myGLCD.setColor(255, 0, 0);
myGLCD.drawLine(0,100,319,100);
myGLCD.setBackColor(0, 0, 0);
myGLCD.setColor(255, 255, 255);
myGLCD.setFont(SmallFont);
myGLCD.print("Select Unit", 10, 114);
myGLCD.setFont(BigFont);
myGLCD.print("Distance:", 130, 120);
myGLCD.setColor(223, 77, 55);
myGLCD.fillRoundRect (10, 135, 90, 163);
myGLCD.setColor(225, 255, 255);
myGLCD.drawRoundRect (10, 135, 90, 163);
myGLCD.setBackColor(223, 77, 55);
myGLCD.setColor(255, 255, 255);
myGLCD.print("cm", 33, 140);
myGLCD.setColor(223, 77, 55);
myGLCD.fillRoundRect (10, 173, 90, 201);
myGLCD.setColor(255, 255, 255);
myGLCD.drawRoundRect (10, 173, 90, 201);
myGLCD.setBackColor(223, 77, 55);
myGLCD.setColor(255, 255, 255);
myGLCD.print("inch", 17, 180);
myGLCD.setBackColor(0, 0, 0);
myGLCD.setFont(SmallFont);
myGLCD.print("Source code at: HowToMechatronics.com", CENTER, 220);
}
//====================================================
//===== getDistance - Custom Function
void getDistance() {
// Clears the trigPin
digitalWrite(trigPin, LOW);
delayMicroseconds(2);
// Sets the trigPin on HIGH state for 10 micro seconds
digitalWrite(trigPin, HIGH);
delayMicroseconds(10);
digitalWrite(trigPin, LOW);
// Reads the echoPin, returns the sound wave travel time in microseconds
duration = pulseIn(echoPin, HIGH);
// Calculating the distance
distanceCm= duration*0.034/2;
distanceInch= distanceCm/2.53;
// Prints the distance in centimeters
if (selectedUnit == '0' && distanceCm <=400) {
myGLCD.setFont(SevenSegNumFont);
myGLCD.setColor(0, 255, 0);
myGLCD.setBackColor(0, 0, 0);
myGLCD.printNumI(distanceCm,130, 145, 3,'0');
myGLCD.setFont(BigFont);
myGLCD.print("cm ", 235, 178);
}
// Prints the distance in inches
if (selectedUnit == '1' && distanceCm <=160) {
myGLCD.setFont(SevenSegNumFont);
myGLCD.setColor(0, 255, 0);
myGLCD.setBackColor(0, 0, 0);
myGLCD.printNumI(distanceInch,130, 145, 3,'0');
myGLCD.setFont(BigFont);
myGLCD.print("inch", 235, 178);
}
delay(10);
}
//====================================================
void drawLedControl() {
myGLCD.setColor(100, 155, 203);
myGLCD.fillRoundRect (10, 10, 60, 36);
myGLCD.setColor(255, 255, 255);
myGLCD.drawRoundRect (10, 10, 60, 36);
myGLCD.setFont(BigFont);
myGLCD.setBackColor(100, 155, 203);
myGLCD.print("<-", 18, 15);
myGLCD.setBackColor(0, 0, 0);
myGLCD.setFont(SmallFont);
myGLCD.print("Back to Main Menu", 70, 18);
myGLCD.setFont(BigFont);
myGLCD.print("RGB LED Control", CENTER, 50);
myGLCD.print("LED Color:", 10, 95);
myGLCD.print("R", 10, 135);
myGLCD.print("G", 10, 175);
myGLCD.print("B", 10, 215);
myGLCD.setColor(255, 0, 0);
myGLCD.drawLine(0,75,319,75);
myGLCD.setColor(255, 255, 255);
myGLCD.drawRect(30, 138, 310, 148); // R - Slider
myGLCD.drawRect(30, 178, 310, 188);
myGLCD.drawRect(30, 218, 310, 228);
}
//====================================================
//============= setLedColor() - Custom Funtion
void setLedColor() {
if (myTouch.dataAvailable()) {
myTouch.read();
x=myTouch.getX();
y=myTouch.getY();
// Area of the Red color slider
if( (y>=130) && (y<=156)) {
xR=x; // Stores the X value where the screen has been pressed in to variable xR
if (xR<=38) { // Confines the area of the slider to be above 38 pixels
xR=38;
}
if (xR>=303){ /// Confines the area of the slider to be under 310 pixels
xR=303;
}
}
// Area of the Green color slider
if( (y>=170) && (y<=196)) {
xG=x;
if (xG<=38) {
xG=38;
}
if (xG>=303){
xG=303;
}
}
// Area of the Blue color slider
if( (y>=210) && (y<=236)) {
xB=x;
if (xB<=38) {
xB=38;
}
if (xB>=303){
xB=303;
}
}
}
// Maps the values of the X - Axis from 38 to 0 and 310 to 255, because we need values from 0 to 255 for turning on the led
int xRC = map(xR,38,310,0,255);
int xGC = map(xG,38,310,0,255);
int xBC = map(xB,38,310,0,255);
// Sends PWM signal to the pins of the led
analogWrite(redLed, xRC);
analogWrite(greenLed, xGC);
analogWrite(blueLed, xBC);
// Draws a rectangle with the latest color combination
myGLCD.setColor(xRC, xGC, xBC);
myGLCD.fillRoundRect(175, 87, 310, 119);
// Draws the positioners
myGLCD.setColor(255, 255, 255);
myGLCD.fillRect(xR,139,(xR+4),147); // Positioner
myGLCD.setColor(xRC, 0, 0);
myGLCD.fillRect(31, 139, (xR-1), 147);
myGLCD.setColor(0, 0, 0);
myGLCD.fillRect((xR+5), 139, 309, 147);
myGLCD.setColor(255, 255, 255);
myGLCD.fillRect(xG,179,(xG+4),187);
myGLCD.setColor(0, xGC, 0);
myGLCD.fillRect(31, 179, (xG-1), 187);
myGLCD.setColor(0, 0, 0);
myGLCD.fillRect((xG+5), 179, 309, 187);
myGLCD.setColor(255, 255, 255);
myGLCD.fillRect(xB,219,(xB+4),227);
myGLCD.setColor(0, 0, xBC);
myGLCD.fillRect(31, 219, (xB-1), 227);
myGLCD.setColor(0, 0, 0);
myGLCD.fillRect((xB+5), 219, 309, 227);
}
//====================================================
void drawGround() {
myGLCD.setColor(221,216,148);
myGLCD.fillRect(0, 215, 319, 239);
myGLCD.setColor(47,175,68);
myGLCD.fillRect(0, 205, 319, 214);
myGLCD.setColor(0, 0, 0);
myGLCD.setBackColor(221, 216, 148);
myGLCD.setFont(BigFont);
myGLCD.print("Score:",5,220);
myGLCD.setFont(SmallFont);
myGLCD.print("HowToMechatronics.com", 140, 220);
}
void drawPilars(int x, int y) {
if (x>=270){
myGLCD.setColor(0, 200, 20);
myGLCD.fillRect(318, 0, x, y-1);
myGLCD.setColor(0, 0, 0);
myGLCD.drawRect(319, 0, x-1, y);
myGLCD.setColor(0, 200, 20);
myGLCD.fillRect(318, y+81, x, 203);
myGLCD.setColor(0, 0, 0);
myGLCD.drawRect(319, y+80, x-1, 204);
}
else if( x<=268) {
myGLCD.setColor(114, 198, 206);
myGLCD.fillRect(x+51, 0, x+53, y);
myGLCD.setColor(0, 200, 20);
myGLCD.fillRect(x+49, 1, x+1, y-1);
myGLCD.setColor(0, 0, 0);
myGLCD.drawRect(x+50, 0, x, y);
myGLCD.setColor(114, 198, 206);
myGLCD.fillRect(x-1, 0, x-3, y);
myGLCD.setColor(114, 198, 206);
myGLCD.fillRect(x+51, y+80, x+53, 204);
myGLCD.setColor(0, 200, 20);
myGLCD.fillRect(x+49, y+81, x+1, 203);
myGLCD.setColor(0, 0, 0);
myGLCD.drawRect(x+50, y+80, x, 204);
myGLCD.setColor(114, 198, 206);
myGLCD.fillRect(x-1, y+80, x-3, 204);
}
myGLCD.setColor(0, 0, 0);
myGLCD.setBackColor(221, 216, 148);
myGLCD.setFont(BigFont);
myGLCD.printNumI(score, 100, 220);
}
//====================================================
void drawBird(int y) {
if(y<=219) {
myGLCD.drawBitmap (50, y, 35, 30, bird01);
myGLCD.setColor(114, 198, 206);
myGLCD.fillRoundRect(50,y,85,y-6);
myGLCD.fillRoundRect(50,y+30,85,y+36);
}
else if(y>=200) {
myGLCD.drawBitmap (50, 200, 35, 30, bird01);
myGLCD.setColor(114, 198, 206);
myGLCD.fillRoundRect(50,200,85,200-6);
myGLCD.fillRoundRect(50,200+30,85,200+36);
}
}
void gameOver() {
myGLCD.clrScr();
myGLCD.setColor(255, 255, 255);
myGLCD.setBackColor(0, 0, 0);
myGLCD.setFont(BigFont);
myGLCD.print("GAME OVER", CENTER, 40);
myGLCD.print("Score:", 100, 80);
myGLCD.printNumI(score,200, 80);
myGLCD.print("Restarting...", CENTER, 120);
myGLCD.setFont(SevenSegNumFont);
myGLCD.printNumI(2,CENTER, 150);
delay(1000);
myGLCD.printNumI(1,CENTER, 150);
delay(1000);
myGLCD.setColor(114, 198, 206);
myGLCD.fillRect(0,0,319,239);
drawBird(30);
drawGround();
delay(1000);
}
//====================================================
void restartGame() {
delay(1000);
gameOver();
xP=319;
yB=30;
fallRate=0;
score=0;
}
Codesprache:Arduino (arduino)
Herstellungsprozess
- Anleitung zum Arduino-RFID-Schloss
- Tragbares kapazitives Touch-Piano
- LCD-Animation und -Spiele
- Anzeige eines Bildes auf einem LCD-TFT-Bildschirm mit Arduino UNO!
- BMP-Bilder von SD-Karte auf TFT-LCD-Schild anzeigen
- Anbindung und Behebung von Berührungsproblemen auf dem 2,4-Zoll-TFT-LCD-Shield
- Arduino-Wetterstation
- Anleitung zum Arduino-Fingerabdrucksensor
- Weiche den Defs aus!
- Arduino-Tutorial 01:Erste Schritte