


Arduino-Radar-Projekt
In diesem Arduino-Tutorial zeige ich Ihnen, wie Sie dieses cool aussehende Radar mit dem Arduino Board und der Processing Development Environment erstellen können. Sie können sich das folgende Video ansehen oder das schriftliche Tutorial unten lesen, um weitere Einzelheiten zu erfahren.
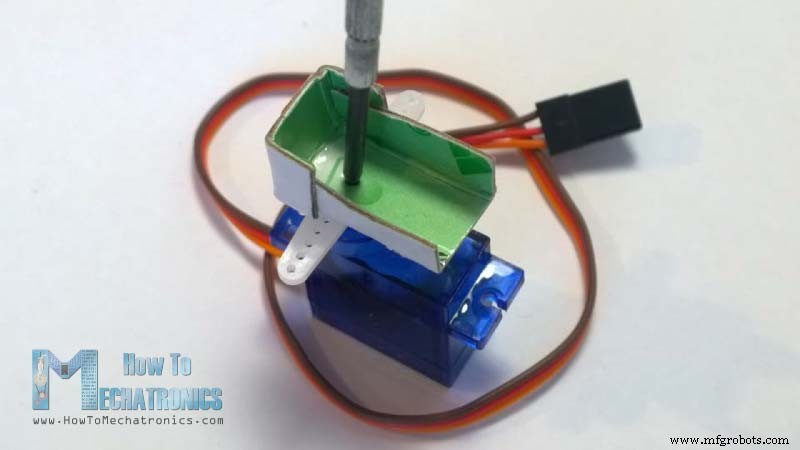
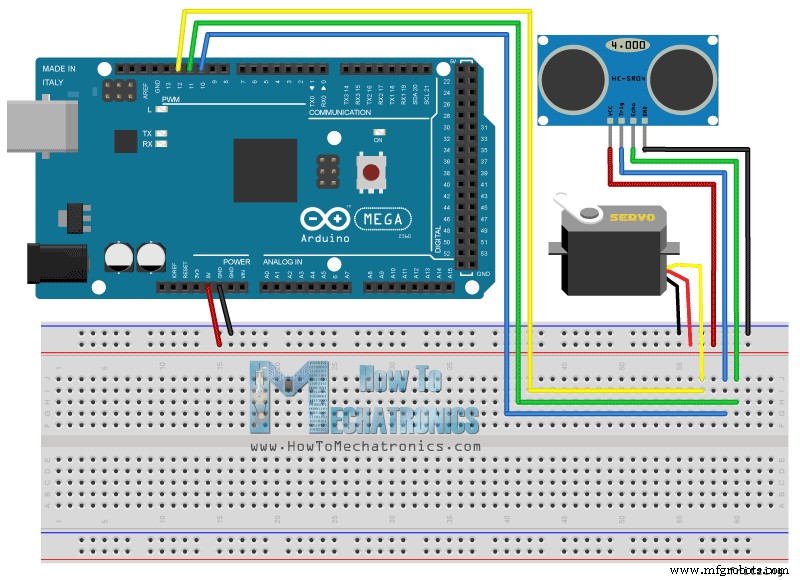
Alles, was Sie für dieses Arduino-Projekt benötigen, ist ein Ultraschallsensor zum Erkennen der Objekte, ein kleiner Bastler-Servomotor zum Drehen des Sensors und ein Arduino-Board zum Steuern. Sie können sich das folgende Video ansehen oder das schriftliche Tutorial unten lesen.[/column]
Sie können diese Komponenten von einer der folgenden Websites beziehen:
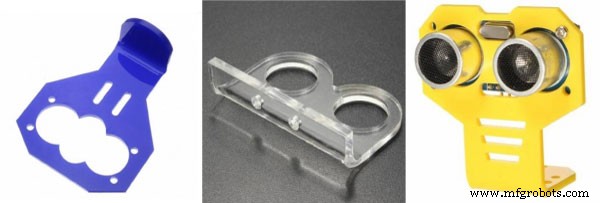
Es gibt auch einige spezielle Halterungen für den Ultraschallsensor von Banggod. Sie können sie unter den folgenden Links abrufen:
Ich habe den Ultraschallsensor HC-SR04 an die Pins Nummer 10 und 11 und den Servomotor an die Pin Nummer 12 auf dem Arduino Board angeschlossen.
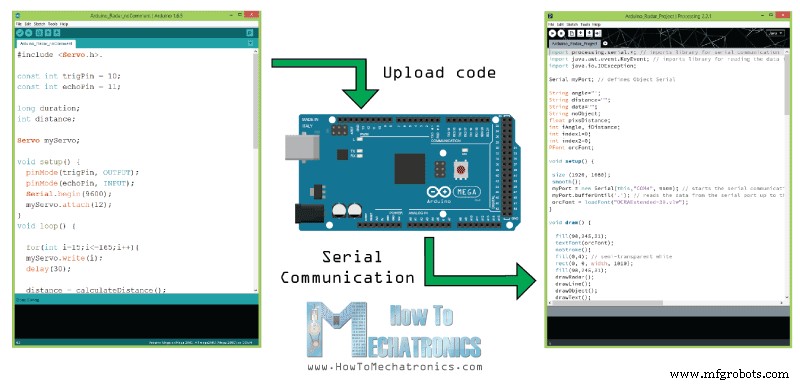
Jetzt müssen wir einen Code erstellen und ihn auf das Arduino Board hochladen, das die Interaktion zwischen dem Arduino und der Processing IDE ermöglicht. Um zu verstehen, wie die Verbindung funktioniert, klicken Sie hier, um mein Arduino- und Verarbeitungs-Tutorial zu besuchen.
Jetzt erhalten wir die vom Sensor gemessenen Werte für den Winkel und die Entfernung vom Arduino Board in die Processing IDE mit dem SerialEvent() Funktion, die die Daten von der seriellen Schnittstelle liest, und wir werden die Werte des Winkels und der Entfernung in die Variablen iAngle und iDistance einfügen. Diese Variablen werden zum Zeichnen des Radars, der Linien, der erkannten Objekte und eines Teils des Textes verwendet.
Zum Zeichnen des Radars habe ich diese Funktion drawRadar() erstellt die aus arc() bestehen und line() Funktionen.
Um die Linie zu zeichnen, die sich entlang des Radars bewegt, habe ich diese Funktion drawLine() erstellt . Sein Rotationszentrum wird mit der translate()-Funktion gesetzt und mit der line()-Funktion, in der die iAngle-Variable verwendet wird, wird die Linie für jeden Grad neu gezeichnet.
Zum Zeichnen der erkannten Objekte habe ich dieses drawObject() erstellt Funktion. Es erhält die Entfernung vom Ultraschallsensor, wandelt sie in Pixel um und zeichnet in Kombination mit dem Winkel des Sensors das Objekt auf dem Radar.
Für den Text auf dem Bildschirm habe ich drawText() erstellt Funktion, die Texte an bestimmten Orten zeichnet.
Alle diese Funktionen werden in der Hauptdatei draw() aufgerufen Funktion, die sich ständig wiederholt und den Bildschirm zeichnet. Auch hier verwende ich diesefill() Funktion mit 2 Parametern zur Simulation von Bewegungsunschärfe und langsamem Überblenden der bewegten Linie.
Hier ist das endgültige Erscheinungsbild des Radars:
Hier ist der vollständige Processing Source Code des Arduino Radar:
Ändern Sie einfach die Werte in der Funktion size() mit Ihrer Bildschirmauflösung.Übersicht
Für dieses Arduino-Projekt benötigte Komponenten
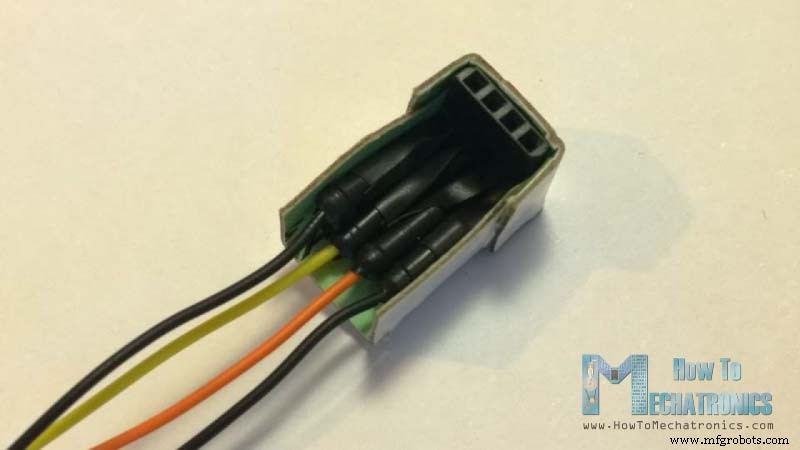
Bauen des Geräts
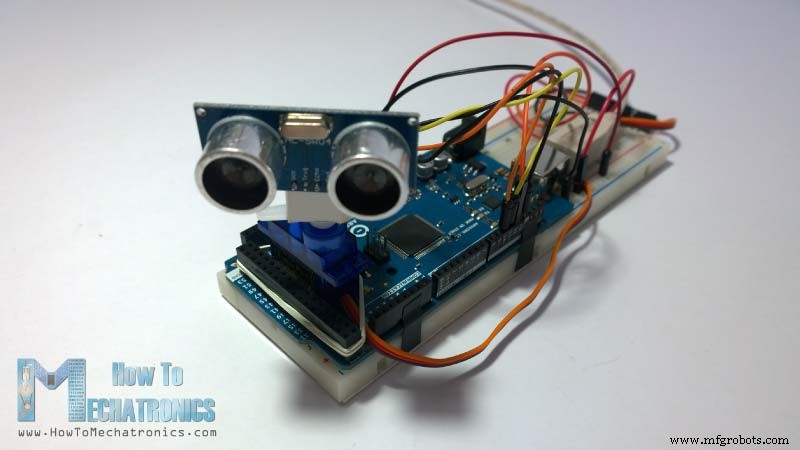
Schaltpläne für Arduino-Radarschaltkreise
Quellcodes
Hier ist der Arduino-Quellcode mit Beschreibung jeder Zeile von der Code:
// Includes the Servo library
#include <Servo.h>.

// Defines Tirg and Echo pins of the Ultrasonic Sensor
const int trigPin = 10;
const int echoPin = 11;
// Variables for the duration and the distance
long duration;
int distance;

Servo myServo; // Creates a servo object for controlling the servo motor

void setup() {
  pinMode(trigPin, OUTPUT); // Sets the trigPin as an Output
  pinMode(echoPin, INPUT); // Sets the echoPin as an Input
  Serial.begin(9600);
  myServo.attach(12); // Defines on which pin is the servo motor attached
}
void loop() {
  // rotates the servo motor from 15 to 165 degrees
  for(int i=15;i<=165;i++){
  myServo.write(i);
  delay(30);
  distance = calculateDistance();// Calls a function for calculating the distance measured by the Ultrasonic sensor for each degree

  Serial.print(i); // Sends the current degree into the Serial Port
  Serial.print(","); // Sends addition character right next to the previous value needed later in the Processing IDE for indexing
  Serial.print(distance); // Sends the distance value into the Serial Port
  Serial.print("."); // Sends addition character right next to the previous value needed later in the Processing IDE for indexing
  }
  // Repeats the previous lines from 165 to 15 degrees
  for(int i=165;i>15;i--){
  myServo.write(i);
  delay(30);
  distance = calculateDistance();
  Serial.print(i);
  Serial.print(",");
  Serial.print(distance);
  Serial.print(".");
  }
}
// Function for calculating the distance measured by the Ultrasonic sensor
int calculateDistance(){

  digitalWrite(trigPin, LOW);
  delayMicroseconds(2);
  // Sets the trigPin on HIGH state for 10 micro seconds
  digitalWrite(trigPin, HIGH);
  delayMicroseconds(10);
  digitalWrite(trigPin, LOW);
  duration = pulseIn(echoPin, HIGH); // Reads the echoPin, returns the sound wave travel time in microseconds
  distance= duration*0.034/2;
  return distance;
}
Codesprache:Arduino (arduino) 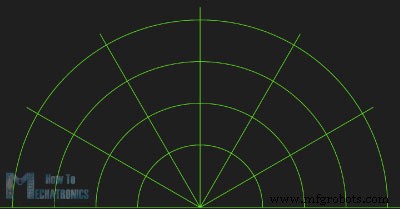
void drawRadar() {
  pushMatrix();
  translate(960,1000); // moves the starting coordinats to new location
  noFill();
  strokeWeight(2);
  stroke(98,245,31);
  // draws the arc lines
  arc(0,0,1800,1800,PI,TWO_PI);
  arc(0,0,1400,1400,PI,TWO_PI);
  arc(0,0,1000,1000,PI,TWO_PI);
  arc(0,0,600,600,PI,TWO_PI);
  // draws the angle lines
  line(-960,0,960,0);
  line(0,0,-960*cos(radians(30)),-960*sin(radians(30)));
  line(0,0,-960*cos(radians(60)),-960*sin(radians(60)));
  line(0,0,-960*cos(radians(90)),-960*sin(radians(90)));
  line(0,0,-960*cos(radians(120)),-960*sin(radians(120)));
  line(0,0,-960*cos(radians(150)),-960*sin(radians(150)));
  line(-960*cos(radians(30)),0,960,0);
  popMatrix();
} Codesprache:Arduino (arduino) 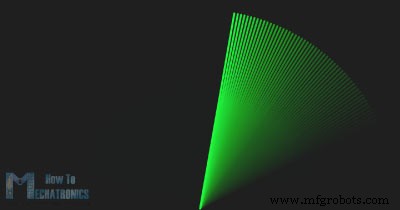
void drawLine() {
  pushMatrix();
  strokeWeight(9);
  stroke(30,250,60);
  translate(960,1000); // moves the starting coordinats to new location
  line(0,0,950*cos(radians(iAngle)),-950*sin(radians(iAngle))); // draws the line according to the angle
  popMatrix();
} Codesprache:Arduino (arduino) 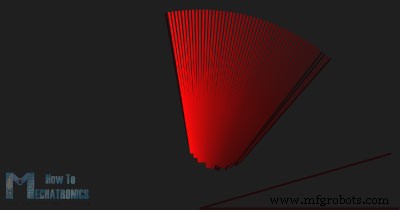
void drawObject() {
  pushMatrix();
  translate(960,1000); // moves the starting coordinats to new location
  strokeWeight(9);
  stroke(255,10,10); // red color
  pixsDistance = iDistance*22.5; // covers the distance from the sensor from cm to pixels
  // limiting the range to 40 cms
  if(iDistance<40){
    // draws the object according to the angle and the distance
  line(pixsDistance*cos(radians(iAngle)),-pixsDistance*sin(radians(iAngle)),950*cos(radians(iAngle)),-950*sin(radians(iAngle)));
  }
  popMatrix();
} Codesprache:Arduino (arduino) void draw() {
fill(98,245,31);
textFont(orcFont);
// simulating motion blur and slow fade of the moving line
noStroke();
fill(0,4);
rect(0, 0, width, 1010);
fill(98,245,31); // green color
// calls the functions for drawing the radar
drawRadar();
drawLine();
drawObject();
drawText();
} Codesprache:Arduino (arduino) 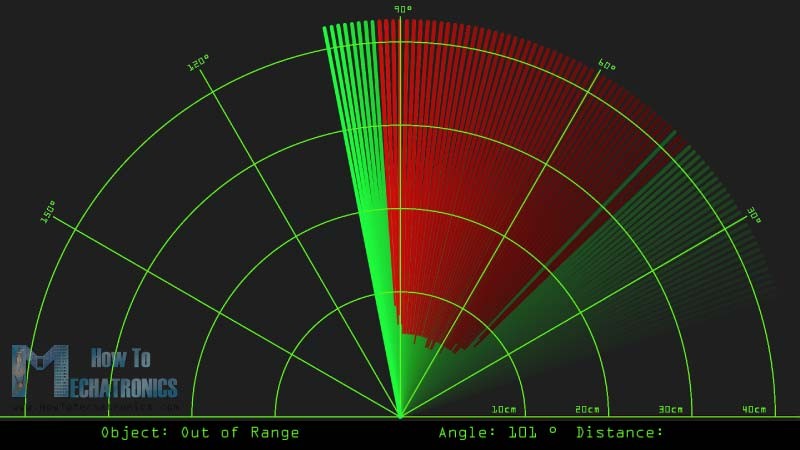
import processing.serial.*; // imports library for serial communication
import java.awt.event.KeyEvent; // imports library for reading the data from the serial port
import java.io.IOException;

Serial myPort; // defines Object Serial
// defubes variables
String angle="";
String distance="";
String data="";
String noObject;
float pixsDistance;
int iAngle, iDistance;
int index1=0;
int index2=0;
PFont orcFont;

void setup() {

 size (1920, 1080);
 smooth();
 myPort = new Serial(this,"COM4", 9600); // starts the serial communication
 myPort.bufferUntil('.'); // reads the data from the serial port up to the character '.'. So actually it reads this: angle,distance.
 orcFont = loadFont("OCRAExtended-30.vlw");
}

void draw() {

  fill(98,245,31);
  textFont(orcFont);
  // simulating motion blur and slow fade of the moving line
  noStroke();
  fill(0,4);
  rect(0, 0, width, 1010);

  fill(98,245,31); // green color
  // calls the functions for drawing the radar
  drawRadar();
  drawLine();
  drawObject();
  drawText();
}

void serialEvent (Serial myPort) { // starts reading data from the Serial Port
  // reads the data from the Serial Port up to the character '.' and puts it into the String variable "data".
  data = myPort.readStringUntil('.');
  data = data.substring(0,data.length()-1);

  index1 = data.indexOf(","); // find the character ',' and puts it into the variable "index1"
  angle= data.substring(0, index1); // read the data from position "0" to position of the variable index1 or thats the value of the angle the Arduino Board sent into the Serial Port
  distance= data.substring(index1+1, data.length()); // read the data from position "index1" to the end of the data pr thats the value of the distance

  // converts the String variables into Integer
  iAngle = int(angle);
  iDistance = int(distance);
}

void drawRadar() {
  pushMatrix();
  translate(960,1000); // moves the starting coordinats to new location
  noFill();
  strokeWeight(2);
  stroke(98,245,31);
  // draws the arc lines
  arc(0,0,1800,1800,PI,TWO_PI);
  arc(0,0,1400,1400,PI,TWO_PI);
  arc(0,0,1000,1000,PI,TWO_PI);
  arc(0,0,600,600,PI,TWO_PI);
  // draws the angle lines
  line(-960,0,960,0);
  line(0,0,-960*cos(radians(30)),-960*sin(radians(30)));
  line(0,0,-960*cos(radians(60)),-960*sin(radians(60)));
  line(0,0,-960*cos(radians(90)),-960*sin(radians(90)));
  line(0,0,-960*cos(radians(120)),-960*sin(radians(120)));
  line(0,0,-960*cos(radians(150)),-960*sin(radians(150)));
  line(-960*cos(radians(30)),0,960,0);
  popMatrix();
}

void drawObject() {
  pushMatrix();
  translate(960,1000); // moves the starting coordinats to new location
  strokeWeight(9);
  stroke(255,10,10); // red color
  pixsDistance = iDistance*22.5; // covers the distance from the sensor from cm to pixels
  // limiting the range to 40 cms
  if(iDistance<40){
    // draws the object according to the angle and the distance
  line(pixsDistance*cos(radians(iAngle)),-pixsDistance*sin(radians(iAngle)),950*cos(radians(iAngle)),-950*sin(radians(iAngle)));
  }
  popMatrix();
}

void drawLine() {
  pushMatrix();
  strokeWeight(9);
  stroke(30,250,60);
  translate(960,1000); // moves the starting coordinats to new location
  line(0,0,950*cos(radians(iAngle)),-950*sin(radians(iAngle))); // draws the line according to the angle
  popMatrix();
}

void drawText() { // draws the texts on the screen

  pushMatrix();
  if(iDistance>40) {
  noObject = "Out of Range";
  }
  else {
  noObject = "In Range";
  }
  fill(0,0,0);
  noStroke();
  rect(0, 1010, width, 1080);
  fill(98,245,31);
  textSize(25);
  text("10cm",1180,990);
  text("20cm",1380,990);
  text("30cm",1580,990);
  text("40cm",1780,990);
  textSize(40);
  text("Object: " + noObject, 240, 1050);
  text("Angle: " + iAngle +" °", 1050, 1050);
  text("Distance: ", 1380, 1050);
  if(iDistance<40) {
  text("        " + iDistance +" cm", 1400, 1050);
  }
  textSize(25);
  fill(98,245,60);
  translate(961+960*cos(radians(30)),982-960*sin(radians(30)));
  rotate(-radians(-60));
  text("30°",0,0);
  resetMatrix();
  translate(954+960*cos(radians(60)),984-960*sin(radians(60)));
  rotate(-radians(-30));
  text("60°",0,0);
  resetMatrix();
  translate(945+960*cos(radians(90)),990-960*sin(radians(90)));
  rotate(radians(0));
  text("90°",0,0);
  resetMatrix();
  translate(935+960*cos(radians(120)),1003-960*sin(radians(120)));
  rotate(radians(-30));
  text("120°",0,0);
  resetMatrix();
  translate(940+960*cos(radians(150)),1018-960*sin(radians(150)));
  rotate(radians(-60));
  text("150°",0,0);
  popMatrix();
}
 Codesprache:Arduino (arduino)
Neue aktualisierte Version des Arduino-Radar-Codes für alle Bildschirmauflösungen:
/*   Arduino Radar Project
 *
 *   Updated version. Fits any screen resolution!
 *   Just change the values in the size() function,
 *   with your screen resolution.
 *
 *  by Dejan Nedelkovski,
 *  www.HowToMechatronics.com
 *
 */

import processing.serial.*; // imports library for serial communication
import java.awt.event.KeyEvent; // imports library for reading the data from the serial port
import java.io.IOException;

Serial myPort; // defines Object Serial
// defubes variables
String angle="";
String distance="";
String data="";
String noObject;
float pixsDistance;
int iAngle, iDistance;
int index1=0;
int index2=0;
PFont orcFont;

void setup() {

 size (1920, 1080); // ***CHANGE THIS TO YOUR SCREEN RESOLUTION***
 smooth();
 myPort = new Serial(this,"COM4", 9600); // starts the serial communication
 myPort.bufferUntil('.'); // reads the data from the serial port up to the character '.'. So actually it reads this: angle,distance.
 orcFont = loadFont("OCRAExtended-30.vlw");
}

void draw() {

  fill(98,245,31);
  textFont(orcFont);
  // simulating motion blur and slow fade of the moving line
  noStroke();
  fill(0,4);
  rect(0, 0, width, height-height*0.065);

  fill(98,245,31); // green color
  // calls the functions for drawing the radar
  drawRadar();
  drawLine();
  drawObject();
  drawText();
}

void serialEvent (Serial myPort) { // starts reading data from the Serial Port
  // reads the data from the Serial Port up to the character '.' and puts it into the String variable "data".
  data = myPort.readStringUntil('.');
  data = data.substring(0,data.length()-1);

  index1 = data.indexOf(","); // find the character ',' and puts it into the variable "index1"
  angle= data.substring(0, index1); // read the data from position "0" to position of the variable index1 or thats the value of the angle the Arduino Board sent into the Serial Port
  distance= data.substring(index1+1, data.length()); // read the data from position "index1" to the end of the data pr thats the value of the distance

  // converts the String variables into Integer
  iAngle = int(angle);
  iDistance = int(distance);
}

void drawRadar() {
  pushMatrix();
  translate(width/2,height-height*0.074); // moves the starting coordinats to new location
  noFill();
  strokeWeight(2);
  stroke(98,245,31);
  // draws the arc lines
  arc(0,0,(width-width*0.0625),(width-width*0.0625),PI,TWO_PI);
  arc(0,0,(width-width*0.27),(width-width*0.27),PI,TWO_PI);
  arc(0,0,(width-width*0.479),(width-width*0.479),PI,TWO_PI);
  arc(0,0,(width-width*0.687),(width-width*0.687),PI,TWO_PI);
  // draws the angle lines
  line(-width/2,0,width/2,0);
  line(0,0,(-width/2)*cos(radians(30)),(-width/2)*sin(radians(30)));
  line(0,0,(-width/2)*cos(radians(60)),(-width/2)*sin(radians(60)));
  line(0,0,(-width/2)*cos(radians(90)),(-width/2)*sin(radians(90)));
  line(0,0,(-width/2)*cos(radians(120)),(-width/2)*sin(radians(120)));
  line(0,0,(-width/2)*cos(radians(150)),(-width/2)*sin(radians(150)));
  line((-width/2)*cos(radians(30)),0,width/2,0);
  popMatrix();
}

void drawObject() {
  pushMatrix();
  translate(width/2,height-height*0.074); // moves the starting coordinats to new location
  strokeWeight(9);
  stroke(255,10,10); // red color
  pixsDistance = iDistance*((height-height*0.1666)*0.025); // covers the distance from the sensor from cm to pixels
  // limiting the range to 40 cms
  if(iDistance<40){
    // draws the object according to the angle and the distance
  line(pixsDistance*cos(radians(iAngle)),-pixsDistance*sin(radians(iAngle)),(width-width*0.505)*cos(radians(iAngle)),-(width-width*0.505)*sin(radians(iAngle)));
  }
  popMatrix();
}

void drawLine() {
  pushMatrix();
  strokeWeight(9);
  stroke(30,250,60);
  translate(width/2,height-height*0.074); // moves the starting coordinats to new location
  line(0,0,(height-height*0.12)*cos(radians(iAngle)),-(height-height*0.12)*sin(radians(iAngle))); // draws the line according to the angle
  popMatrix();
}

void drawText() { // draws the texts on the screen

  pushMatrix();
  if(iDistance>40) {
  noObject = "Out of Range";
  }
  else {
  noObject = "In Range";
  }
  fill(0,0,0);
  noStroke();
  rect(0, height-height*0.0648, width, height);
  fill(98,245,31);
  textSize(25);

  text("10cm",width-width*0.3854,height-height*0.0833);
  text("20cm",width-width*0.281,height-height*0.0833);
  text("30cm",width-width*0.177,height-height*0.0833);
  text("40cm",width-width*0.0729,height-height*0.0833);
  textSize(40);
  text("Object: " + noObject, width-width*0.875, height-height*0.0277);
  text("Angle: " + iAngle +" °", width-width*0.48, height-height*0.0277);
  text("Distance: ", width-width*0.26, height-height*0.0277);
  if(iDistance<40) {
  text("        " + iDistance +" cm", width-width*0.225, height-height*0.0277);
  }
  textSize(25);
  fill(98,245,60);
  translate((width-width*0.4994)+width/2*cos(radians(30)),(height-height*0.0907)-width/2*sin(radians(30)));
  rotate(-radians(-60));
  text("30°",0,0);
  resetMatrix();
  translate((width-width*0.503)+width/2*cos(radians(60)),(height-height*0.0888)-width/2*sin(radians(60)));
  rotate(-radians(-30));
  text("60°",0,0);
  resetMatrix();
  translate((width-width*0.507)+width/2*cos(radians(90)),(height-height*0.0833)-width/2*sin(radians(90)));
  rotate(radians(0));
  text("90°",0,0);
  resetMatrix();
  translate(width-width*0.513+width/2*cos(radians(120)),(height-height*0.07129)-width/2*sin(radians(120)));
  rotate(radians(-30));
  text("120°",0,0);
  resetMatrix();
  translate((width-width*0.5104)+width/2*cos(radians(150)),(height-height*0.0574)-width/2*sin(radians(150)));
  rotate(radians(-60));
  text("150°",0,0);
  popMatrix();
} Codesprache:Arduino (arduino)
Herstellungsprozess
- Erstellen von Monitor-Ambilight mit Arduino
- Arduino Pong-Spiel - OLED-Display
- Hindernisse vermeiden Roboter mit Servomotor
- Audiofrequenzdetektor
- Arduino Tamagotchi Klon - Digitales Haustier
- Wireless Lichtschalter-Manipulator
- Tech-TicTacToe
- Bewegungssensor-Wasserpistole
- Arduino-Countdown-Timer
- Arduino Sunflower:Eine elektronische Sonnentänzerin