



DIY 2D-Motion-Rennsimulator mit Arduino Nano & SG90 Servos
Komponenten und Materialien
| Arduino Nano R3 | × | 1 |
| SG90 Mikro-Servomotoren | × | 2 |
Benötigte Werkzeuge
- Lötkolben
Apps und Online-Dienste
- Arduino IDE
Projektbeschreibung
SimTools ist eine universelle Motion-Simulator-Software, die diverse Hardware-Schnittstellen – einschließlich Arduino – steuern kann. Diese Kombination wird im gezeigten Video verwendet. Die Hardware besteht lediglich aus einem Arduino Nano und zwei günstigen SG90-Mikroservos. Es muss nur der untenstehende Code hochgeladen werden.
Die erforderlichen Spieldaten werden mit SimTools über den seriellen Port an den Arduino übertragen. Der Arduino aktiviert die Servomotoren, die die Simulationsplattform entsprechend bewegen. Dies ist ein Kleinmodell eines 2-Achs-Simulators. Für einen echten Simulator würden Motortreiber und große Servomotoren benötigt.

Zahlreiche DIY-Simulator-Beispiele, Baupläne und Tipps finden sich auf xsimulator.net. Die SimTools-Einrichtung wird im Video erklärt; das PDF-Handbuch ist hier verfügbar: SimTools User Manual v2.4

SimTools läuft im "Demo"-Modus, bis eine gültige Lizenz registriert wird. Das Live-for-Speed-Plugin ist im Demo-Modus voll funktionsfähig. (Auch die Live-for-Speed-Demo funktioniert zum Testen.) Mehr Infos und Download: Live for Speed
SimTools Download: xsimulator.net
Programmcode
Arduino Code (C/C++)
//********************************************************************************************
// RC Model Servo
// Originalcode von EAOROBBIE (Robert Lindsay)
// Stark angepasst von aarondc
// Freie Nutzung für SimTools Motion Software
//********************************************************************************************
#include <Servo.h>
//#define DEBUG 1  // Auskommentieren zum Entfernen der Debug-Ausgaben

const int kActuatorCount = 2;  // Anzahl Aktuatoren
// Buchstaben ("Namen"), die SimTools zur Identifikation sendet
// Reihenfolge bestimmt die Zuordnung zu kPins und kActuatorScale
const char kActuatorName[kActuatorCount] = { 'R', 'L' };
const int kPins[kActuatorCount] = { 4, 5 };  // Pins für Aktuatoren
const int kActuatorScale[kActuatorCount][2] = {
  { 0, 179 },   // Rechter Aktuator Skalierung
  { 179, 0 }    // Linker Aktuator Skalierung (invertiert)
};
const char kEOL = '~';  // End-of-Line Delimiter für Aktuatorwerte
const int kMaxCharCount = 3;  // Maximal 3 Ziffern pro Wert

Servo actuatorSet[kActuatorCount];
int actuatorPosition[kActuatorCount] = { 90, 90 };  // Startposition 90°
int currentActuator;
int valueCharCount = 0;

enum TPortState { psReadActuator, psReadValue };
TPortState currentState = psReadActuator;

void setup() {
  for (int i = 0; i < kActuatorCount; i++) actuatorSet[i].attach(kPins[i]);
  for (int i = 0; i < kActuatorCount; i++) updateActuator(i);
  Serial.begin(9600);
}

void loop() {
  // Hauptlogik läuft in serialEvent()
}

void serialEvent() {
  char tmpChar;
  int tmpValue;
  while (Serial.available()) {
    // Aktuator-Name lesen
    if (currentState == psReadActuator) {
      tmpChar = Serial.read();
      #ifdef DEBUG
      Serial.print("Empfangen: "); Serial.println(tmpChar);
      #endif
      for (int i = 0; i < kActuatorCount; i++) {
        if (tmpChar == kActuatorName[i]) {
          #ifdef DEBUG
          Serial.print("Aktuator: "); Serial.println(i);
          #endif
          currentActuator = i;
          currentState = psReadValue;
          actuatorPosition[currentActuator] = 0;
          valueCharCount = 0;
          break;
        }
      }
    }
    // Aktuator-Position lesen
    if (currentState == psReadValue) {
      while ((valueCharCount < kMaxCharCount) && Serial.available()) {
        tmpValue = Serial.read();
        if (tmpValue != kEOL) {
          tmpValue = tmpValue - 48;  // ASCII zu Zahl
          if ((tmpValue < 0) || (tmpValue > 9)) tmpValue = 0;
          actuatorPosition[currentActuator] = actuatorPosition[currentActuator] * 10 + tmpValue;
          valueCharCount++;
        } else break;
      }
      // Wert vollständig empfangen
      if (tmpValue == kEOL || valueCharCount == kMaxCharCount) {
        #ifdef DEBUG
        Serial.print("Rohwert: "); Serial.println(actuatorPosition[currentActuator]);
        #endif
        // Skalierung auf 0-179
        actuatorPosition[currentActuator] = map(actuatorPosition[currentActuator], 0, 255,
          kActuatorScale[currentActuator][0], kActuatorScale[currentActuator][1]);
        #ifdef DEBUG
        Serial.print("Skaliert: "); Serial.println(actuatorPosition[currentActuator]);
        #endif
        updateActuator(currentActuator);
        currentState = psReadActuator;
      }
    }
  }
}

void updateActuator(int thisActuator) {
  actuatorSet[thisActuator].write(actuatorPosition[thisActuator]);
}
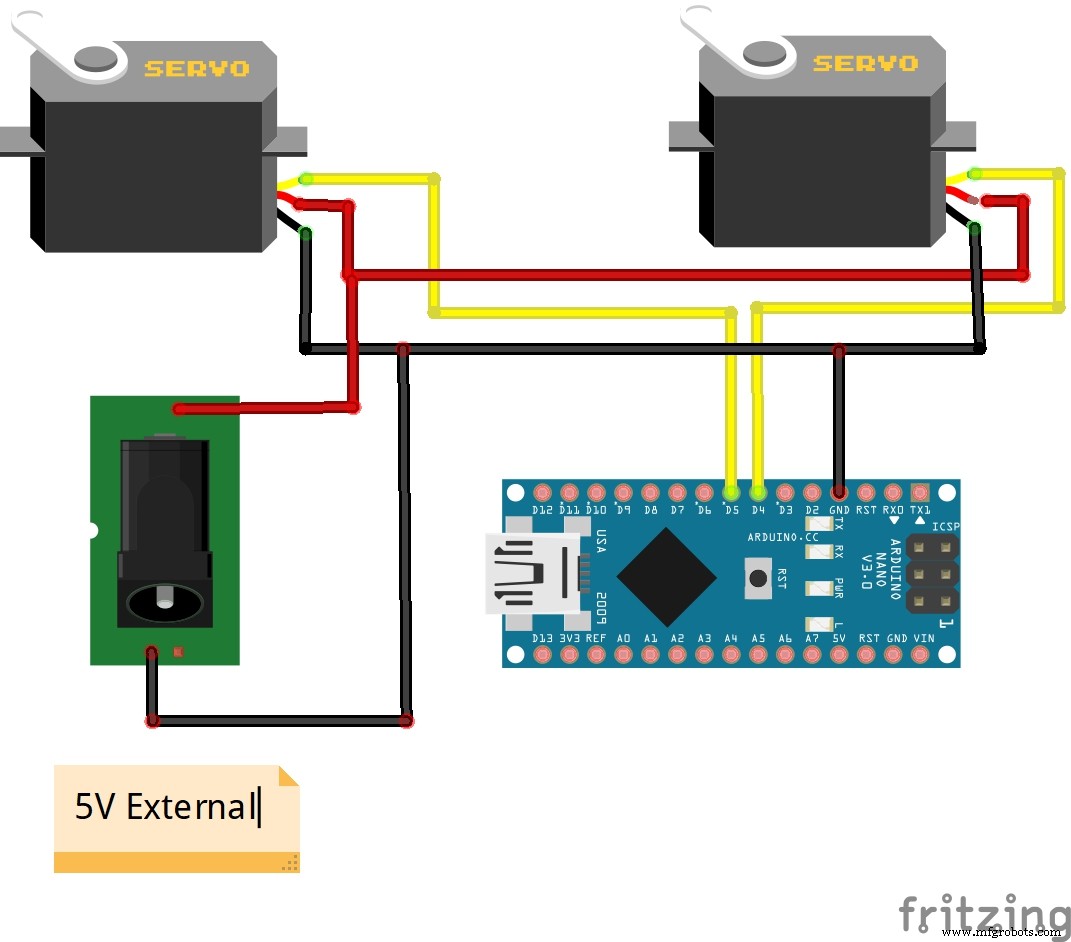
Schaltplan
Herstellungsprozess
- DIY Infrarot-Bewegungsmelder für Raspberry Pi – Schritt-für-Schritt-Anleitung
- Eigenen LUMAZOID bauen: DIY Arduino Musik-Visualisierer
- Intelligentes Voltmeter mit Arduino & Smartphone bauen – Einfaches DIY-Projekt
- DIY VR-Skateboard mit Arduino, Google Cardboard und Bluetooth bauen
- Intelligente, bewegungsaktivierte Wasserpistole mit Arduino Nano
- DIY Radionik EMR-Behandlungsgerät mit Arduino Nano – Kritische Betrachtung
- Portables RFID-Türschloss mit Arduino bauen – Schritt-für-Schritt-Anleitung
- DIY 3-Achsen CNC-Fräse (VMC): Präzisions-Fräsmaschine selbst bauen
- Berührungsloses Infrarot-Thermometer mit Arduino Nano & GY-906 bauen
- Flugsimulator-Ruderpedale selbst bauen: Schritt-für-Schritt DIY-Anleitung