



Snake Game auf 16×16 LED-Matrix mit Arduino UNO bauen
Komponenten und Zubehör
| Arduino UNO | × | 1 |
| RGB LED Pixel Matrix (NeoPixel NeoMatrix) 16×16 – z. B. AliExpress | × | 1 |
| Jumper Wires | × | 1 |
| Analoger Joystick (generisch) | × | 1 |
| Breadboard | × | 1 |
Über dieses Projekt
Ich lerne Arduino und wollte das klassische Snake-Spiel von meinem alten Nokia nachbauen. Verwendet: 16×16 LED-Matrix, Joystick, Arduino UNO. Die Programmierung war knifflig, da jede LED seriell adressiert ist – die Bewegungslogik erfordert spezielle Index-Berechnung.
Steuerung: Snake bewegen, Futter fressen, wachsen, sterben. Code ist erweiterbar.


Code (C/C++)
#include

// Matrix Settings
#define NUM_LEDS 256
#define DATA_PIN 3
#define BRIGHTNESS 8

// Joystick Settings
#define pinX A2
#define pinY A1
#define swPin 2

int snake[256];
int snakeSize = 2;
int snakeSpeed = 500;
int row, col;
int lastDirection = 135;
int i, newDirection, OlddX = 1, OlddY, f;
int red, green, blue, fred, fgreen, fblue;

CRGB leds[NUM_LEDS];

void setup() {
  red = random(0, 255); green = random(0, 255); blue = random(0, 255);
  fred = random(127, 255); fgreen = random(127, 255); fblue = random(127, 255);
  Serial.begin(9600);
  pinMode(pinX, INPUT);
  pinMode(pinY, INPUT);
  pinMode(swPin, INPUT_PULLUP);
  FastLED.addLeds(leds, NUM_LEDS);
  FastLED.setBrightness(BRIGHTNESS);
  for (i = 0; i <= 255; i++) snake[i] = 0;
  for (i = 0; i <= snakeSize; i++) snake[i] = lastDirection + i;
  f = random(0, 255);
  FastLED.show();
}

// Richtungsberechnung für serpentinenförmige Matrix
int Snakedirection(int last, int dX, int dY) {
  dX = map(dX, 0, 1023, -1, 1);
  dY = map(dY, 0, 1023, -1, 1);
  if (dX == 0 && dY == 0 && OlddX != dX) dX = OlddX;
  if (dY == 0 && dX == 0 && OlddY != dY) dY = OlddY;

  int newDirection = last;
  if (dX != 0) { // X-Bewegung
    if (row & 1) { // ungerade Zeile
      if (col == 0 && dX == 1) newDirection = last - 15;
      else if (col == 15 && dX == -1) newDirection = last + 15;
      else newDirection = last + dX;
    } else { // gerade Zeile
      if (col == 0 && dX == 1) newDirection = last + 15;
      else if (col == 15 && dX == -1) newDirection = last - 15;
      else newDirection = last - dX;
    }
  }
  if (dY < 0) { // Y DOWN
    if (row == 15 && dY == -1) newDirection = col;
    else if (row & 1) newDirection = last + (col * 2) + 1;
    else newDirection = last + (16 - col - 1) + (16 - col);
  }
  if (dY > 0) { // Y UP
    if (row == 0 && dY == 1) newDirection = 255 - col;
    else if (row & 1) newDirection = last - (last - 16 * row) - (16 - col);
    else newDirection = last - (col * 2) - 1;
  }
  OlddX = dX; OlddY = dY;
  return newDirection;
}

// Snake bewegen & Kollision prüfen
int snakeMove(int snakeDirection) {
  for (i = 0; i <= 255; i++) if (snake[i] == snakeDirection) death();
  FastLED.clear();
  for (i = snakeSize; i >= 1; i--) snake[i] = snake[i-1];
  snake[0] = snakeDirection;
  for (i = 0; i <= 255; i++) if (snake[i]) leds[snake[i]].setRGB(red, green, blue);
  FastLED.show();
  row = snakeDirection / 16;
  if (row & 1) col = (row + 1) * 16 - snakeDirection - 1;
  else col = snakeDirection - row * 16;
  return snakeDirection;
}

// Futter handling
void food(int eaten) {
  if (eaten == f) {
    snakeSize++;
    f = random(0, 255);
    red = fred; green = fgreen; blue = fblue;
    fred = random(0, 255); fgreen = random(0, 255); fblue = random(0, 255);
    snakeSpeed = snakeSpeed / 1.1; // schneller werden
  } else {
    leds[f].setRGB(fred, fgreen, fblue);
    FastLED.show();
  }
}

void death() {
  snakeSize = 2; snakeSpeed = 500;
  red = 255; green = 0; blue = 0; // rot bei Tod
}

// Joystick-Button: Farbe wechseln
void color(boolean sw) {
  if (!sw) { red = random(0,255); green = random(0,255); blue = random(0,255); }
}

void loop() {
  color(digitalRead(swPin));
  newDirection = Snakedirection(lastDirection, analogRead(pinX), analogRead(pinY));
  lastDirection = snakeMove(newDirection);
  food(newDirection);
  delay(snakeSpeed);
}
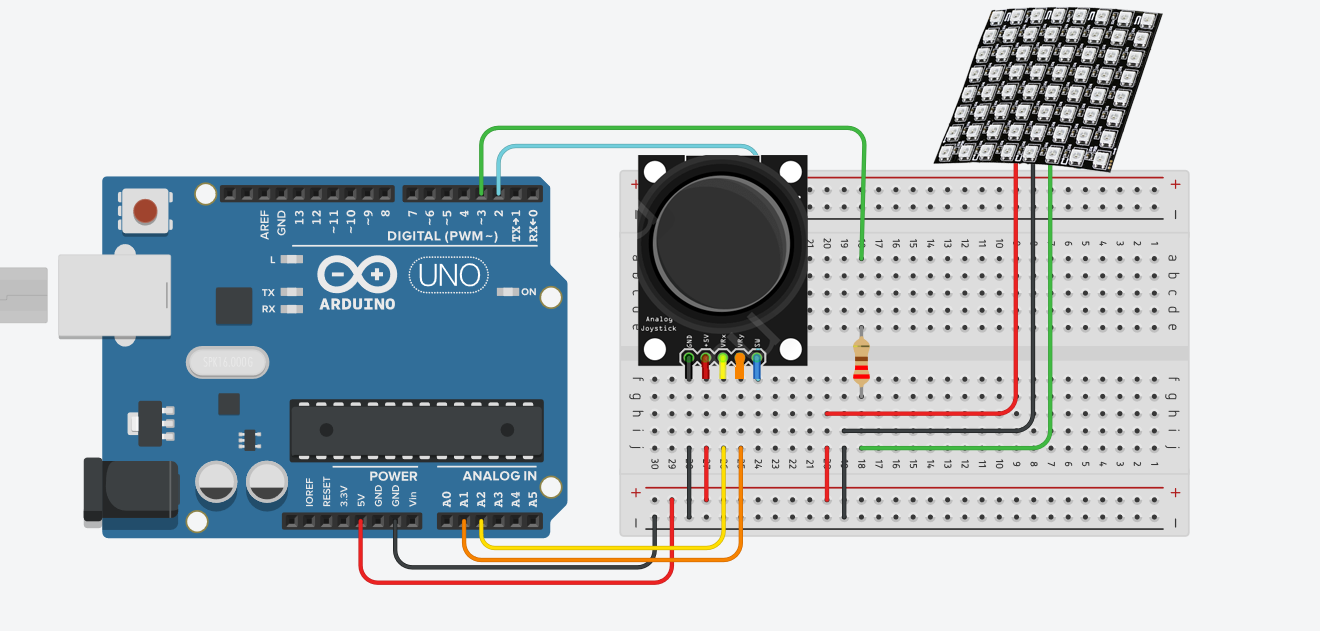
Schaltplan
Arduino Yun 5-DOF Roboterarm mit IoT & Blynk-Steuerung
Smart Buoy Projekt: Bau, Elektronik, 3D-Druck & Dashboard
Herstellungsprozess
- DIY Arduino USB Gaming Controller – Bauen Sie Ihren eigenen High-Performance Gamepad
- 24×16 LED Pong-Konsole mit Arduino Nano & MAX7219 bauen
- Tetris-Spiel mit Arduino Nano auf selbstgebauter 16×8 LED-Matrix
- LED per Bluetooth mit Arduino steuern – Einfache DIY-Anleitung
- Interaktive LED-Matrix Tür-Anzeige mit PIR-Bewegungssensor – Arduino Feiertagsgruß
- Intelligenten Arduino-Vierbeiner-Roboter bauen: Schritt-für-Schritt-Anleitung
- Pixel Chaser: Interaktives One-Tap-LED-Spiel mit Arduino Nano
- Arduino Flip Clock mit 8×8 LED-Matrix – DIY Echtzeituhr-Projekt
- Arduino RGB-LED-Farbmischer – Einsteigerfreundliches DIY-Projekt
- 8×8 LED-Matrix mit Arduino Uno meistern: Schritt-für-Schritt-Anleitung